
User manual
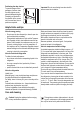

1. Open the door.
2. Remove the trans-
port support from
the door sides.
3. Remove the trans-
port support from
the lower hinge
(some models).
3
2
Important! Some models are fitted with a silencing pad
under the cabinet. Do not remove this pad.
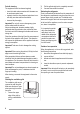
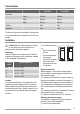
Spacers
Install the spacers provided within the accessory bag
as shown in the figures.
Place the spacers on the brackets of the condenser
(the black grill) at the back of the appliance.
Levelling
When placing the appli-
ance ensure that it
stands level. If necessary
adjust the feet using the
adjustment spanner sup-
plied.
Door alignment is de-
pendent on proper level-
ling.
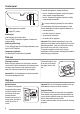
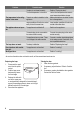
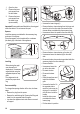
Door reversibility
To change the opening direction of the door, do these
steps:
• Remove the plug from the power.
• Remove the ventilation grille. Remove the filling and
install it on the opposite side of the grille.
• Lay down the appliance back side down on a wood-
en support.
• Unscrew the lower hinge (a1).
• Remove the door closure device from the hinge and
move the pin to the other side. Re-screw the door
closure device provided within the accessory bag.
• Unscrew and move the pedal to the other side (a3).
• Remove the door closure device on the door (b1).
• Unscrew and move the bracket (b2) to the other
side.
• Re-screw the door closure device provided within the
accessory bag to the other side (b3).
• Remove the door.
• Unscrew and move the
pin to the other side.
• Re-insert the door.
• Re-screw the lower
hinge.
• Raise the appliance and
install the ventilation
grille.
• Unscrew the handle. On
the opposite side re-
move the hole covers by
driving a 3-4 mm drift or
drill into them. Install the
handle.
Install the hole covers
provided within the ac-
cessory bag.
• Put the cabinet in position.
a3
a2
a1
b2
b1
b3
10