
User manual


Location
To ensure best performance, if the appliance is posi-
tioned below an overhanging wall unit, the minimum
distance between the top of the cabinet and the wall
unit must be at least 40 mm . Ideally, however, the
appliance should not be positioned below overhanging
wall units.
If the cabinet is placed in a corner and the side with the
hinges facing the wall, the distance between the wall
and the cabinet must be at least 10 mm to allow the
door to open enough so that the equipment can be
removed.
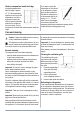
The ventilation space
can be:
• directly above the ap-
pliance
• behind and above the
top cupboard.
In this case, the space
behind the top cup-
board must be at least
50 mm deep.
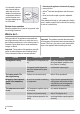
Electrical connection
Before plugging in, ensure that the voltage and fre-
quency shown on the rating plate correspond to your
domestic power supply.
The appliance must be earthed. The power supply ca-
ble plug is provided with a contact for this purpose. If
the domestic power supply socket is not earthed, con-
nect the appliance to a separate earth in compliance
with current regulations, consulting a qualified electri-
cian.
The manufacturer declines all responsibility if the
above safety precautions are not observed.
This appliance complies with the E.E.C. Directives.
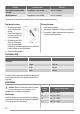
Removing the transport support
Your appliance is equipped with transport support to
secure the door during transportation.
To remove them do these steps:
1. Open the door.
2. Remove the trans-
port support from the
door sides.
3. Remove the trans-
port support from the
lower hinge (some
models).
Important! Some models are fitted with a silencing
pad under the cabinet. Do not remove this pad.
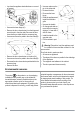
Removing the shelf holders
Your appliance is equipped with shelf retainers that
make it possible to secure the shelves during trans-
portation.
To remove them proceed
as follows:
1. Move the shelf hold-
ers in the direction of
the arrow (A).
2. Raise the shelf from
the rear and push it
forward until it is
freed (B).
3. Remove the retain-
ers (C).
Levelling
When placing the appli-
ance ensure that it
stands level. If necessary
adjust the feet using the
adjustment spanner sup-
plied.
Door alignment is de-
pendent on proper level-
ling.
Door reversibility
To change the opening direction of the door, do these
steps:
• Remove the plug from the power.
• Remove the ventilation grille. Remove the filling an
install it on the opposite side of the grille.
11