
User manual
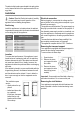
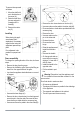


To remove them proceed
as follows:
1. Move the shelf hold-
ers in the direction of
the arrow (A).
2. Raise the shelf from
the rear and push it
forward until it is
freed (B).
3. Remove the retain-
ers (C).
Levelling
When placing the appli-
ance ensure that it
stands level. If necessary
adjust the feet using the
adjustment spanner sup-
plied.
Door alignment is de-
pendent on proper level-
ling.
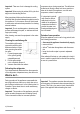
Door reversibility
To change the opening direction of the door, do these
steps:
• Remove the plug from the power.
• Remove the ventilation grille. Remove the filling an
install it on the opposite side of the grille.
• Lay down the appliance back side down on a wood-
en support.
• Unscrew the lower hinge (a1).
• Remove the door closer device from the hinge and
move the pin to the other side. Re-screw the door
closer device provided within the accessory bag.
• Unscrew and move the pedal to the other side (a3).
• Remove the door closer device on the door (b1).
• Unscrew and move the pedal to the other side (b2).
• Re-screw the door closer device provided within the
accessory bag.
• Remove the door.
• Unscrew and move the
pin to the other side.
• Re-insert the door.
• Re-screw the lower
hinge.
• Raise the appliance and
install the ventilation
grille.
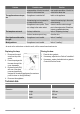
• Unscrew the handle.
• On the opposite side re-
move the hole covers by
driving a 3-4 mm drift or
drill into them.
• Install the handle in the
opposite order.
• Put the cabinet in posi-
tion.
Warning! Reposition, level the appliance, wait
for at least four hours and then connect it to the
power socket.
Do a final check to make sure that:
• All screws are tightened.
• The edges of the doors run parallel to the side edge
of the appliance.
• The magnetic seal adheres to the cabinet.
• The door opens and closes correctly.
11