
Installation guide


Copyright 2011 All Rights Reserved
AV7900 Installation Guide GC1018 Rev A
Page 7
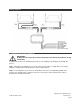
Step 2:
Select a location to mount the junction box for the AV7900 units. Normally the junction box is best
located under either the driver or passenger seat. Be sure to locate it so that it will not obstruct any moving
parts in the seat or damaged by the feet of passengers.
.
Step 3:
Route the power harness to the dash area where you have located the 12V (+) ACC connection
point. Be sure to protect the cable from any potential sharp edges which could damage the harness in the
future. To avoid vibration noise, use tape to secure the harness whenever possible.
Step 4: Route the FMT antenna wire (purple) toward the antenna/tuner. (Be sure to separate it
from the power wires and avoid any power seat modules or other vehicle harnesses as these
may induce noise into the FM transmission.)
Step 5:
When connecting the power harness, Rosen recommends soldering all connections. When using
T-Tap or crimp connectors, always ensure the connections are made with the proper gauge connectors.
Failure to make a proper connection will result in a system failure in the future.
Step 6: With ACC off, plug all harnesses into the main interface unit. Note: Plug the main power
harness in last.
10 Initial test, reassembly, and pre-delivery re-test
You will need to fully test the system to ensure it is working and connected to the vehicle properly. The
following steps will guide you through this process.
Step 1:
INITIAL TEST (Do this BEFORE you reassemble any trim panels)
a. Reconnect the vehicle battery if needed
b. Install batteries into the remote control, and wireless headphones
c. Start the vehicle (ensure that it is safe to do so, there are no tools or people under the hood)
d. Perform the following steps on each headrest to ensure proper operation:
Insert a DVD (in good condition) and select play
Check the audio on the IR headphones
Press the Speaker button and adjust the vehicle radio frequency as needed to
check the audio
Eject the disc
Turn off the vehicle and wait for the unit to turn off
Step 2:
REINSTALL all trim panels removed during the installation using care not to damage any
harnesses
Step 3:
PRE-DELIVERY AND RE-TEST
a. Start the vehicle (ensure that it is safe to do so, there are no tools or people under the hood)
b. Perform the following steps
Insert a DVD (in good condition) and select play
Insert iOS device (iPhone, iPod etc..) into multimedia dock (if equipped) and test
Re-check IR headphones and FMT audio
Eject the disc
Remove the protective films and clean the unit as needed
c. Place the Owners Information package in the glove compartment
d. Place the IR headphones and remote control in a convenient location