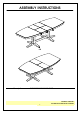
ASSEMBLY INSTRUCTIONS OR Description : TABLE TOP AND TABLE BASE Printed in Vietnam THIS ITEM IS PACKED IN TWO CARTONS -1-
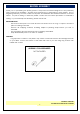
BEFORE ASSEMBLY Thank you for purchasing this quality product. This product has been designed for easy assembly and constructed for durability. All parts were checked prior to packaging to insure quality. Prior to beginning assembly, however, make sure all parts and hardware are included and free of obvious defect. If a part is missing or defective, please contact the store where purchased. If hardware is missing, or you need help with assembly, please call toll free.
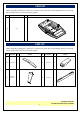
PART LIST When unpacking, please be careful not to discard any parts with the packaging. Before continuing, please make sure you have the following parts: NO Description Qty A Top 1 Sketch PART LIST When unpacking, please be careful not to discard any parts with the packaging.
HARDWARE LIST When unpacking, please be careful not to discard any parts with the packaging. Before continuing, please make sure you have all of the following hardware: NO Description Qty 1 Hexagon nut (M8 x 13mm) 3 Sketch NO Description Qty 12 2 Flat washer (2 x 8.5 x 19mm) 12 Lock washer (8.5 x 11mm) 12 4 Wrench (M13mm) 5 Wood screw (M4 x 30mm) 4 6 Bolt (M8 x 70mm) 2 7 Allen key (M4 x 30mm x 110mm) 1 8 U-washer (M8) 2 Sketch 1 NOTE: HARDWARE IS PACKED IN CARTON.
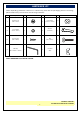
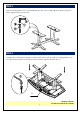
STEP 1 Attach crossbar (E) to pedestal columns (D) with bolts (6) and U-washers (8) as shown below. Tighten with Allen key (7). Attach legs (C) to legs (B) with screws (5) as shown below. Tighten with a screwdriver. Attach legs (B & C) to pedestal columns (D) with nuts (1), and washers (2) and (3) as shown below. Tighten with the wrench (4). STEP 2 Use Allen key (7) to loosen bolts and washers and take out the mounting plates as shown below.
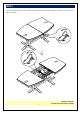
STEP 3 Attach mounting plates on top of the pedestals (D) with nuts (1), and washers (2) and (3) as shown below. Tighten with the wrench (4). STEP 4 Carefully place the base (from Step 3) on the bottom side of top (A). Attach mounting plates to top (A) with bolts and washers (from Step 2) as shown below. Tighten with Allen key (7).
STEP 5 Unlock the table top from both sides underneath the top as shown below. Pull the two parts of the table top apart.
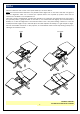
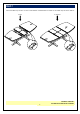
STEP 6 Place the leaves in the center of the open table top, as shown below. Note: The metal swivel bar bracket is very flexible and a slight twist of one half of the leaf can get the leaf into alignment. With one of these tops opened and in the topside up position and can be attached to the base to accomplish this too.
STEP 7 Push the table top closed. Lock the mechanism underneath two sides of the table top as shown below.