
Installation & Assembly

10
10
5
1
2
3
4
6
5
6
6
9
Page 2 of 2
CARE & MAINTENANCE
:
The touch of a soft cloth is all the maintenance the finish will ever need. Please do not use harsh or abrasive cleaners for polishing, as they may
cause damage to the finish. Periodic checks are recommended to make sure that all hardware is securely tightened.
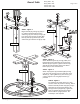
STEP 1 - Figure 1
Begin assembly by putting Leg 2 (D) on
to bottom of Pedestal (B) and then
attach Leg 1 (C) over the top of Leg 2 (D).
Line up the holes and secure with Allen
Bolts (5) and Spring Washers (6). Next
attach Feet (9) to bottom of Legs (C & D).
STEP 2 - Figure 2
Attach Bottom Supports (E) to Legs (C & D) and
Pedestal (B) using 2 Allen Bolts (4) and 2 Spring
Washers (6) per support. Tighten all bolts using
Allen Wrench (8) provided. Insert each Wood
Button (10) to cover the bolt head.
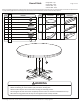
STEP 4 - Figure 3
Put Table Top (A) upside down on a clean
smooth surface to prevent scratching. Attach
bottom assembly to Table Top (A) by using 2
Allen Bolts (5) and 2 Spring Washers (6)
through each Top Support (F). Tighten all
bolts using Allen Wrench (8) provided.
Return table to upright position. The
assembly is now complete.
C
D
B
B
F F
F
4
6
E
E
E
E
A
FIGURE 1
FIGURE 2
FIGURE 3
F
F
F
F
F
C
D
STEP 3 - Figure 2
Attach Top Supports (F) to Pedestal (B) by sliding
into place and securing from the inside with 1 Flat
Washer (3), 1 Spring Washer (2) and 1 Nut (1) per
support. Tighten nuts using Open Wrench (7)
provided.
Dining Table - Top
Dining Table - Base
Counter Table - Top
Counter Table - Base
Round Table