
Use and Care Manual


18
RolliBot RolliCool 310 Portable AC with Heater User Manual
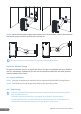
Step by Step
The steps are the same for both the upper and lower drainage openings.
1. Turn o and unplug the unit then move it to a
suitable location for drainage.
2. Locate the opening, unscrew the cover, and remove
the pre-installed plug.
3. Peel the sticker o the spacer and use the adhesive side to
attach it to connector.
4. Thread the connector through the cover.
5. Screw the cover onto the opening.
6. Fit the drainage pipe over the connector.
Ifthedrainagepipeistoostiand/orcannotbeattached,trysoakingtheendin
hotwatertosoftenitrst.
7. Allow the water to drain.
After draining is complete, it is recommended to turn the unit on and run
it in fan mode at the lowest speed for at least two hours in order to
ensure the drainage pipe dries inside.
8. Detach the drainage pipe.
9. Unscrew the cover then separate it from the connector.
Save the connector for later drainage needs.
10. Reinstall the plug and screw the cover back on to close
the opening.
Section 7. Storage
Before storing your RolliCool 310, select a dry, indoor environment. Properly storing your
RolliCool will help improve performance and battery life expectancy.
Step 1. Turn the unit o.
Step 2. Remove the heat exhaust pipe and window kit as needed for storage with the unit.
Step 3. Drain the unit of any water and insure all parts are completely dry.
Step 4. Turn the unit on and run it in fan mode at the lowest speed for at least two hours in
order to ensure the inner reservoir is dried inside.
Step 5. Turn o the unit and install the power cord’s plug into its xture on the back of the unit.
Step 6. Remove the remote batteries and store separately.
• Alwaysturntheunitobeforetransportingorstoring.
• Covertheunittoprotectitfromdust.Donotstoreinadustyenvironmentas,withallelectronicdevices,dustmaycause
damage over time.
• Storetheunitindoorsatadryandstabletemperature.Donotstoreinanunheatedgarage,shed,orotherlocationswith
extremetemperatureuctuations.