GLC-1 Roland Group-Learning Controller Owner’s Manual and User’s Guide Copyright © 2010, 2010 ROLAND CORPORATION All rights reserved. No part of this publication may be reproduced in any form without the written permission of ROLAND CORPORATION.
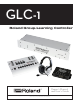
Introduction Introduction The Roland GLC-1 represents the next generation in music conferencing systems. This all-in-one communication solution is perfect for group piano teaching, music ensemble instruction, and even sophisticated language lab teaching. Because the GLC-1 doesn’t rely on external computer hardware or software, it’s both intuitive and easy-to-use. As a result, music conferencing will never be the same.
Introduction Included Items Item Qty. GLC-1 Hub. . . . . . . . . . . . . . . . . . . . . . . . . . . . . . . . . . . . . . . . . . . . . . . . . . . . . . . . . . . . . . . . . . . . . . . . . . . . . . . . . . . . . . . . . . . . . . . . . . . . . . . . . . . . . . . (1) GLC-1 Teacher Control Pad. . . . . . . . . . . . . . . . . . . . . . . . . . . . . . . . . . . . . . . . . . . . . . . . . . . . . . . . . . . . . . . . . . . . . . . . . . . . . . . . . . . . . . . . . . . . . .
Contents Contents Introduction Main Features. . . . . . . . . . . . . . . . . . . . . . . . . . . . . . . . . . . . . . . . . . . . . . . . . . . . . . . . . . . . . . . . . . . . . . . . . . . . . . . . . . . . . . . . . . . . . . . . . . . (1) Flexible Music Conferencing System. . . . . . . . . . . . . . . . . . . . . . . . . . . . . . . . . . . . . . . . . . . . . . . . . . (1) Fully Expandable. . . . . . . . . . . . . . . . . . . . . . . . . . . . . . .
Contents [All] Button. . . . . . . . . . . . . . . . . . . . . . . . . . . . . . . . . . . . . . . . . . . . . . . . . . . . . . . . . . . . . . . . . . . . . . . . . . . . . . . . . . . . . . . . . . . (14) [STUDENT MUTE] Button. . . . . . . . . . . . . . . . . . . . . . . . . . . . . . . . . . . . . . . . . . . . . . . . . . . . . . . . . . . . . . . . . . . . . . . . . . (14) Communicate with a Single Student (Two-Way Communication) . . . . . . . . . . . . . . . . . . . . . . . . . . . . . . . . . . . .
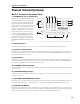
PanelDescriptions Panel Descriptions GLC-1 Teacher Control Pad 1. [GROUPS A, B, C, D] Buttons Establish two-way communication between the teacher and students in a selected group. When one of these buttons (i.e. [A], [B], [C], or [D]) is held down and student number buttons are engaged, the selected students can listen to, talk to, and play for, or along with, other students in the selected group.
Panel Descriptions 9. [AUX. INPUT] Button Broadcasts audio to all headsets from any external audio source (e.g. CD player, computer, Music Tutor, etc.) connected to the [Aux. In] jacks. When this button is engaged, each student can listen to and play along with the external audio material. Students will not hear other student instruments. Pressing this button cancels the [CD INPUT] button (p. 16). 10. [PAIRS] Button Establishes two-way communication between adjacent students (i.e.
Panel Descriptions GLC-1 Hub 2 25 26 27 28 29 30 31 32 41 42 43 44 45 46 47 48 17 18 19 20 21 22 23 24 33 34 35 36 37 38 39 40 9 10 11 12 13 14 15 16 Right Teacher Left 1 2 3 4 5 6 7 Split On/Off Remote USB On/Off Power 8 Aux. In 1 CD In 3 Rec. Out Mon. Out 4 5 9vAC 6 7 8 9 10 11 1. Student Instrument [1–8] Connectors Connect the GLC-1 Hub to the student GLC-SB interface boxes via supplied RJ-45 (8-conductor telephone-type) cables (p.
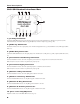
PanelDescriptions GLC-SB Student Interface Box 6 7 8 9 10 5 4 3 2 1 1. [To Hub] Connector Connects the GLC-SB interface box to the [Teacher] connector (for the teacher’s instrument) or a Student [1–8] connector (for the student instruments) on the GLC-1 Hub via a supplied RJ-45 (8-conductor telephone-type) cable (p. 10). 2. [Audio In] Connector Connects the interface box to the output jack(s) on an external audio playback device (e.g. CD, handheld recorder, MP3 player, Music Tutor, etc.). 3.
Chapter 1: Installation Guide Chapter 1: Installation Guide Prepare the Room Before installing an GLC-1 music conferencing system, there are many factors to consider. For example, the size and shape of the room, the availability of lighting and power outlets, and the ventilation and temperature control of the room all need to be addressed. Please consider the following physical and electrical requirements before installing the GLC-1 music conferencing system.
Chapter 1: Installation Guide Review the Included Items The GLC-1 music conferencing system includes all of the components needed to connect up to eight student instruments and one teacher instrument in stereo. Before setting up the GLC-1, be sure you have the following components: Item Qty. GLC-1 Hub. . . . . . . . . . . . . . . . . . . . . . . . . . . . . . . . . . . . . . . . . . . . . . . . . . . . . . . . . . . . . . . . . . . . . . . . . . . . . . . . . . . . . . . . . . . . . . . . . .
Chapter 1: Installation Guide • Connect each student GLC-SB interface box to the corresponding numbered connectors on the GLC-1 Hub using supplied RJ-45 (8-conductor telephone-type) cables. • Optional—Connect the audio outputs on the external audio playback device(s) to the [Aux. In] / [CD In] jacks on the GLC-1 Hub using optional cables. • Optional—Connect the [Rec. Out] jacks on the GLC-1 Hub to the audio input(s) on the external audio recording device using optional cables.
Chapter 1: Installation Guide Test the Student Stations • Simultaneously press the [All] and [STUDENT MUTE] buttons on the GLC-1 conference controller to “clear all” settings. • Press the [All] button on the GLC-1 conference controller. • Play a few notes on the teacher’s instrument while an assistant listens at Student Station #1. The assistant should hear what you’re playing. If the assistant doesn’t hear anything, check the GLC-SB interface box-to-GLC-1 Hub [1] connections.
Chapter 2: Operating the GLC-1 Chapter 2: Operating the GLC-1 The GLC-1 Teacher Control Pad is the heart of the GLC-1 Group Learning Controller. It provides routing capabilities similar to those found in a telephone switchboard. For example, when a teacher needs to hear a particular student, or group of students, he or she can do so using the GLC-1 Teacher Control Pad.
Chapter 2: Operating the GLC-1 [TEACHER MIC] Button Use this button to turn the teacher’s microphone on and off. Be sure the [TEACHER MIC] button is engaged when communicating with students, pairs, groups, or the entire class. [TEACHER MIC] Slider Use this slider to control the teacher’s microphone level. Move the slider upward to increase the teacher’s microphone level, and move the slider downward to decrease the teacher’s microphone level.
Chapter 2: Operating the GLC-1 Create Student Groups or Pairs To add a student to a group for practice and/or performance, hold down one of the [GROUPS A, B, C, D] buttons and select group members using the Student [1–8] buttons—use the [Bank] button to access the Student [1-8] buttons for additional students. This establishes two-way communication between the selected students.
Chapter 2: Operating the GLC-1 Broadcast a Student’s Performance to the Class Selected student(s) hears: Their instrument and microphone. The teacher’s instrument and microphone. Teacher hears: The teacher’s instrument and microphone. The selected (broadcasting) student’s instrument and microphone. Unselected students hears: Their instrument and microphone. The teacher’s instrument and microphone. The selected (broadcasting) student’s instrument and microphone.
Chapter 2: Operating the GLC-1 To record a class performance, use the Student [1–8] buttons to select the student(s) to be recorded—use the [Bank] button to access the Student [1-8] buttons for additional students. During rehearsal, adjust the input level on the external recording device. When rehearsal is complete, press the Record button on the external recording device and have the student(s) perform. When the performance is completed, press the Stop button on the external recording device.
Appendix A: Specifications Appendix A: Specifications GLC-1 Hub Connectors Student Inputs RJ-45 (8-conductor telephone-type) Note: Do not use Cat 5e or Cat 6 cable. Aux. In (2) RCA unbalanced mono CD In (2) RCA unbalanced mono Rec. Out (2) RCA unbalanced mono Mon. Out (2) RCA unbalanced mono Teacher RJ-45 (8-conductor telephone-type) Note: Do not use Cat 5e or Cat 6 cable. Remote RJ-45 (8-conductor telephone-type) Note: Do not use Cat 5e or Cat 6 cable. Power 7.5 Volts DC, 3.
Appendix B: Limited Factory Warranty Appendix B: Limited Factory Warranty System This GLC-1 is warranted to be free of defects in materials or workmanship for a period of 12 months from the date of purchase. This warranty is non-transferable and the benefits apply to the original owner. Proof of purchase in the form of an itemized sales receipt is required for warranty coverage. To receive service under this warranty, customers in the United States should contact Roland Corp. U.S.
Notes 20
Notes 21
Notes 22
Notes 23
ROLAND CORPORATION U.S., 5100 S. Eastern Avenue, Los Angeles CA 90040-2936 www.rolandus.