® Owner’s Manual Thank you, and congratulations on your choice of the Roland Digital Piano FP-3. Main Features Stylish, Light, Compact Design The refined design fits in anywhere; and since it is so lightweight and compact, it’s easy to take the instrument with you wherever you go.
For the U.K. IMPORTANT: THE WIRES IN THIS MAINS LEAD ARE COLOURED IN ACCORDANCE WITH THE FOLLOWING CODE. BLUE: NEUTRAL BROWN: LIVE As the colours of the wires in the mains lead of this apparatus may not correspond with the coloured markings identifying the terminals in your plug, proceed as follows: The wire which is coloured BLUE must be connected to the terminal which is marked with the letter N or coloured BLACK.
010 101b • This unit, either alone or in combination with an amplifier and headphones or speakers, may be capable of producing sound levels that could cause permanent hearing loss. Do not operate for a long period of time at a high volume level, or at a level that is uncomfortable. If you experience any hearing loss or ringing in the ears, you should immediately stop using the unit, and consult an audiologist. ................................................................................................
IMPORTANT NOTES In addition to the items listed under “USING THE UNIT SAFELY” on page 2 and 3, please read and observe the following: Power Supply Additional Precautions 301 553 • Do not use this unit on the same power circuit with any device that will generate line noise (such as an electric motor or variable lighting system). • Use a reasonable amount of care when using the unit’s buttons, sliders, or other controls; and when using its jacks and connectors. Rough handling can lead to malfunctions.
Contents USING THE UNIT SAFELY ............................................... 2 Selecting a Rhythm ............................................................ 28 IMPORTANT NOTES ......................................................... 4 Changing Rhythms As You Perform ........................ 28 Contents................................................................................. 5 Changing a Rhythm’s Tempo........................................... 29 Panel Descriptions .......................
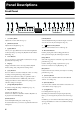
Panel Descriptions Front Panel 1 1 2 3 4 [Volume] Knob Adjusts the overall volume level (p. 11). 2 [Brilliance] Knob Adjusts the tone brightness (p. 11). 3 [Split] Button Allows you to play different tones in the left and right sides of the keyboard (p. 16) and specify Rhythm chords with the left hand (p. 31). 4 Tone Buttons They are used to choose the kinds of sounds (Tone Groups) played by the keyboard (p. 14).
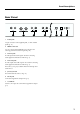
Panel Descriptions Rear Panel Damper Soft R R L (Mono) Stereo MIDI Line In Line Out 1 2 3 4 Out 1 L (Mono) Stereo Pedal In On Off Power DC In 9 V 5 6 7 Pedal Jacks Accepts connection of the supplied pedal , or other suitable pedals (p. 10). 2 MIDI Connectors You can connect external MIDI devices to the FP-3 and exchange performance data among them (p. 42). 3 Line In Jacks Provide input of the audio signals. Used for connecting audio equipment and other such devices (p. 8).
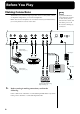
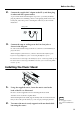
Before You Play Making Connections NOTE To prevent malfunction and/or damage to speakers or other devices, always turn down the volume, and turn off the power on all devices before making any connections. The FP-3 does not contain an amp or speakers. To hear sound, either connect an amplifier and speakers, or use stereo headphones. * MIDI cable and stereo headphones are not included. Consult your Roland dealer if you need to purchase accessories such as these. fig.
Before You Play 2. Connect the supplied AC adaptor to the FP-3, and then plug its other end into a power outlet. To prevent the inadvertent disruption of power to your unit (should the plug be pulled out accidentally), and to avoid applying undue stress to the DC In jack, anchor the power cord using the cord hook, as shown in the illustration. fig.00-02 Rear panel On Off Power DC In 9 V 3. Connect the amp or audio gear to the Line Out jacks as shown in the diagram.
Before You Play Connecting Pedals 1. Connect the pedal included with the FP-3 to one Turning the Power On and Off of the Pedal jacks. Once the connections have been completed, turn on or off When connected to the Damper jack, the pedal can be power to your various devices in the order specified. By used as a damper pedal. turning on devices in the wrong order, you risk causing When connected to Soft, the pedal can be used as a soft malfunction and/or damage to speakers and other devices. pedal.
Before You Play Connecting Headphones ■ Turning Off the Power 1. Before switching the power off, turn the volume all the way down by rotating the [Volume] knob. Also completely turn down the volume of any connected Connecting headphones allows you to enjoy playing anytime, even at night, without concern. fig.00-09 audio device and other equipment. 2. Turn off the power to the connected external equipment. 3. Press the [Power] switch on the back of the unit. The power is switched off. fig.
Chapter 1 Playing the Keyboard Listening to Internal Songs For more on internal song names, refer to “Internal Song List” (p. 54). Now, try listening to internal songs The FP-3 comes with fifty four internal songs. fig.01-01 2 1. fig.01-02 Press the [-] or [+] button to select the song. Press the [Play] button. The song will begin playing back. The selected song is played to the end, and then playback stops. 4. 1 Press the [Song] button, getting its indicator to light.
Chapter 1 Playing the Keyboard When the following appears in the display If there is any performance data stored in the FP-3’s memory, the following appears in the display. fig.01-03 Flashes in green Flashes in red Flashes in green Until you erase the performance data, you cannot play back an internal song. To erase the performance data and play back the internal song, press the [Rec] button. If you don’t want to erase the song, press the [Play] or [Song] button.
Chapter 1 Playing the Keyboard Performing with a Variety of Sounds The FP-3 features 40 different internal sounds, allowing you to enjoy performing with sounds suitable for many different types of music. These onboard sounds are called “Tones.” The Tones are divided into six different groups, each of which is assigned to a different Tone button. The Tone “Grand Piano 1” is selected when the instrument’s power is turned on. fig.01-07 1, 3 1. 2 Press one of the Tone buttons to choose a Tone Group.
Chapter 1 Playing the Keyboard Performing With Two Layered Tones (Dual Play) You can play two different sounds from a single key at the same time. This method of performance is called “Dual Play.” Example: Try Layering Piano and String Tones fig.01-09 1 1. Press the [Piano] button and the [Strings/Pad] button at the same time. The indicators for both buttons light. Try fingering the keyboard. Both the piano and string sounds play.
Chapter 1 Playing the Keyboard Performing With Different Tones in the Left and Right Sides of the Keyboard (Split Play) Performing with the keyboard divided at a certain key into a left side and a right side is called “Split Play,” and the point at which the keyboard is divided is called the “split point.” In Split Play, you can have a different tone sound in the left and right sides.
Chapter 1 Playing the Keyboard ■ Changing Tones fig.01-13 1 1. 2 Hold down the [Split] button and press the Tone button for the tone you want to change, whether the Upper or Lower Tone. The indicators for the [-] and [+] buttons light in the same color as the indicator of the selected tone button. When orange, it indicates that the Upper Tone can be changed; when red, it is the Lower Tone that is being changed. 2.
Chapter 1 Playing the Keyboard Changing the Volume Balance for Dual Play and Split Play You can change the volume balance of the Upper and Lower Tones in Dual Play (p. 15) and Split Play (p. 16). When the instrument is turned on, this is set to “5–5” (“Lower Tone volume”–“Upper Tone volume”). fig.01-15 2 1. Hold down the [Song] button and press the [Split] button. The indicators for the [Song] and [Split] buttons flash in red. fig.01-16 Lower Tone volume (The Tone button’s indicator light is red) 2.
Chapter 1 Playing the Keyboard Changing the Keyboard’s Touch You can change the touch sensitivity, or response of the keys. When the instrument is turned on, this is set to “Normal.” fig.01-17 2 1. 1 3 Hold down the [Song] button and press the [Reverb] button. The indicators for the [Song] and [Reverb] buttons flash in red. fig.01-18 2. 3. Press the [-] or [+] buttons to select the touch.
Chapter 1 Playing the Keyboard Adding Breadth to the Sound (Chorus Effect) You can apply a chorus effect to the notes you play on the keyboard. By adding the chorus effect, you can give the sound greater dimension, with more fatness and breadth. The settings of the chorus effect are memorized independently for each sound, and remain in effect until you turn off the power. fig.01-19 1, 2 1. Press the [Chorus] button, getting its indicator to light. Try fingering the keyboard.
Chapter 1 Playing the Keyboard fig.01-20 2. Press the [-] or [+] button to change the depth of effect. 3. Press the [Chorus] button once more. The button’s indicator returns to its previous state. The next time you choose the same tone, the chorus effect with the depth you’ve selected here is applied. Adding Reverberation to Sounds (The Reverb Effect) You can apply a reverb effect to the notes you play on the keyboard.
Chapter 1 Playing the Keyboard Transposing the Key of the Keyboard (Key Transpose) You can transpose the key of a performance without having to shift the position of your fingers on the keyboard. This feature is called “Key Transpose.” This lets you take a song in a difficult key with lots of sharps ( ) and flats ( ) and play it in a key with fingering that’s easier for you. This is handy when playing accompaniment to a song, to match what you play to the pitch of the singer’s voice. fig.
Chapter 1 Playing the Keyboard Using the Metronome Here’s how you can make use of the metronome. fig.02-01 1, 2 1. Press the [ sound. (Metronome)] button to have the metronome The [Tempo/Rhythm] button’s indicator flashes in red and green in time with the beat selected at that time. The indicator lights in red on the downbeats, and in green on weak beats. The tempo appears in the display. fig.02-02 2. To stop the metronome, press the [ again. (Metronome)] button ■ Changing the Tempo 1.
Chapter 1 Playing the Keyboard ■ Changing the Beat of Metronome 1. While holding down the [Tempo/Rhythm] button, press the [-] or [+] button. The [Tempo/Rhythm] button’s indicator flashes in red. The currently selected beat is displayed. fig.02-03 2. Press the [-] or [+] button to select the beat. You can select from the following beats. 3. Display Beat Display Beat 2.2 2/2 6.4 6/4 0.4 Weak beats only 7.4 7/4 2.4 2/4 3.8 3/8 3.4 3/4 6.8 6/8 4.4 4/4 9.8 9/8 5.4 5/4 12.
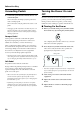
Chapter 2 Playing Along with Rhythms What is Session Partner? “Session Partner” Lets You Enjoy Playing with a Session-Like Feel “Session Partner” is a function that lets you select the On/Off status of the two Rhythm buttons along with the “Rhythm,” making it easy to add accompaniment. You can play intros, endings, and fill-ins (short phrases inserted at transition points in the song) by pressing buttons as you play the keyboard.
Chapter 2 Playing Along with Rhythms Performing Along With Rhythms fig.02-05 ■ Performing Along With Drum Sounds Now, try performing as the sound of the Rhythm’s Drum Part plays. Since a wide variety of musical genres is provided, be sure to use a Rhythm that best suits the song you are performing. Please refer to “Selecting a Rhythm” (p. 28). 1. Press the [Drums] button. The [Drums] button’s indicator lights up, and the intro begins to play. 2.
Chapter 2 Playing Along with Rhythms Playing Only the Bass Sound of the Chord Part A Rhythm’s Chord Part not only contains its fundamental bass sound, but may also include the sound of instruments other than the bass. However, you can have just the bass sound of such Chord Parts play. You can also change the settings while the Rhythm is being played. This setting is effective for all Rhythms until the FP-3’s power is turned off. 1. Hold down the [Song] button and press the [Chord] button.
Chapter 2 Playing Along with Rhythms Selecting a Rhythm Now, try changing the Rhythm being performed. fig.02-09 2 1. 1 43 Press the [Tempo/Rhythm] button so that the Rhythm number appears in the display. Rhythm numbers are indicated by an “r” before the number. When a Rhythm is displayed, the [-] and [+] buttons light in green. fig.02-10 2. Press the [-] or [+] button to select the Rhythm. 3. Press the [Chord] or [Drums] button.
Chapter 2 Playing Along with Rhythms Changing a Rhythm’s Tempo You can change the tempo of the selected Rhythm. Furthermore, you can change the tempo as the Rhythm is being played. fig.02-08 2 1. 1 Press the [Tempo/Rhythm] button to have the tempo displayed. Pressing the [Tempo/Rhythm] button alternately displays the tempo and the currently selected Rhythm number (indicated by an initial “r”). When the tempo is displayed, the [-] and [+] buttons light in red. 2.
Chapter 2 Playing Along with Rhythms Selecting a Rhythm’s Chord Progression When playing the Chord Part while performing, the chord progression is automatic. You can change the chord progression pattern if you want. These settings cannot be memorized independently for each Rhythm. 1. Hold down the [Chord] button and press the [-] or [+] button. For more information on chord progression patterns, refer to the “Chord Progression Pattern List” (p. 50). The [Chord] button’s indicator flashes in red.
Chapter 2 Playing Along with Rhythms Performing With the Chord Progression Specified in the Left Hand (Rhythm Split Play) Performing with the keyboard divided at a certain key into a left side and a right side is called “Split Play.” When using the Rhythm while Split Play is in effect, you can specify the chords with the keys in the left part of the keyboard. NOTE When specifying the chords in the left part of the keyboard, Dual Play (p. 15) is disabled in the right part. fig.02-13 1, 5 4 2 1.
Chapter 2 Playing Along with Rhythms Changing the Volume Balance Between the Keyboard and the Rhythm When using Rhythms in a performance, you can change the balance between the Rhythm volume and the volume of the performance played on the keyboard. When the power is turned on, the volume balance is set to “5–5” (“Keyboard volume” – “Rhythm volume”). When you change the volume balance between the keyboard and the Rhythm, the volume balance between the keyboard and the internal song may change. fig.
Chapter 3 Recording a Performance You can easily record your performances. You can play back a performance you have recorded to check what and how you played, and play melodies on the keyboard along with prerecorded accompaniment using the Rhythm. Notes Regarding Recording • Only one song can be recorded. With second or later recordings, the previously recorded song is erased as the new material is recorded.
Chapter 3 Recording a Performance ■ Recording a Performance Using Rhythms NOTE You can also easily record session performances to the internal Rhythms and chord progressions. fig.03-02 1 1. 1 4 3 5 2 Select the Tone or Rhythm to be played. Also set the Rhythm tempo to one that is easier to play (p. 29). 2. When you record additional material without erasing the previously recorded sounds, the song is recorded at the initially recorded tempo. Press the [Rec] button.
Chapter 3 Recording a Performance ■ Recording a Performance Using Rhythms (in Split Play) NOTE Specify the chord progression yourself to record session performances with even greater freedom. By prerecording only the Rhythm (accompaniment) using your preferred chord progressions, you can then use the entire keyboard in session performances as you play along with the playback of this recording.
Chapter 3 Recording a Performance ■ Recording Selected Track buttons FP-3’s Recorder has three Track buttons. When you press the [Rec] button, all Track buttons are set to be recorded, but by selecting Track buttons that are not to be recorded, you can then record only on the specific Track buttons you want. For example, you can record each hand’s performance to different Track buttons, or record over only certain Track buttons in a previously recorded performance.
Chapter 3 Recording a Performance Erasing Recorded Performances You can erase recorded performances. fig.03-04 2 1. 1 Hold down the [Song] button and press the [Rec] button. A confirmation message appears in the display. fig.03-05 Flashes in green Flashes in red 2. Flashes in green Press the [Rec] button. The recorded performance is erased. If you do not want to erase the performance, press the [Play] or [Song] button.
Chapter 4 Other Functions Changing the Damper Pedal’s Resonance On an acoustic piano, depressing the damper pedal makes fig.04-02 Flashes in red Flashes in red the notes you play resonate with other strings, adding rich reverberations and fatness to the sound. The damper pedal on the FP-3 recreates this resonance (Sympathetic Resonance) when depressed. You can select from ten levels of depth for the resonant sound (resonance level). 2. Press the [-] or [+] button to select the pedal function.
Chapter 4 Other Functions Changing How the Pedal Effects Are Applied When the pedal is pressed in Dual Play (p. 15) or Split Play Changing the Pitch of the Lower Tone in Octave Steps (Octave Shift) (p. 16), the pedal’s effect is applied to both the Upper Tone You can change the pitch of the Lower Tone in Dual Play and the Lower Tone, but you can change the settings for the (p. 15) and Split Play (p. 16) an octave at a time. tone to which the effect is applied.
Chapter 4 Other Functions Tuning to Other Instruments’ Pitches (Master Tuning) Adjusting the Tuning When playing ensemble with other instruments and in other their original tuning. such instances, you can match the standard pitch to another Most modern songs are composed and played with the instrument.
Chapter 4 Other Functions Temperament Just Minor 4 Changing the Beat Pattern Qualities The Just tunings differ from major and minor keys. You can get the same effect with the minor scale as with the major scale. Mean Tone 5 but you can change the beat pattern to sound, for example, one beat for every dotted quarter note. 1.
Chapter 4 Other Functions Connecting MIDI Devices ■ How to Enjoy MIDI Recording Data of Performances Played on the FP-3 to a About MIDI Sequencer* and Automatically Playing Recorded MIDI stands for “Musical Instrument Digital Interface,” and is a worldwide standard for the exchange of performance data (MIDI messages) and other information among electronic instruments and computers.
Chapter 4 Other Functions ■ MIDI Settings Local Control ON: The keyboard and the internal sound MIDI Send Channel Settings generator are in a linked state. fig.04-13.e MIDI features sixteen MIDI channels, numbered 1–16. Sound is emitted Simply connecting a cable is not enough for communication to take place. The connected devices must be set to use the same MIDI channels. Otherwise, no sound will be produced, Sound Generator and no sounds can be selected.
Chapter 4 Other Functions Setting the MIDI Out Mode 3. Press the [Song] button. By setting the MIDI Out Mode, you can select to have a more suitable (to the external MIDI device) selection of MIDI data be output from the MIDI Out connector when you make tone changes on the FP-3. Three settings for the MIDI Out Mode are available. “MIDI Out Mode 1” is the power-up default setting. MIDI Descriptions Out Mode 1 MIDI This setting is suitable for the connec- Out tion of sequencers.
Troubleshooting If you think there’s a problem, read this first. Case No Power No Sound Cause/What to do Case Is the power cord properly connected? (p. 8) Is the [Song] button indicator lit in green? (p. 12) Is the volume level of the FP-3 (p. 11) or con- Songs cannot be played back when the [Song] nected device turned all the way down? Is the power to all devices turned on? (p. 10) Cause/What to do button’s indicator is on.
Troubleshooting Case Cause/What to do Case Cause/What to do Is the pedal connected correctly? When listening through speakers: Connect the pedal securely to the Pedal jack Playing at loud volumes may cause instru- (p. 10). ments near the FP-3 to resonate. Resonation Pedal Has No Unplugging a pedal cord from the unit while Effect, or Effect the power is on may cause the pedal’s effect “Sticks” to be applied nonstop. can also occur with fluorescent light tubes, glass doors, and other objects.
Error Messages/Other Messages Display USr Usr. Meaning User. Stores recorded Performances. (p. 12, p. 33) The “.” in the display indicates that there is Performance material already recorded. (p. 12, p. 33) d. Demo song number. (p. 12, p. 36) P. Piano song number. (p. 12, p. 36) r. Rhythm number. (p. 28) This appears when you attempt to delete a recorded song (p. 37). dEL Additionally, this appears after recording a song when you try to select another song (p. 13). E.
Tone List → “Performing with a Variety of Sounds” (p. 14) Piano 1 2 3 4 5 6 Grand Piano 1* Grand Piano 2* Rock Piano Honky-tonk Upright Piano* Harpsichord * indicates a tone with sympathetic resonance (p. 38). E.Piano 1 2 3 4 5 6 7 8 Stage Rhodes Dyno Rhodes E.Piano Suitcase Wurly Clavi Vibraphone Vibra Bell Organ 1 2 3 4 5 6 Jazz Organ* Rock Organ Full Organ* Lower Organ* Church Organ Nason Flute 8’ * indicates a tone with rotary effect (p. 20).
Rhythm List → “Selecting a Rhythm” (p. 28) No. Genre r01 Pop r02 Name Recommended Tempo Beat No.
Chord Progression Pattern List → “Selecting a Rhythm’s Chord Progression” (p.
Chord Progression Pattern List Recommended Rhythm Genre: Blues, Rock, Pop Pattern 7 C7 F7 C7 I7 IV7 I7 F7 C7 IV7 I7 G7 F7 C7 G7 V7 IV7 I7 V7 Recommended Rhythm Genre: Jazz CM7 Cdim I M7 I dim Dm9 G7 CM7 Dm9 IIm9 V7 I M7 IIm9 Pattern 8 CM7 Cdim I M7 I dim Dm9 G7 CM7 IIm9 V7 I M7 Recommended Rhythm Genre: Latin, Pop C Am7 I VIm7 Pattern 9 Dm7 G7sus4 IIm7 V7sus4 51
Chord Fingering List ● symbol: indicates the constituent notes of chords. ★ symbol: Chords shown with an “★” can be played by pressing just the key marked with the “★”. → “Performing With the Chord Progression Specified in the Left Hand (Rhythm Split Play)” (p.
Chord Fingering List F# G A A B B F#M7 GM7 A M7 AM7 B M7 BM7 F#7 G7 A 7 A7 B 7 B7 F#m Gm A m Am B m Bm F#m7 Gm7 A m7 Am7 B m7 Bm7 F#dim Gdim A dim Adim B dim Bdim F#m7 ( 5 ) Gm7 ( 5 ) A m7 ( 5 ) Am7 ( 5 ) B m7 ( 5 ) Bm7 ( 5 ) F#aug Gaug A aug Aaug B aug Baug F#sus4 Gsus4 A sus4 Asus4 B sus4 Bsus4 F#7sus4 G7sus4 A 7sus4 A7sus4 B 7sus4 B7sus4 F#6 G6 A 6 A6 B 6 B6 F#m6 Gm6 A m6 Am6 B m6 Bm6 53
Internal Song List → “Listening to Internal Songs” (p. 12) Song Song Title Composer Copyright No. d. 1 Jobs For The Boys J. Maul © 2000 John Maul d. 2 Howz It Feel? S. Wilkie © 2000 Scott Wilkie (ASCAP) d. 3 Bop on the Rock J. Maul © 1992 Roland Corporation d. 4 Yesterday’s Dream J. Maul © 1992 Roland Corporation P. 1 Arabesque No. 1 in E-Major C. Debussy © 1994 Roland Corporation P. 2 Gymnopedie No. 1 E. Satie © 1997 Roland Corporation P. 3 Golliwog’s Cakewalk C.
Internal Song List Song Song Title Composer Copyright No. P.31 Spinnerlied Op. 14-4 A. Ellmenreich © 1994 Roland Corporation P.32 “Berceuse” from “Dolly,” Op. 56 G. Fauré © 1995 Roland Corporation P.33 3-Romances Sans Paroles No. 3, Op. 17 G. Fauré © 1996 Roland Corporation P.34 “Gavotte” from Opera “Rosine” F. Gossec © 1996 Roland Corporation P.35 “Arietta” from “Lyric Pieces, Volume 1” Op. 12-1 E. Grieg © 1996 Roland Corporation P.36 Invention No. 4 in D Minor, BWV. 775 J. S.
Easy Operation List 1 2 3 4 5 6 7 8 9 10 11 2 3 1 12 13 14 15 4 5 6 No. You want to Buttons Page Hold down the [Song] button and press the [●] button. Volume balance between the Lower and Upper 1 Tone [Song] + [Split] p. 18 2 Octave Shift [Song] + [Piano] p. 39 3 Pedal works [Song] + [E.Piano] p. 38 4 How the pedal effects are applied [Song] + [Organ] p. 39 5 MIDI send channel settings [Song] + [Guitar/Bass] p. 43 6 MIDI OutMode [Song] + [Strings/Pad] p.
MIDI Implementati on DIGITAL PIANO Date : Oct. 1, 2000 MIDI Implementation Chart Model FP-3 Transmitted Function... Recognized Basic Channel Default Changed 1 1–16 1–16 1–16 Mode Default Messages Altered Mode 3 x Mode 3 Mode 3, 4(M=1) Note Number : True Voice ************** 0–127 0–127 Velocity Note ON Note OFF O x 8n v=64 O x After Touch Key’s Ch’s x x O O x O Prog Change Remarks *2 ************** Pitch Bend 0, 32 7 10 11 64 66 67 91 93 Control Change Version : 1.
Main Specifications 88 keys (Progressive Hammer Action Keyboard) Display Touch Sensitivity 7-segment, 3-digit LED Light/Normal/Heavy/Fixed Connectors Keyboard Mode Line Out jacks (L/Mono, R) Whole Line In jacks (L/Mono, R) Dual Phones jack x 2 (Stereo Mini) Split (adjustable split point) MIDI connectors (In/Out) Max.
Index A L AC adaptor ....................................................................... 9 All Song Play .................................................................. 12 Line Out ............................................................................ 9 Local Control .................................................................. 43 Lower Tone .............................................................. 15, 16 B Beat .....................................................................
Index S Sequencer ....................................................................... 42 Session Partner .............................................................. 25 Soft ................................................................................... 10 Soft Pedal .............................................................. 8, 10, 38 Sostenuto pedal ............................................................. 38 Split Play ....................................................................
MEMO
Information When you need repair service, call your nearest Roland Service Center or authorized Roland distributor in your country as shown below. AFRICA EGYPT Al Fanny Trading Office 9, EBN Hagar A1 Askalany Street, ARD E1 Golf, Heliopolis, Cairo 11341, EGYPT TEL: 20-2-417-1828 REUNION Maison FO - YAM Marcel 25 Rue Jules Hermann, Chaudron - BP79 97 491 Ste Clotilde Cedex, REUNION ISLAND TEL: (0262) 218-429 PANAMA ITALY ISRAEL SUPRO MUNDIAL, S.A. Roland Italy S. p. A.
For EU Countries This product complies with the requirements of European Directive 89/336/EEC. For the USA FEDERAL COMMUNICATIONS COMMISSION RADIO FREQUENCY INTERFERENCE STATEMENT This equipment has been tested and found to comply with the limits for a Class B digital device, pursuant to Part 15 of the FCC Rules. These limits are designed to provide reasonable protection against harmful interference in a residential installation.
This owner’s manual is printed on recycled paper.