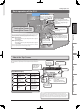
For EU Countries English Deutsch Italiano Español Owner's Manual Bedienungsanleitung Mode d'emploi Manuale dell'utente Manual de instrucciones Manual do Proprietário Gebruikershandleiding Français For China Português Nederlands G6027134R0 G 6 0 2 7 1 3 4 - 0 1 G 6 0 2 7 1 3 4 - 0 1
For the U.K. IMPORTANT: THE WIRES IN THIS MAINS LEAD ARE COLOURED IN ACCORDANCE WITH THE FOLLOWING CODE. BLUE: NEUTRAL BROWN: LIVE As the colours of the wires in the mains lead of this apparatus may not correspond with the coloured markings identifying the terminals in your plug, proceed as follows: The wire which is coloured BLUE must be connected to the terminal which is marked with the letter N or coloured BLACK.
Owner's Manual 201a sections provide important information concerning the proper operation of the unit. Additionally, in order to feel assured that you have gained a good grasp of every feature provided by your new unit, this owner’s manual should be read in its entirety, and it should be saved and kept on hand as a convenient reference. English Before using this unit, carefully read the sections entitled: “USING THE UNIT SAFELY” (p. 42) and “Important Notes” (p. 43).
1 Chapter Main Features The JS-8 combines the functions of an audio playback device with a variety of popular BOSS guitar effects, all in a single unit. Just plug in your guitar and enjoy performing along with songs while playing through great-sounding COSM amps and effects. Basic Structure of the JS-8 Basic Routing of Sounds You can easily play along with your favorite songs. ”Playing Songs” (p. 8) Audio Signal Song (Audio File) Internal Speaker Song (MP3 or other format) Play back directly.
Main Features Sound Path When Used with Connected Devices You can use the JS-8 with digital audio players, computers, and other devices to play sounds and more.
2 Chapter Setting Up the JS-8 Basic setup for the JS-8 AC Adaptor (PSB-1U) Be sure to use a PSB-1U adaptor. The use of any other adaptor may cause malfunction. Place the AC adaptor so the side with the indicator (see illustration) faces upwards and the side with textual information faces downwards. The indicator will light when you plug the AC adaptor into an AC outlet.
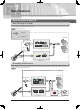
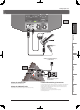
Setting Up the JS-8 Basic operation of the JS-8 MENU Button This calls up various different functions depending on the screen displayed. Dial Use this to change values and settings. 941 ENTER Button When powering up EXIT Button • Turn on the power to your component stereo system or mixer last. Use this to confirm selection of an item, and to adjust the values of settings and switch among them. Deutsch Once the connections have been completed (p. 4) (p.
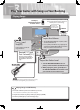
Setting Up the JS-8 Using the JS-8 with Other Devices Computer Expression Pedal (EV-5, etc.) Footswitch (BOSS FS-6, etc.) Security Slot USB Cable (Commercially available) USB Memory Connector Ground Terminal SD Card Connector Top Cover Holder (indentation) SD Card About the USB Cable A USB cable is not included with the JS-8. Please use a commercially available cable. About the Expression Pedal and Footswitch Recording and playback on the JS-8 requires an SD card.
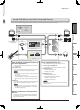
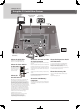
Setting Up the JS-8 Front side English Stereo Headphones Deutsch Electric Guitar Français Microphone Italiano CD Player, Digital Audio Player, or other device Español Right side AUX IN jacks White (Left channel) LINE OUT jacks Português Red (Right channel) Component stereo system or other device About the AUX IN Jack Input audio from line-level devices here. Output audio to a component stereo system or other device from here.
3 Chapter Play Your Guitar with Songs as Your Backing Playing Songs Use a commercially available cable that's appropriate for the device to which you are connecting. CD Player, Digital Audio Player, or other device You can mix in sound from external audio devices. To AUX IN Step Step 2 Adjust the Volume 1. Turn the MASTER VOLUME knob completely counterclockwise (minimum level). Play[] and Stop[] 2.
Play Your Guitar with Songs as Your Backing Recording Performances You can record the exact sounds you hear from the JS-8. Recording Performances English 1. Press [](REC). Deutsch To Stop Recording Français 1. Press [](STOP). Italiano Saves the recorded song and starts playback. Discards the recorded content. At the message "Are you sure?", press [ENTER] to discard the recording. (The recorded content will not be saved.
Play Your Guitar with Songs as Your Backing Selecting Songs Selecting Songs 1. Press [SONG LIST]. 2. Turn the dial to select a song. 3. Press [ENTER]. Select the song you want to hear or the rhythm you want played. You can narrow the number of songs displayed by specifying certain conditions (SEARCH Function).
Play Your Guitar with Songs as Your Backing With the MENU button... Pressing [SONG LIST] and then [MENU] allows you to carry out the following procedures. You can choose from the following types of searches. SEARCH Type Description All songs included in the saved albums and artists are listed. USER Data recorded with the JS-8 is automatically registered in this category. BEST 30 Only the thirty favorite songs are listed, if these songs have already been ranked (1–30).
Play Your Guitar with Songs as Your Backing Switching Effects Effect patch number Select Effects 1. Press [EFFECTS]. Use the dial to select the effect. Effect category Switch to the SOLO Effect 1. Press [SOLO]. With the MENU button... Pressing [EFFECT] and then [MENU] allows you to carry out the following procedures. The SOLO icon will light if SOLO is on. MENU Category Description WRITE Saves the effect currently being edited. Also copies the currently selected effect.
Play Your Guitar with Songs as Your Backing Changing Effects to Get the Desired Sound 1. Press [EFFECTS]. 2. Press the right cursor button. You can create sounds by choosing song genres and using intuitive sound-shaping grids that adjust multiple parameters with a single control. Press the right cursor button to switch to Screen 3. For solos Screen 2 Distortion: Hard You can then select a sound that is similar to what you have in mind.
Play Your Guitar with Songs as Your Backing Convenient Practice Functions Metronome 1. Press [MENU]. Tuner 2. Select METRONOME with the dial and press [ENTER]. 1. Press [TUNER]. Use this feature to tune your instruments. Play along with the metronome to learn how to perform at a steady tempo. This sets the frequency of A4 (the middle A on a piano keyboard). Press [SPEED] two or more times to match the song's rhythm; that pace is set as the TEMPO.
Play Your Guitar with Songs as Your Backing Phrase Trainer 1. Press [](PLAY). B] at the start point, and 2. Press [A again at the end point of the segment to be repeated. Practicing with the Song Tempo Changed and Center Sound Removed 1. Press [SPEED]. This lets you slow down the song tempo to practice faster passages and remove the center sound from songs so you Use this feature for guitar solo practice and in other situaas it plays back repeatedly. B] once again.
4 Chapter Importing Songs Importing Songs from CD Players and Other Devices Use a commercially available cable that's appropriate for the device to which you are connecting. CD player, Digital Audio Player, or other equipment To AUX IN Stereo miniature phone type Importing the Song (CAPTURE) Use this procedure to import (capture) songs from CD players and other devices. 1. Press [MENU]. 2. Select CAPTURE with the dial and press [ENTER]. 3.
Importing Songs Capturing Songs from Various Sound Sources The JS-8 can capture songs using various different methods. Source Capture Method Analog connection (audio input to AUX IN jack) Refer to “Importing the Song (CAPTURE)” (p. 16). English 1. Connect the computer to the JS-8's USB port by a USB cable. 2. When the USB SELECT screen appears in the JS-8, select AUDIO and press [ENTER]. Digital connection (audio input to USB port) 3.
5 Chapter Using the JS-8 Song List Editor You can use the JS-8 Song List Editor (hereafter referred to as “Song List Editor”) for the following. • Importing songs from music CDs into the JS-8 • Importing WAV and MP3 files into the JS-8 • Editing song data 1. Connecting to the Computer USB 2. When the USB SELECT screen appears in the JS-8, select JS-8 SONG LIST EDITOR and press [ENTER]. USB Computer 1. Connect the computer to the JS-8's USB port by a USB cable.
Using the JS-8 Song List Editor Importing Songs into the JS-8 from CDs (CD IMPORT) This procedure converts music CDs to songs and imports them into the JS-8. Importing WAV or MP3 into the JS-8 (IMPORT) This procedure imports WAV or MP3 audio data into the JS-8. 1. Start up the Song List Editor. 2. Click [IMPORT]. 2. Load the CD you want to import into the JS-8. 3. Use the Song List Editor to select the song (audio file) you want to import. 3. Click [CD RIPPING]. 4. Click [OK]. 4.
6 Chapter Convenient Functions Advanced Editing of Effect Parameters 1. Press [EFFECTS]. Screen 1 Screen 2 Effect patch number Press the right cursor button to switch to Screen 4. Press the right cursor button to switch to Screen 2, 3. Use the dial to select the effect category. Select the effect patch you want to edit here. Screen 3 Screen 4 Screen 5 (Example: AMP) Use the cursor buttons and dial to edit the parameters. Pressing [MENU] enables various editing procedures.
Convenient Functions About the Effect Menu Pressing [EFFECT] and then [MENU] allows you to carry out a variety of different procedures. WRITE Screen Select the patch number to be written to here (save destination). Use the left and right cursor buttons and the dial to name the effect. Press [ENTER] to save the effect patch. Deutsch Saves the effect patch currently being edited (or copies the current patch if it’s unedited).
Convenient Functions About the JS-8's Internal Effects The trademarks listed in this document are trademarks of their respective owners, which are separate companies from Roland/BOSS. Those companies are not affiliated with Roland/BOSS and have not licensed or authorized BOSS’s JS-8. Their marks are used solely to identify the equipment whose sound is simulated.
Convenient Functions Paremeter BOSS CRUNCH This is a crunch sound that faithfully reproduces picking nuances. BLUES This is a sound suited to blues. WILD CRUNCH This is a crunch sound with wild distortion. VO CLEAN This models the clean sound of the VOX AC-30TB. MATCH DRIVE This models the sound produced using the left input on a Matchless D/C-30, a modern tube amp widely used in styles from blues to rock. FAT MATCH This models the sound of a Matchless modified for high gain.
Convenient Functions Parameter Parameter MIDDLE BASS TREBLE These adjust the volume of the respective EQ bands. This setting selects the simulated mic type. PRESENCE Frequency When you set the TYPE parameter to VO DRIVE, VO LEAD, VO CLEAN, MATCH DRIVE, FAT MATCH, or MATCH LEAD, the PRESENCE parameter functions as the high cut filter found in the original amps. MIC TYPE DYN57 This is the sound of the SHURE SM-57, a general-use dynamic mic used for instruments and vocals.
Convenient Functions FX parameter list Parameter OFF/ON Turns FX OFF/ON. FX SELECT Parameter OD/DS This effect distorts the sound to create long sustain. Select the type of distortion with TYPE, then use DRIVE to adjust the amount of distortion. ”OD/DS parameter list” (p. 26) You can connect an expression pedal to the EXP PEDAL CTL1/2 jack and use the pedal to control the wah effect in real time. ”WAH parameter list” (p.
Convenient Functions OD/DS parameter list BOOSTER Mid Bst This is a booster with unique characteristics in the midrange. This produces a great sound for solos. Cln Bst This not only functions as a booster, but also produces a clean tone that has punch even when used alone. Trbl Bst This is a booster that has bright sound characteristics. BLUES Blues This is the crunch sound of the BOSS BD-2. This produces distortion that faithfully reproduces the nuances of picking.
Convenient Functions COMP parameter list Parameter SUSTAIN This sets the sustain for the sound. ATTACK This sets the attack (onset) of the sound. LEVEL This sets the volume level of the effect. PHASER parameter list Parameter LIMITER parameter list Selects the number of stages that the phaser effect uses. TYPE 4 STAGE This is a four-phase effect. A light phaser effect is obtained. 8 STAGE This is an eight-phase effect. This is the most common phaser effect.
Convenient Functions ROTARY parameter list Parameter RATE SLOW This parameter adjusts the SPEED SELECT of rotation when set to “SLOW.” RATE FAST This parameter adjusts the SPEED SELECT of rotation when set to “FAST.” DEPTH This sets the richness of the effect. SPEED SELECT This parameter changes the simulated speaker’s rotating speed. UNI-V parameter list Parameter RATE This sets the speed of the effect. DEPTH This sets the richness of the effect.
Convenient Functions DELAY parameter list Parameter OFF/ON Turns the DELAY OFF/ON. Use this to choose the type of delay. This is a simple monaural delay. PAN This delay is specifically for stereo output. This provides a tap delay effect that divides the delay time between the left and right channels. STEREO The direct sound is output from the left channel, and the effect sound is output from the right channel. REV. This produces the effect of playback in reverse.
Convenient Functions CHORUS parameter list Parameter OFF/ON Turns the CHORUS OFF/ON. Use this to choose the type of chorus. TYPE MONO This chorus effect outputs the same sound from the left and right channels. ST 1 This is a stereo chorus effect that adds different chorus sounds to L channel and R channel. ST 2 This stereo chorus uses spatial synthesis, with the direct sound output in the left channel and the effect sound output in the right channel.
Convenient Functions Adjusting the Guitar and Mic Input Sensitivity You can connect a mic to the JS-8's GUITAR/MIC IN jack and adjust the input sensitivity. 1. Press [MENU]. 2. Select SYSTEM, and then press [ENTER]. 3. Select SYSTEM SETTING, and then press [ENTER]. 4. Set INPUT GAIN parameter to MIC. Deutsch Turning Off the Internal Speakers English • The JS-8 features an effect especially designed for use with mics. To choose this effect, select MIC from the effect categories.
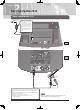
Convenient Functions Using Foot Switches and Expression Pedals EXP/CTL PEDAL jack JS-8 1/4” phone cable (monaural) (Commercially available item) Stereo 1/4” phone cable (Commercially available item) Expression Pedal (Roland EV-5, etc.) Red PCS-31L: sold separately White Footswitch (BOSS FS-6) CTL2 If you’re using an FS-5U footswitch, set its POLARITY switch as shown below.
Convenient Functions Using USB Audio Interfaces Exchanging audio data between a computer and the JS-8 via USB requires installation of a USB driver on the computer you are using. Follow the instructions below to install the USB driver. • It is only necessary to install the USB driver on the computer the first time the driver is used. • The USB driver is contained on the SD card included with the JS-8. • The latest version of the USB driver can be found on the Roland website.
Convenient Functions Using the JS-8 with Commercial Digital Audio Workstation (DAW) Software Via USB, you can use the JS-8 as an audio interface for commercially available DAW software. Record audio from a connected guitar or mic into the DAW, either dry or with the JS-8's effects applied. Play back audio from the DAW for monitoring purposes, or through the JS-8's effects to "re-amp" previously recorded tracks. 1. Connect the computer to the JS-8's USB port by a USB cable. 2.
Convenient Functions Using Commercial SD Cards Removing SD Cards 1. Press [POWER] to turn off the JS-8. 2. Push SD card inward, and then release your finger. 1. Press [MENU]. 2. Release your finger About the SD card Write/ Protect Function (Lock) Deutsch Initializing SD Cards 1. Push English Remove an SD card only while the JS-8's power is switched off. Removing an SD card with the JS-8 turned on may result in corruption of data recorded on the SD card or damage to the card itself. 2.
Convenient Functions Backing Up Backing Up SD Cards You can back up data on SD cards to computers. The computer procedures in the following descriptions use Explorer and My Computer with Windows and Finder and other applications with the Mac OS. 1. Connect the computer to the JS-8's USB port by a USB cable. 2. When the USB SELECT screen appears in the JS-8, select JS-8 SONG LIST EDITOR and press [ENTER]. 3. Using Explorer or My Computer (Windows) or Finder (Mac OS), navigate to the folders on the JS-8.
Convenient Functions Recovering Backed Up Data (RECOVER) Recovering Backed Up Data to SD Cards (RECOVERY) Use this procedure to restore JS-8 data previously backed up on a computer to SD cards. You can restore the JS-8 to its status at the time the data was backed up. The computer procedures in the following descriptions use Explorer and My Computer with Windows and Finder and other applications with the Mac OS. 1. Connect the computer to the JS-8's USB port by a USB cable. 3.
Convenient Functions Song Settings (Song Information/Protect/Effects/Song Name) 1. Turn the dial to select the desired song. 2. Press [MENU]. 3. Select SONG INFO, then press [ENTER]. Press the right cursor button to switch to Screen 2. Screen 1 Screen 2 This sets the volume of song playback. Normally, SONG LEVEL should be set to 100. Song format Song size If you press [MENU] to select SET PATCH, the currently selected effect patch number will be registered (assigned) to PATCH SYNC.
Convenient Functions Various System Settings 1. Press [MENU]. 2. Use the dial to select SYSTEM, and then press [ENTER]. You can make a variety of settings for the JS-8 in the SYSTEM screen. SYSTEM Category Description SYSTEM SETTING Allows you to turn the internal speaker on and off and adjust the GUITAR/MIC IN jack input sensitivity. Adjusts the tone of the entire JS-8. English GLOBAL EQ Adjust the low-end volume. Adjust the high-end volume. Turns GLOBAL EQ OFF/ON.
7 Chapter Appendices Error Messages Cannot Edit Song Name! Protected! to edit the name. Turn off protection. (p. 38) It is not possible to edit the song name. Use Song List Editor The song name edited by Song List Editor can be viewed but not edited on the JS-8. Card Full! There is no free space on the SD card. Either delete unwanted songs from this card (p. 9), or use a different SD card that contains free space. (p. 35) Card Locked! The SD card’s write protection is activated.
Appendices Troubleshooting Power not turning on • Make sure the JS-8's AC adaptor is properly connected to the power outlet and the JS-8 (p. 4). Can’t record/can’t import songs • Do you have an SD card inserted? • Is the SD card lock on? • Does the SD card have too little free space available? No sound • Is the MASTER LEVEL knob turned down? (p.
Appendices USING THE UNIT SAFELY The symbol alerts the user to important instructions or warnings.The specific meaning of the symbol is determined by the design contained within the triangle. In the case of the symbol at left, it is used for general cautions, warnings, or alerts to danger. Used for instructions intended to alert the user to the risk of death or severe injury should the unit be used improperly.
Appendices Important Notes 204 Microsoft and Windows are registered trademarks of Microsoft Corporation. 206e The screen shots in this document are used in compliance with the guidelines of the Microsoft Corporation. 206j Windows® is known officially as: "Microsoft® Windows® operating system." 207 Apple and Macintosh are registered trademarks of Apple Inc. 209 Mac OS is a trademark of Apple Inc.
Appendices Index A AB REPEAT .....................................9, 15, 41 AC.PROCESSOR................................ 25, 27 ALL DELETE ....................................... 21, 38 AMP ................................ 20, 22, 23, 24, 34 Audio Interface....................................... 33 AUDIO ROUTING .................................... 34 B Backing Up ............................................... 36 BEST 30 ...........................................9, 10, 11 C Capacity .....................
For the U.K. IMPORTANT: THE WIRES IN THIS MAINS LEAD ARE COLOURED IN ACCORDANCE WITH THE FOLLOWING CODE. BLUE: NEUTRAL BROWN: LIVE As the colours of the wires in the mains lead of this apparatus may not correspond with the coloured markings identifying the terminals in your plug, proceed as follows: The wire which is coloured BLUE must be connected to the terminal which is marked with the letter N or coloured BLACK.