
User Manual


8
Panel Descriptions
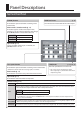
Rear Panel/Side Panel (Connecting Your Equipment)
* To prevent malfunction and equipment failure, always turn down the volume, and turn o all the units before making
any connections.
You can connect a USB ash drive here.
It is used when loading a still image, or
when saving or loading settings
When in switcher mode (p. 15)
VIDEO OUTPUT 1 connector
These connectors output the video that is selected by
the XPT3 row (PGM) of the cross-point buttons.
VIDEO OUTPUT 2, 3 connectors
These connectors output the following video,
depending on the Composition menu’s “Mode”setting.
Connector Mode = PinP & Key Mode = AUX
OUTPUT 2
Preview the PinP or
key-composited result
Final output video
OUTPUT 3 Final output video AUX bus video
VIDEO OUTPUT 4 connector
This connector outputs a multi-
view of the channel 1–4 input
videos. It also shows a tally frame.
* The output format is xed at “1080p/60 Hz.”
* The frame rate will decrease to approximately 5 fps.
VIDEO INPUT 1–4 connectors
These connectors input HDMI signals from video
devices such as a video camera or BD player, or
from a computer.
* The input format is automatically recognized.
* In the Input menu, the "Input Status" shows the video format that
is being input to each channel, and the presence or absence of an
HDCP signal.
* By executing “EDID Copy” in the System menu, you can copy the
EDID of the output-destination device connected to a VIDEO OUTPUT
connector and use it as the EDID of a VIDEO INPUT connector.
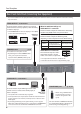
HDMI output
connector
* When using a USB ash drive
for the rst time, you must
format it using the XS-1HD
(p. 23).
USB MEMORY port
VIDEO OUTPUT 1–4 connectors
These connectors output video. You can connect
them to devices such as projectors, video recorders,
or external displays.
* The VIDEO OUTPUT 4 connector displays a menu (OSD)
on the connected monitor (p. 10).
HDMI input
connector
p. 16, 22
p. 10
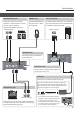
[POWER] button
This button turns the power on/o.
* By attaching the included POWER button
cover, you can prevent accidental
operation of the [POWER] button (p. 30).