www.rohlhome.
www.rohlhome.com INSTALLATION INSTRUCTIONS Consult your local ROHL showroom for additional information and specifications. For complete warranty details and a list of showrooms, go to www.rohlhome.com.
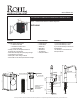
www.rohlhome.com INSTALLATION INSTRUCTIONS HOT WATER DISPENSER COLLECTION FOR USE ONLY WITH PERRIN AND ROWE HOT WATER TANK G1445 G1655 5.5” 5.5” 10” 9.2” 2MAX 2MAX 1.2/8” HOLE 1.2/8” HOLE 1/4” 1/4” 5.5” 5.5” 10” 10” 2MAX 2MAX 1.2/8” HOLE 1.2/8” HOLE G7545 1/4” MB7945 SCALDING HAZARD: The tap dispenses water up to 208.4°F (98°C), which can instantly cause scalds or burns. Use care when operating this appliance. 1/4” RECOMMENDED WORKING PRESSURE Min 1.
www.rohlhome.com INSTALLATION INSTRUCTIONS The Hot Water Dispenser Collection Installation & User Guide Congratulations on the purchace pf your ROHL product. Correctly installed and with sensible care, this product will give you many years of trouble free service. IMPORTANT INFORMATION Before you proceed... We recommend you engage the services of a registered plumber / builder to install this product.
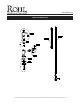
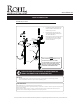
www.rohlhome.com INSTALLATION INSTRUCTIONS The Hot Water Dispenser Collection Installation & User Guide base ring base seal work surpace 1. Feed the tubes down through the hole. In the work surface until the base seal and base ring are at rest. 2. From under the sink, place the semicircular clamping plate and fixing nuts onto the threaded stud. 3. Ensure the tap is the desired angle Insert a screw driver into the hole in the hex tool (creating a T), and use to tighten and secure the faucet.
www.rohlhome.com INSTALLATION INSTRUCTIONS ROHL WARRANTY POLICY Please contact the local retailer or showroom where you purchased this product for all warranty related claims. SPARE PARTS & SERVICE 3 Parker Irvine, California 92618-1605 Ph. 800 777 9762 Fax 714 557 8635 We would like to thank you for purchasing a ROHL product and take this opportunity to invite you to look at other luxury products. Please contact us to recieve our latest catalogue. rohlinfo@rohlhome.com - www.rohlhome.
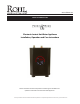
www.rohlhome.com INSTALLATION INSTRUCTIONS Electronic Instant Hot Water Appliance Installation, Operation and Care Instructions Please read these instructions fully before commencing the installation and operation of the Electronic Instant Hot Water Appliance Consult your local ROHL showroom for additional information and specifications. For complete warranty details and a list of showrooms, go to www.rohlhome.com.
www.rohlhome.com INSTALLATION INSTRUCTIONS We are delighted that you have chosen the electronic instant hot water appliance to compliment your instant hot water Dispenser. This unique electronic instant hot water appliance will save you time and effort when requiring near boiling water for making tea and coffee and we are sure you will discover many new uses each day.
www.rohlhome.com INSTALLATION INSTRUCTIONS SAFETY INSTRUCTIONS PLEASE READ BEFORE YOU START The alert symbols displayed on the right point to important safety information to make you aware of potential hazards that can cause serious injury or death. Please pay special attention to the information following these warning alerts. Failure to comply with these instructions could result in property damage, serious injury or death.
www.rohlhome.com INSTALLATION INSTRUCTIONS IMPORTANT SAFETY INSTRUCTIONS PLEASE READ ALL INSTRUCTIONS CAREFULLY When using all electrical appliances, basic safety precautions should always be followed including the information below: To protect against electrical shock, do not place cord, plugs or unit near or in water or other liquids and do not operate the electronic instant hot water appliance controls or power socket with wet hands.
www.rohlhome.com INSTALLATION INSTRUCTIONS INSTALLATION REQUIREMENTS Electrical Requirements A standard 120v electrical outlet is required under the sink. If possible, use a separate circuit dedicated to your Hot Tank. It is recommended that a separate circuit serving only your electronic instant hot water appliance be provided or use an outlet that can be turned on/off by a switch. This electronic instant hot water appliance is equipped with a power supply cord with a power plug.
www.rohlhome.com INSTALLATION INSTRUCTIONS PREPERATION FOR INSTALLATION Unlike other household hot water appliances, this electronic instant hot water appliance is Non Pressurised for safety reasons. For this electronic instant hot water appliance, the Instant Hot Dispenser is placed before the electronic instant hot water appliance, creating an “open vent” system and consequently no pressure is built up inside the appliance.
www.rohlhome.com INSTALLATION INSTRUCTIONS INSTALLATION CONTINUED Step 2 – Connect Dispenser The electronic instant hot water appliance inlet connection is a 3/8” BSP male threaded connector. The outlet connector is a 3/8” BSP male thread connector. Check the connections type and size on the instant hot water Dispenser for the inlet and outlet connections. Screw on the inlet and outlet pipe the correct connectors and tighten with a wrench.
www.rohlhome.com INSTALLATION INSTRUCTIONS INSTALLATION CONTINUED Step 4 – Electrical Connection Ensure that the installation area is dry and no water has spilled. Connect the plug to the power socket and turn on the power socket at the switch. The electronic instant hot water appliance display panel will now light up with the on / off button illuminated.
www.rohlhome.com INSTALLATION INSTRUCTIONS MAINTENANCE AND CARE INSTRUCTIONS CONTINUED Flushing the Instant Hot Water Tank It is recommended that the user flushes through the system completely by drawing off the instant hot water and allowing to reheat and repeating the process for a further 2 or 3 times to ensure the system is fully operational.
www.rohlhome.com INSTALLATION INSTRUCTIONS TROUBLE SHOOTING PROBLEM Water and Steam is spitting from the instant hot water Dispenser spout POSSIBLE CAUSE Unit is boiling WHAT TO DO Turn instant hot water Dispenser handle on and release at least 1 pint of water. Adjust the water temperature on the display to a lower setting. Check aerator is not blocked Bleed system to remove any air Re-Prime bladder to allow correct operation. Water is not hot.
www.rohlhome.
www.rohlhome.com INSTALLATION INSTRUCTIONS Customer Services : ROHL LLC 3 Parker Irvine, California 92618-1605 Phone 800-777-9762 www.rohlhome.com Guarantee Void Unless The Water Filter Is Replaced Every 6 Months Issue : PRV114112017 Rohl & Perrin & Rowe are Registered trade marks. Consult your local ROHL showroom for additional information and specifications. For complete warranty details and a list of showrooms, go to www.rohlhome.com.
www.rohlhome.com INSTALLATION INSTRUCTIONS • Instant Hot Tap • ® • CARTRIDGE REPLACMENT The filter cartridge in your instant hot tap system needs to be changed every six months in order to ensure the system works at its optimum performance. Changing the filter cartridge is a simple matter: 1. Switch off the heater tank either at the mains or by pressing the centre button on the heater tank touch screen. ***Important Notice*** – run off all hot water until just cold water is coming out of the tap. 2.
www.rohlhome.com INSTALLATION INSTRUCTIONS • Instant Hot Tap • ® • Filter Installation 1. Fixing Mounting Bracket IT IS VERY IMPORTANT THAT BEFORE YOU START INSTALLING THIS FILTER SYSTEM YOU ENSURE YOU HAVE READ THE INSTALL GUIDES THAT CAME WITH THE TAP AND THE HEATER TANK. First you will need to remove the filter sump. This can be done by turning the sump a quarter turn anti-clockwise and pulling down.