
Specification


3
w
ww.rohlhome.com
Installation Instructions
Consult your local ROHL showroom for additional information and specifications. For complete warranty details and a list of showrooms, go to www.rohlhome.com.
INSTALLATION AND CARE & MAINTENANCE GUIDE
Installation guide
Installation must comply with local plumbing codes
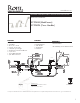
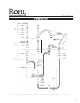
Disassemble the nut (A), the T connection (B) and the fixing kit (C).
Fix the shank (R) the washer and then the metal nut with disk.
Introduce the spout body (D) in the spout shank (R) and tighten, using the block connection (S) and then the knob (T)
Assemble the T connection (B) placing, then the metal ring first and then the O - ring washer.
Fix the T connection (B), then the O - Ring, the metal ring and the nut (A).
Assemble the valve body (I), placing the metal nut with disk and then the rubber washer.
Introduce the valve body (I) in the hole of the deck and tighten, placing the O - Ring washer and the escutcheon.
--- Assemble the handle (G) screwing the cover valve (F). ATTENSION: Be sure the handle has no play.
--- Lock the valve body (I) from the underside with the brass nut.