
User Manual


The Spectrum Application
R&S
®
FPC
117User Manual 1178.4130.02 ─ 05
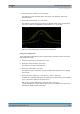
Selecting the marker type
You can change the marker type for markers 2 to 6.
Because marker 1 is the reference marker for the delta markers, it is always a normal
marker. Therefore, it cannot be converted to a delta marker.
1. Activate a marker and a delta marker.
2. Select the delta marker if it is not already selected.
3. Select the "Marker Type" menu item.
The delta marker turns into a normal marker. Its label changes accordingly (from
"D<x>" to "M<x>") and its coordinates are now absolute values.
Removing markers or delta markers
You can remove markers or delta markers at any time you want.
1. Press the "Mkr" key to open the marker menu.
2. Select the marker or delta marker you want to remove with the corresponding
"Marker <x>" softkey.
The R&S FPC selects the corresponding marker or delta marker.
3. Remove the marker or delta marker by selecting the corresponding menu item
again.
The R&S FPC deletes the selected marker or delta marker.
Deactivating markers
If you delete marker 1 (M1), all delta markers that are relative to that marker are also
deleted. Other markers remain.
Instead of removing individual selected markers, you can also remove all markers at
the same time.
1. Press the "Mkr" key to open the marker menu.
2. Select the "All Marker Off" menu item.
The R&S FPC deletes all markers and delta markers.
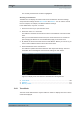
12.9.2 Automatic Marker Positioning
The R&S FPC has several useful tools to position markers automatically (for example
on a peak level) and tools that change instrument settings based on the current marker
position.
Positioning markers automatically
1. Press the "Mkr→" key to open the marker positioning menu.
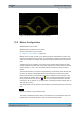
Marker Configuration