
Owner`s manual


7
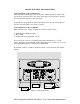
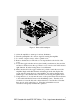
Figure 2. Removable hatchplate
1) Allow the amplifier to warm up for at least 30 minutes.
2) Turn the preamplifier off so that no signal is entering the amplifier
3) Loosen the 4 captive screws on the top hatch cover.
4) Remove the hatch cover. The bias tool is snap attached to the inside of the
cover.
5) Locate the toggle switches and associated small potentiometers (they are blue
and have a small screw in the top). There is a set of six for each of the left and
right channels. Note the biasing meter for each channel
6) Make sure that all of the toggle switches are pointed towards the rear of the
amplifier. Begin with either channel and starting from the left, flip the first
toggle switch towards the front of the amplifier. You will see that the meter
will rise up to show that the tube’s current is now flowing through the meter.
7) Using the bias tool, slowly turn the screw on the potentiometer that is adjacent
to the switch until the bias meter reads 40 miliamps (mA). Turn the screw
clockwise to lower the bias and counterclockwise to raise the bias. Note that
there are two ends on the bias tool. Using the end with the recessed
screwdriver will greatly facilitate this operation.
PDF Created with deskPDF PDF Writer - Trial :: http://www.docudesk.com