
Owner`s manual


4
CAUTION – Do not operate the amplifier unless it is connected to a
loudspeaker.
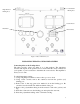
Connecting ATLAS to the preamplifier:
The input connections from the preamplifier are made via RCA jacks on the rear
of the amplifier. See figure 2. Be sure to use high quality interconnect cables as
they do make a difference
Note that if you have a variable output CD player you can drive the ATLAS with
it directly.
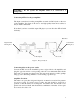
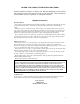
Figure 2. Rear panel layout
Connecting Atlas to the power outlet:
Connect the IEC end of the detachable power cord provided to the amplifier, and
plug the opposite end into corresponding outlet. It is recommended that both the
Atlas and your preamp are plugged into the same wall outlet if possible (perhaps
using a power outlet strip). This is to avoid creating a ground loop.
Amplifier Location:
The Atlas is an open tube design and depends on natural convection flow patterns
for proper cooling. To ensure proper cooling, the unit should be located in a
position so that the airflow is not impeded. In addition, the unit should not be
placed in an enclosed shelf, and should have a minimum of 6 inches of free space
above and to the sides of it.
Right Channel
Bindin
g
Pos
t
Left Channel
Bindin
g
Pos
t
Main Fuse
Power In RCA Inputs