
Manual
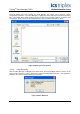

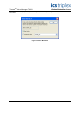
Table Of Contents
- 1. Description
- 2. System Requirements
- 3. OPC Requirements
- 4. Valve Manager Application
- 4.1. Installation
- 4.2. Running the Valve Manager application
- 4.3. Creating a Data Source
- 4.4. Creating a Project
- 4.5. Working with Multiple Projects
- 4.6. Editing a Project
- 4.7. Removing a Project
- 4.8. Adding, Removing, and Renaming Valves
- 4.9. Configuring a Valve Profile
- 4.10. Applying the Same Profile to Multiple Valves
- 4.11. Initiating a Test
- 4.12. Recording Automated Tests and External Events
- 4.13. Clearing Valve Test History
- 4.14. Controlling the Monitor
- 4.15. Project Tree
- 4.16. Main Window

Trusted
TM
Valve Manager T8031
Issue 2 Oct 05 PD-T8031 37
4.9. Configuring a Valve Profile
Each valve associated with a project must have a profile. A valve’s profile contains information the
Valve Manager uses to initiate tests, apply pass/fail criteria to a test, and to display the test results. To
configure a valve’s profile, first select the valve in the Project Tree view. Selecting “Valve | Edit Valve
P
rofile” from the main menu, or clicking on the “Edit Profile” button on the toolbar will bring up the
Valve Profile wizard.
4.9.1. Profile Strings
The “Profile Strings” dialog box allows you to associate a textual description with the feed-back input
states for a valve. The enumerated states correspond directly to the “_VPS” variable values for a
particular valve. Unused states may be left blank. Once the state names have been entered, click the
“Next” button to continue.
Figure 36 Profile Strings