VW32RT-UM001D-EN-E 5/1/07 3:48 PM Page 1 RSView 32 ® RUNTIME USER’S GUIDE PUBLICATION VW32RT-UM001F-EN-E–July 2011 Supersedes Publication VW32RT-UM001D-EN-E
Contact Rockwell Customer Support Telephone — 1.440.646.3434 Online Support — http://support.rockwellautomation.com Copyright Notice © 2011 Rockwell Automation Technologies, Inc. All rights reserved. Printed in USA. This document and any accompanying Rockwell Software products are copyrighted by Rockwell Automation Technologies, Inc. Any reproduction and/or distribution without prior written consent from Rockwell Automation Technologies, Inc. is strictly prohibited.
Contents Chapter P Preface About the documentation ............................................................................ P-1 Technical support services ........................................................................ P-1 When you call ............................................................................................................... P-2 Chapter 1 Installing RSView32 Runtime Determining system requirements ........................................................
Starting RSView32 Runtime manually.......................................................................2-3 Starting RSView32 Runtime automatically ...............................................................2-3 Step 4 – Opening the project ......................................................................2-5 Using the Runtime Project Manager..........................................................................
P Preface RSView32™ Runtime is a package for running automation applications developed in RSView32 Works. RSView32 Runtime runs on Microsoft® Windows® Server 2003, Microsoft Windows XP, Windows 2000, Windows Vista, Windows 7, and Windows Server 2008. About the documentation The RSView32 Runtime documentation includes: Help, which contains procedures and reference information. Readme file, which contains additional information about RSView32. Read this file before you begin working with the software.
When you call When you call, be at your computer and prepared to give the following information: the product serial number You’ll find this number on the Activation disk label and in the Help About dialog box that you access from the RSView32 Project Manager.
1 Chapter Installing RSView32 Runtime This chapter describes: hardware and software requirements how to install and activate RSView32™ Runtime how to uninstall RSView32 Runtime Determining system requirements The hardware and software you use with RSView32 Runtime depends on the demands your project places on the system. The greater the demand, the more powerful a system you need. The recommendations below are based on field experience.
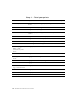
Step 1 – Total your points For If you are Add points RSView32 project running displays, or editing your project using RSView32 Works 2 using more than 30,000 tags 2 using more than 5,000 tags 1 changing displays, on average, more than 5 times per minute 1 using more than 200 objects in displays 2 using ActiveX® controls in displays 2 monitoring more than 1,500 tags for alarms 2 monitoring more than 300 tags for alarms 1 using typically more than 5 active clients 2 using at least 1 c
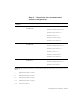
Step 2 – Determine the recommended system configuration For this number of points Minimum hardware you need Minimum software you need 8 or more Pentium® II 400 MHz 128 MB RAM Windows® XP Professional* or Windows 2000 Professional** or Windows Server 2003*** or Windows Vista**** or Windows 7 Professional or Windows Server 2008***** 6 to 7 Pentium II 300 MHz 128 MB RAM Windows XP Professional* or Windows 2000 Professional** or Windows Server 2003*** or Windows Vista**** or Windows 7 Professional or Wi
Installing RSView32 Runtime The steps below explain how to install RSView32 software and user’s guides from a CD–ROM to your computer. If you choose not to install the user’s guides, you can view them from the CD. Installing RSView32 Runtime on Windows Server 2003, Windows XP, Windows 2000 and Windows Vista As part of the installation process, RSView32 Runtime creates program folders and modifies registry entries.
If you removed the activation or if you are installing RSView32 Runtime for the first time, insert the Activation disk in the diskette drive and click Activate. For details about activation, see “Activating RSView32 Runtime” on page 1-5. 6. When installation is complete, restart Windows. If you choose not to restart Windows now, be sure to restart it before running RSView32 Runtime for the first time. If you plan to use RSView32 as an OPC server, you must configure Microsoft® Distributed COM (DCOM).
FactoryTalk® Activation FactoryTalk Activation provides a secure, software-based system for activating Rockwell Software products and managing software activation files. With FactoryTalk Activation, there is no need for a physical “master disk” or any physical media; instead, activation files are generated and distributed electronically. Important: EvRSI activation is replaced by FactoryTalk® Activation in this release.
3. Save the activation file or files. Activation files must have a .lic extension. You can save the files to the default location: On Windows 2003 and Windows XP the default location for FactoryTalk activation files is:.
Using borrowed activations RSView32 supports borrowed activations for development computers. A borrowed activation is retrieved from a pool of available activations on the activation server, and expires after a specified length of time. Once a borrowed activation is checked out to a particular computer, the computer can disconnect from the network.
To open the Activation Help: To open FactoryTalk Activation Help. Open FactoryTalk Activation Manager, click Help or Learn More . . . FactoryTalk® Activation Grace Period FactoryTalk provides customers with access to critical software components for a grace period of 7 days regardless of availability of valid activations. When a product is successfully activated, all grace period records will be cleared and the product will proceed with valid activations.
4. 1–10 When the Uninstall program is finished, restart Windows.
2 Chapter Running a project This chapter outlines: the steps for setting up and running your project how to add files to a project how to stop a project Setting up and running your project Once you have installed RSView32™ Runtime on the target computer, you are ready to set up and run the project you have created in RSView32 Works. Summary of steps 1. Move the project to the target computer. 2.
Step 1 – Moving the project If your project will be running on a different computer than it was developed on, you must move the project using an external tool such as Windows® Explorer, My Computer, or the File Manager. Be sure you move all files referenced in your project, including any files outside of the project directory. You do not have to move the project to the same directory in which it was created.
3. Select the language or locale whose settings you want to use. 4. Verify or customize the settings on the Number, Time, and Date tabs. 5. Click OK. For more information, see your Windows documentation. Step 3 – Starting RSView32 Runtime You can start RSView32 Runtime manually, or you can set up RSView32 Runtime to start automatically when Windows starts.
4. To start RSView Works when Windows starts, browse to the location of the RSV32.exe file, and then click the file name. The path is \Program Files\Rockwell Software\RSView\RSV32.exe. 5. To start RSView Works and open a project when Windows starts, specify the path to RSView32 and to the project. For example, to specify a project called Norm’s Bakery, type: “C:\Program Files\Rockwell Software\RSView\RSV32.exe” “C:\Program Files\Rockwell Software\Samples\Norm’s Bakery\Norm’s Bakery.
Step 4 – Opening the project To open a project: 1. In the RSView32 Runtime window, click Open on the File menu. 2. In the Open dialog box, locate the project, click the project’s .rsv file (for example, Norm’s Bakery.rsv), and then click Open. Using the Runtime Project Manager . . . any related components developed in RSView32 Works are listed here. To run a component, double-click it. When you select an icon here . . .
open the command line to manually enter RSView32 commands— to open the command line, double–click the Command Line icon run individual project components—to run a component, select the icon for the editor that created the component, and then double–click the component name run a project—for details about running a project, see “Step 7 – Running the project” on page 2-9 Step 5 – Setting up the channel, OPC server, or DDE server Before you can run a project, you must load and configure drivers for the progra
Connecting to OPC servers and DDE servers To connect to a wide range of local and remote devices, install and configure the appropriate OPC or DDE server. For details about configuring the server, see your server documentation. To change the OPC node’s server name and access path or the application and topic name for the DDE server your project will use, use the NodeSwitch command or use the Node editor. For details about the NodeSwitch command, see Appendix A, RSView32 commands, or see Help.
2. Click the Application Paths tab. 3. In the Name field, select the editor that was used to create the component. Any components associated with the editor are displayed in the Components field. 4. In the Default Path field, type the new path or click Browse to select the new path. 5. Click Apply Default Path. The components are updated to the new path. 6. 2–8 Click OK.
Step 7 – Running the project You can run the project manually or you can set up the project to run automatically when Windows starts. Running a project manually In the Project Manager, click Run Project. Click this button to run a project. Running a project automatically To automatically start RSView32 Runtime and run a project each time Windows starts, include an RSView32 Runtime shortcut in the Windows Startup folder, as described on page 2-3.
Adding files to a project You can add new files to a project any time by copying or moving the physical file to the target computer and then adding the file’s name to the Project Manager. To add files: 2–10 1. In Windows Explorer, My Computer, or File Manager, copy or move the file you want to add into the appropriate folder in the project. For example, add a graphic display file to the Gfx folder. 2.
Changing data logging paths You can change the data logging paths at runtime. You can change the primary and secondary paths for dBASE® IV data log models, and the backup path for ODBC data log models. You cannot change the ODBC database using RSView32 Runtime. After you change the logging path you must stop and restart data logging for the changes to take effect. To edit the logging paths: 1. In the Project Manager, open the Data Log folder. 2. Open the Data Log Path editor. 3.
When a project stops When a project stops, the following occurs: open displays and RSView32 components close running data log models stop running derived tag files stop running event files stop alarm monitoring stops OPC/DDE (real-time) data server stops If a shutdown macro has been specified in the Startup editor, the macro runs once the above components have closed and stopped running.
3 Chapter Using security This chapter describes how to: add, delete, or change users log into a running project change passwords This chapter is applicable only for projects that use security. Editing the users for a project If your project has been set up with security, only users or groups of users listed in the User Accounts editor can log in and out of the project.
For details about the fields in the User Accounts editor, see Chapter 10, Adding security, in the RSView32 User’s Guide. Logging in at runtime If you want users to log in, your project must include a way for users to access the RSView32 Login dialog box. One way is to create a button in RSView32 Works. When configuring the button, use the Login command as the press action. When the button is pressed, the RSView32 Login dialog box appears.
Using the electronic signature button If your project uses the electronic signature button, users must enter their names and passwords in order to initiate the button’s action. Optionally, you can set up the button so that a supervisor must also enter a name and password to authorize the transaction. For more information about using the signature button at runtime, see Chapter 10, Adding security, in the RSView32 User’s Guide.
A Appendix RSView32 commands This appendix lists the RSView32™ commands that are supported in RSView32 Runtime. Commands that are not listed here will not run in the runtime package. For more information about commands and their usage, see the RSView32 User’s Guide. = (Equal) [&] = Writes the value resulting from an expression to a tag. A [&] Forces the command to be executed asynchronously, which makes the command faster.
You can attach security to the = (Equal) command just as you can for any RSView32 command. For more information about security, see Chapter 10, Adding security, in the RSView32 User’s Guide. For more information about expressions, see Chapter 14, Creating expressions, in the RSView32 User’s Guide. Examples: The = (Equal) command &Tag1 = Tag1 + 1 Evaluates the command asynchronously. Increases the value of Tag1 by 1. Tag1 = Tag2 Sets the value of Tag1 to be the same as Tag2.
Abort Abort [parameter] Closes one or more windows. Without a parameter, the Abort command closes the window that has focus. [parameter] One of the following: me Closes the window from which the command is executed. editor Closes the specified editor, such as a graphic display or an alarm summary. To name the editor, use the RSView32 command that opens the editor. See the examples below. * Closes all windows. Ctrl–F4 also closes the active window.
Account Account Opens the User Accounts editor. To prevent security from being changed at runtime, restrict access to this command. Acknowledge Acknowledge [tag_name] Acknowledges an alarm or a group of alarms. This command gives no indication that it has run but will display a message if not executed properly. If an acknowledge bit is associated with an alarm, acknowledging the alarm sets the acknowledge bit. [tag_name] The name of the tag to be acknowledged.
Acknowledge [tag] Acknowledges the alarm for the tag associated with the highlighted object in the active graphic display. AcknowledgeAll AcknowledgeAll Acknowledges all outstanding alarms. This command runs more quickly than Acknowledge *. It gives no indication that it has run but will display a message if not executed properly. If an acknowledge bit is associated with an alarm, acknowledging the alarm sets the acknowledge bit.
ActivityLogSend ToODBC ActivityLogSendToODBC [/Wn] [/Uuser_name] [/Ppassword] Exports activity log data from DBF files to the ODBC database. The connection to the ODBC database is maintained for the length of time specified by the wait (/W) parameter. A valid ODBC data source name. If the name has a space embedded in it, enclose the name in quotes (“”). The name of a table in the ODBC database where the data will be exported.
ActivityOn ActivityOn Starts activity logging. Activity logging is on by default. ActivityPrintOff ActivityPrintOff Turns off the printing of activity logging. By default, activity log printing is turned on when you start an RSView32 project. ActivityPrintOn ActivityPrintOn Turns on the printing of activity logging if it has been turned off by the ActivityPrintOff command. By default, activity log printing is turned on when you start an RSView32 project.
[OutOfAlarm]Indicates that the tag has gone out of or [Out] alarm. [InAndOut OfAlarm] Indicates that an alarm has occurred, but the tag is again immediately out or [InAndOut] alarm, such as a digital change–of– state alarm. of [TagType] The type of tag, which must be one of: [/A] Analog [/D] Digital If you don’t specify either /A or /D, the alarm is assumed to be analog. [/VTagValue] A floating–point value associated with the alarm event.
[/HTime– stamp] The time stamp associated with the alarm transaction, in the format: [Date]: The 24–hour military format for time. You must use this format for indicating the time. [Date] A date that can be specified in the same format as the Windows® date style configured for your computer. If you want to use a VBA program to set the date, you can use any date format that conforms to the MFC class COleDateTime. If you do not specify a date, the current date is used.
AlarmLog Remark AlarmLogRemark [“Text”] [/P] [/Sn] [/R] [/Ttagname] Adds the specified text string as a transaction in the alarm log file. [“Text”] [/P] A text string, up to 132 characters long. The text can contain the following placeholders: [\D] the current date [\T] the current time [\N] the tag name. If the tag is in a local tag database, you can also use the placeholders [\S] tag description, and [\U] tag units.
If both the /P parameter and the /Sn parameter are specified, the prompt dialog box will display the alarm severity at runtime, but the operator cannot change the severity. AlarmLogSend ToODBC [/R] Logs the remark to a printer as well as to the alarm log file. If the alarm severity is not specified (/Sn parameter), the printer for Severity 1 is used. If no printer is assigned to the specified severity, the alarm log remark is not printed.
This parameter allows frequent exports to the database without having to connect every time. Once the connection is established, RSView32 waits the specified time and, if another command is received to export data, the command is executed and the wait timer is reset. If no command is received within the wait time, the connection is closed. AlarmOff [/Uuser_name] A user ID that is valid on the data source. [/Ppassword] A password that is valid on the data source. AlarmOff Stops alarm monitoring.
AlarmViewer AlarmViewer Opens the Alarm Log Viewer. AppAbort AppAbort Closes the specified Windows application. The name of a Windows application exactly as it appears in the application’s title bar. Example: The AppAbort command If Notepad is open and contains an untitled file, the Notepad title bar will read Untitled – Notepad.
AppStart AppStart Runs the specified application, which can be another Windows application or an “application extender” you’ve programmed. The path and executable required to start the program. Examples: The AppStart command AppStart c:windows\notepad c:\autoexec.bat Opens Notepad and displays the autoexec.bat file. AppStart c:\Program Files\Plus!\Microsoft Internet\Iexplore.exe Opens Microsoft® Internet Explorer.
ComStatusOn ComStatusOn Starts logging of communication errors if RSView32 is set up to do so. To log communication errors, ensure the Communications category is selected in the Activity Log Setup editor. To have error logging automatically start when a project starts, open the Startup editor and click the Communication Status check box. DatabaseSync DatabaseSync Makes RSView32 convert the tag database into binary format the next time the project opens.
DataLogChangeR ate DataLogMerge ToPrimary DataLogChangeRate [unit] Changes the periodic log rate. The change affects the current logging session only, and won’t be retained if data logging is stopped and restarted. The name of a data log model, without a file extension. The numeric portion of the time interval for the log rate. For example, if you want to log data every 20 seconds, the value is 20. The value must be an integer from 1 to 64,000.
DataLogNewFile DataLogNewFile Creates a new data log file for the specified model or for all models, on the path RSView32 is currently logging to (either the primary path or the backup path). If RSView32 is logging to an ODBC database, RSView32 logs an End snapshot and then a Begin snapshot when you issue this command. DataLogOff The name of the data log model, without a file extension. * Creates new files for all models that are currently running.
DataLogPath DataLogPath Opens the Data Log Path editor. You can use the editor to change the primary and secondary paths for dBASE® IV data log models, and the backup path for ODBC data log models. You cannot change the ODBC database using the Data Log Path editor. DataLogRename File The name of a data log model, without a file extension.
DataLogSwitch Back DDEExecute DataLogSwitchBack Switches data logging back to the primary dBASE IV file path or ODBC database for the specified model or for all models. This command switches data logging for a model only if the model is running, RSView32 is logging data to the secondary or backup path, and the primary path or ODBC database is available. For .dbf files, RSView32 creates a new set of files when it switches back to the primary path.
Examples: The DDEExecute command DDEExecute RSlinx|__Drivers [Who_Active()] Sends the Who_Active command, which displays the default RSLinx® RSWho window. Drivers must be preceded by two underscores. DDEExecute WINAB5|SYSTEM .SR 3 Sends WINtelligent™ LOGIC 5 (WINAB5) the Dot command SR 3, which means search for Rung 3. DDEExecute WINAB5|SYSTEM .UI Sends WINtelligent LOGIC 5 (WINAB5) the Dot command UI, which displays the System Information window.
Define Define [string] Creates a symbol. A symbol is an abbreviation for a command or a command with parameters. The symbol can be used anywhere a command can be used. You cannot nest symbols. Symbol definitions are valid only during the current session; they must be re–defined each time RSView32 is restarted. Symbols are typically defined in a startup or login macro. The abbreviated command. It cannot contain spaces. [string] An existing command with or without parameters.
DerivedOff DerivedOff Stops running the specified derived tag file. DerivedOn The name of a derived tag file without a file extension. DerivedOn Starts running the specified derived tag file. The name of a derived tag file without a file extension. To have a derived tag file automatically start when a project starts, open the Startup editor, click the Derived Tags check box and specify a file.
controller or server, unless the Display On-Screen Keyboard option is selected (in the Behavior tab of the Display Settings dialog box). [/U] Updates tag values in all input fields when the display first opens. [/O] Suppresses the display of the key list. [cache] Specifies how to load the specified graphic display into the display cache, as follows: /Z Loads the specified graphic display into the cache (but does not make it visible), so the display appears quickly when it is first used.
[/Ttag_name] One or more tags, separated by commas and no spaces, to be substituted for placeholders in the display. If the display does not contain placeholders, do not use this parameter. [/Hnnn] Specifies the height of the graphic display in pixels. [/Wnnn] Specifies the width of the graphic display in pixels. [/Min] Runs the graphic display minimized (as an icon). [/Max] Runs the graphic display maximized (full–screen size).
screen, using the file called Names to replace tag placeholders with tag names. Display Picture /H300 /W400 /CC Makes the graphic display called Picture 300 pixels high and 400 pixels wide, and positions the display in the center of the screen.
DownloadAll DownloadAll Writes the values in all input fields of the active graphic display to the programmable controller or server. This command operates on the active graphic display. If no display is active, this command is ignored. PgDn also downloads all the values in the input fields. DriverPrimary DriverPrimary Switches from the secondary driver to the primary driver on the specified channel.
This command is normally used in macros to prevent the contents of the macro from being logged. EchoOn EchoOn Restores logging to normal after an EchoOff command. EventOff EventOff Stops running the specified event file. EventOn The name of an event file without a file extension. EventOn Starts running the specified event file. The name of an event file without a file extension.
FTDataServerOff FTDataServerOff Stops running the FactoryTalk live data server. This command has no parameters. FTDataServerOn FTDataServerOn Runs the FactoryTalk live data server, allowing FactoryTalk clients to read RSView32 tags and other live data. This command has no parameters. FTDataWrite Disable FTDataWriteDisable FTDataWrite Enable FTDataWriteEnable HandshakeOff HandshakeOff Stops FactoryTalk Clients from writing values to RSView32 tags. This command has no parameters.
Help Help [word] [/Ffile] Displays a Windows help file. [word] A word you want to search for in the help file. When you specify a search word, the command will either: open the help file at a topic if the word uniquely identifies that topic open a list of related topics [/Ffile] The name of a Windows help file. The default help file is for RSView32. If no search word is specified, the command opens the RSView32 help file and displays the Contents topic.
Examples: The Identify command Identify Hopper1\Divider Runs the Identify command or macro for the tag Hopper1\Divider, whether or not the tag is in alarm. Identify [tag] Runs the Identify command or macro for the selected tag in the active graphic display. Identify Runs the Identify command or macro for the most recent, most severe unacknowledged alarm. Invoke Invoke Use this command with ActiveX objects.
object The name of the ActiveX object as specified in the Object Name dialog box in the Graphic Display editor. method The name of a function or sub–routine in the ActiveX object. The method is initiated by an external event such as the Invoke command. parameter The tag name or constant that the method will use. You must specify all of the parameters, even those that are optional. tag_name=file.object.method(parameter1, parameter2, . . .
LInsertStringTag LInsertStringTag [sheet] [tagname series] Use this command to select one or more string tags from the tag database and insert the tag names to an Excel spreadsheet if the tags do not exist in the spreadsheet. [sheet] The spreadsheet name of Excle file. [tagname series] A series of tag names. Make sure Microsoft Excel has been installed before using this command. If the inserted tags have already existed in the Excel file, there will be a warning message logged into Activity Bar.
LTagSubstitute LTagSubstitute [language] [sheet] Use this command to substitute string values of all the tags specified in the selected spreadsheet with the selected language. [language] The selected language name. [sheet] The spreadsheet name of Excel file. Space is not allowed in Excel spreadsheet name. The Excle file is created automatically with the project name and located in the current project folder by default.
Examples: The Monitor command Monitor /THopper1\Flow Opens a tag monitor displaying the tag Hopper1\Flow. Monitor /THopper1\Flow /THopper\Temp Opens a tag monitor displaying the tags Hopper1\Flow and Hopper\Temp. Monitor /T* Displays information on the first 100 tags in the tag database. Monitor /THopper*\Divider Displays information on the first 100 tags called Divider from all folders beginning with Hopper. Monitor Bread Displays the tag monitor file called Bread.
Node Node Opens the Node editor. NodeDisable NodeDisable Disables the specified node. NodeEnable The name of the node you want to disable. NodeEnable Enables the specified node. NodeSwitch The name of the node you want to enable. NodeSwitch Permanently changes a device node’s address, an OPC® node’s computer name, server name, and access path, or a DDE node’s application and topic.
When you use the NodeSwitch command to change a node’s address or server information, the change appears in the Node editor’s spreadsheet. If the Node editor is open when you use the command, the change won’t appear until you’ve refreshed the display by closing and re–opening the editor. Password Password Displays the Password dialog box so users can change their password. Users must already be logged in to use this command. Pause Pause Specifies a pause between the execution of two commands.
numeric and string input objects buttons objects to which you have assigned object keys This command operates on the active graphic display. If no display is active, this command is ignored. See also PrevPosition and NextPosition. PrevPosition PrevPosition Moves focus to the object with the previous index number. This command operates on the active graphic display. If no display is active, this command is ignored. Shift–Tab also moves focus to the object with the previous number.
display from which the command is executed). [/Wait=tttt] Specifies the amount of time to wait before starting to print, where tttt is the time in milliseconds. If you use the /U parameter, specify enough time to allow for the upload of tag values. If you do not specify a time, the default is 2000 milliseconds. [/U] Initiates an update of tag values in all input fields before starting to print. This parameter is not necessary with input fields that are updated continuously.
reflected in the printout. To ensure the printout is up-to-date, save the display before printing it. Project Project Obsolete. Use ProjectHide, ProjectRun, ProjectShow, or ProjectStop. ProjectHide ProjectHide Hides the Project Manager so it is not visible on the screen. Ctrl-Alt-P also hides the Project Manager if it is visible. ProjectRun ProjectRun Starts running the project. This is the same as choosing the Run Project button in the Run Mode tab of the Project Manager.
If the specified display is of the Replace or Overlay type, and if no other Replace or Overlay displays are open, nothing happens when you issue this command. PushBack PushBack Moves the specified graphic display behind all other windows. If the specified graphic display is of the On Top type, PushBack positions the display behind any other open On Top displays, and in front of any open displays of the Replace or Overlay type.
Tag Write category. Specify where to send Tag Write errors using the Categories tab of the Activity Log Setup editor. The name of an analog tag.
Ramp Hopper1\Level delta If Hopper1\Level is 1000 and delta is –200, the command writes 800 to the programmable controller. RecipeRestore RecipeRestore Reads the values from a recipe file into all input fields in the active graphic display. This command is used with the Recipe field. The name of the file, without a file extension, tag values are read from. This command operates on the active graphic display. If no display is active, this command is ignored.
To log comments, the Remarks category must be selected in the Activity Log Setup editor. RTDataServer Off RTDataServerOff Stops running the RSView32 real-time data server. RTDataServerOn RTDataServerOn [/Quiet] [/NetDDE] The RSView32 OPC or DDE server is also known as the real-time data server. This command runs the RSView32 real-time data server, allowing OPC and DDE client applications to read (but not write) tag values. To enable writes, use the RTDataWriteEnable command.
correctly, RSView32 displays a dialog box that allows you to specify the setting when you issue the command. [/NetDDE] Enables RSView32 as a NetDDE server to remote DDE clients. If the real-time data server is already running, this parameter is ignored. By default, writes are disabled. Therefore, the RTDataWriteDisable command is required only after the RTDataWriteEnable command has been used.
SendKeys SendKeys <“keystring”> Sends the specified keystrokes to the active window. <“keystring”> A list of keys. The quotes must be included. The following syntax rules apply: Use braces { } to enclose special keys, such as F3 or Enter; for example, “{Enter}” sends Enter. Use ^ to send a control key. For example, “^{F2}” sends Ctrl–F2. Use + to send a shift key. For example, “+{F3}” sends Shift–F3. Use % to send an alt key. For example, “%A” sends Alt–A.
Set [&]Set [/V] Writes a value to a tag. IMPORTANT If a node has been disabled, the Set command changes the value in the value table but not in the programmable controller. [&] Forces the command to be executed asynchronously, which makes the command faster. [/V] Performs a read immediately after the write to verify that the value was altered in the programmable controller or server. This parameter is useful if the network is in poor condition or susceptible to noise interference.
For digital tags: Numeric value of 0 or 1. Tag’s on or off label specified in the tag database. Setting a digital tag to its on label writes the value 1, and setting the tag to its off label writes the value 0. Name of another analog or digital tag. If it is an analog tag with a value that is not 0, the value 1 is written to the digital tag, otherwise the value 0 is written. For string tags: String enclosed in quotation marks. The string can contain any character and can include spaces.
Set String\string1 “open” String\string1 is a string tag. This command writes “open” to the programmable controller or server. SetFocus SetFocus Sets the focus to a particular graphic display. Silence The name of a graphic display file without a file extension. Silence If the alarm for the specified tag is configured to use the internal bell, this command silences the computer’s sound.
Summary Summary [/Xnnn] [/Ynnn] Runs the specified alarm summary file. Suppressed The name of an alarm summary file without a file extension. [/Xnnn] Positions the X coordinate of the alarm summary window to nnn pixels from the left edge of the screen. Valid range depends on screen resolution. [/Ynnn] Positions the Y coordinate of the alarm summary window to nnn pixels from the top edge of the screen. Valid range depends on screen resolution.
Toggle Toggle [/V] Reads the tag’s value and writes back a 1 or 0 as follows: if the tag value is 0, Toggle changes it to 1 if the value is not 0, Toggle changes it to 0 [/V] Performs a read immediately after the write to verify that the value was altered in the programmable controller or server. This parameter is useful if the network is in poor condition or susceptible to noise interference.
Upload Upload In a graphic display, reads a value from the programmable controller or server and displays it in the selected input field. This command operates on the active graphic display. If no display is active, this command is ignored. Ctrl–PgUp also uploads the value to the selected input field. UploadAll UploadAll In a graphic display, reads values from the programmable controller or server and displays them in all the input fields. This command operates on the active graphic display.
Index Symbols .rsv file 2-5 .
Silence A-48 SilenceAll A-48 Summary A-49 Suppressed A-49 SuppressOff A-49 SuppressOffAll A-49 SuppressOn A-49 Alarm Log Viewer, opening 2-5 AlarmEvent command A-7 AlarmLogRemark command A-10 AlarmLogSendToODBC command A-11 AlarmPrintOff command A-12 AlarmPrintOn command A-12 Allen-Bradley devices connecting to 2-6 Application commands AppAbort A-13 AppActivate A-13 AppStart A-14 Applications Windows A-13, A-14 Asynchronous execution and the = (Equal) command A-1 and th
DataLogRenameFile A-18 DataLogSnapshot A-18 DataLogSwitchBack A-19 Data logging paths changing at runtime 2-11 DatabaseSync command A-15 Date format specifying 2-2 DDE and RSLinx A-20 and WINtelligent LOGIC 5 A-20 and WINtelligent RECIPE A-20 connecting to devices 2-7 RSView32 as server, enabling A-43 for tag writes A-44 server 2-7 setting up 2-6 switching applications 2-7 switching topics 2-7 DDE commands DDEExecute A-19 NodeDisable A-35 NodeEnable A-35 NodeSwitch A-
FlushCache A-27 NextPosition A-34 NextWindow A-34 Position A-36 PrevPosition A-37 PrevWindow A-37 PrintDisplay A-37 PullForward A-39 PushBack A-40 RecipeRestore A-42 RecipeSave A-42 ScreenPrint A-44 SendKeys A-45 SetFocus A-48 Upload A-51 UploadAll A-51 Graphic displays caching, with the Display command displaying in background A-22 moving among A-39, A-40 positioning A-24 printing A-37 reducing call-up time of A-23 sizing A-24 using parameter files in A-23 H
O Online Help P-1 On-screen keyboard A-23 OPC connecting to devices 2-7 RSView32 as server, enabling A-43 for tag writes A-44 server 2-7 configuring 1-5 setting up 2-6 switching 2-7 switching access paths 2-7 OPC commands NodeDisable A-35 NodeEnable A-35 NodeSwitch A-35 RTDataServerOff A-43 RTDataServerOn A-43 RTDataWriteDisable A-43 RTDataWriteEnable A-44 OPC nodes changing at runtime A-35 P Parameter files A-23 Password command 3-3, A-36 Passwords changing at run
Remark command A-42 Requirements, hardware and software 1-1 RSLinx drivers 2-6 RSLinx, and DDE A-20 RSView32 commands.
Updating project paths 2-7 Upload command A-51 UploadAll command A-51 User account commands Account A-4 Login A-32 Logout A-32 Password 3-3, A-36 User accounts editing 3-1 logging in 3-2 maintaining in Windows Server 2003, Windows XP, Windows 2000 3-1 passwords changing at runtime 3-3 User Accounts editor opening 3-1 V VBA commands VbaExec A-51 Viewing log files 2-5 W Windows 2000 and RSView32 Runtime 1-4 user list, using 3-1 Windows applications A-13, A-14 Windows Ser