
User guide


Rockwell Automation Publication 2094-UM003A-EN-P - May 2012 69
Configuring the Kinetix 6000M System Chapter 6
Configuring the IPIM Module
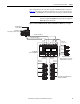
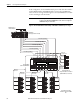
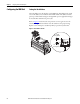
You can include the IPIM module in your RSLogix 5000 project by connecting it
to a configured Ethernet module in the Logix chassis and adding it under the
Ethernet module in the I/O configuration tree. As a result, you can view the
IPIM module status information in RSLogix 5000 software and use it in your
Logix program. To select the IPIM module in RSLogix 5000 software, version
20, you must load an Add-on Profile (see page 73
).
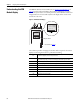
Setting the IPIM Module Network Address
To perform monitoring, diagnostics, and upgrade firmware, it is necessary to
program the following using the LCD display:
• Mode - Static or DHCP
• IP address
• Gateway
• Subnet mask
Settings are stored in non-volatile memory. You can select a static address, or
enable DHCP. IP addressing may also be changed through the Module
Configuration dialog in RSLinx software. Changes to the IP addressing take
effect immediately. The factory setting of the IP address is the static address
192.168.1.1. Refer to Understanding the IPIM Module Display
on page 66 for
programming guidelines.
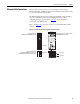
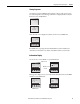
Follow these steps to program the network settings:
1. Apply control power.
2. After initialization is complete and the home screen is displayed, select:
tools>Network configuration>Net mode.
3. Use the arrow keys to select Static or DHCP.
4. Press “save.”
5. Select tools>Network configuration>Net mode>Static IP.
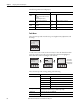
6. Use the right arrow to select the first digit to change.
7. Use the up arrow to increment the value until the desire value is displayed.
Then use the right arrow to select the next digit and so on. Continue until
the IP address is correct.
8. Press “save.”
9. Repeat step 1
through step 8 to set the subnet mask and gateway address.
10. Save your settings and remove control power.