
Quick Start Owner's manual

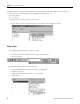

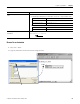
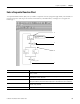
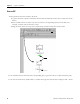
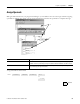
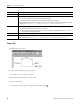
Table Of Contents
- 1756-QS001E-EN-P, Logix5000 Controllers Quick Start
- Summary of Changes
- Table of Contents
- 1 - Program and Test a Simple Project
- What You Need
- Before You Begin
- Follow These Steps
- Create a Project for the Controller
- Add Your I/O Modules
- Look at Your I/O Data
- Ladder Logic
- Enter a Function Block Diagram
- Assign Alias Tags for Your Devices
- Establish a Serial Connection to the Controller
- Download a Project to the Controller
- Select the Operating Mode of the Controller
- 2 - Organize a Project
- 3 - Program Add-On Instructions
- What You Need
- Follow These Steps
- Insert an Add-On Instruction
- Copy an Add-On Instruction Definition
- Import an Add-On Instruction Definition
- Access a Parameter That Is Not Visible
- Monitor or Change the Value of a Parameter of an Add-On Instruction
- View the Logic of an Add-On Instruction
- Edit and Monitor an Add-On Instruction
- Update an Add-On Instruction to a Newer Revision
- 4 - Program an Equipment Phase
- 5 - Program a Project Offline
- 6 - Document a Project
- 7 - Go Online to the Controller
- 8 - Program a Project Online
- 9 - Troubleshoot the Controller
- Index
- Back Cover

Publication 1756-QS001E-EN-P - October 2009 83
Program a Project Offline Chapter 5
Add a Faceplate to Microsoft Excel Software
1. Start Microsoft Excel software.
2. Choose View > Toolbars > Control Toolbox.
3. Click and select the Logix 5000…Faceplate Control that you want.
4. In the location for the faceplate, drag the pointer to the desired size of the faceplate.
5. Right-click the faceplate and from the Logix 5000…Faceplate Control Object menu, choose
Properties.
6. Click and browse to the tag that the faceplate controls.
7. Select the update period for the control and click OK.
8. To exit design mode and use the control, click here.