Programming Manual Logix5000 Controllers Ladder Diagram Catalog Numbers 1756 ControlLogix, 1769 CompactLogix, 1789 SoftLogix, 1794 FlexLogix, PowerFlex 700S with DriveLogix
Important user information Read this document and the documents listed in the additional resources section about installation, configuration, and operation of this equipment before you install, configure, operate, or maintain this product. Users are required to familiarize themselves with installation and wiring instructions in addition to requirements of all applicable codes, laws, and standards.
Summary of changes This manual contains new and updated information. The following table contains the changes made to this revision. Change Topic Updated graphics for version 24 and Windows 7. Throughout the manual. Input and Output program parameters do not require buffering during logic execution.
Table of contents Preface Studio 5000 environment...........................................................................................7 Additional resources.....................................................................................................7 Chapter 1 Program ladder diagram Index Introduction...................................................................................................................9 Instruction ...............................................................
Preface This manual shows how to program Logix5000 controllers with the relay ladder programming language. This manual is one of a set of related manuals that show common procedures for programming and operating Logix5000 controllers. For a complete list of common procedures manuals, refer to the Logix5000 Controllers Common Procedures Programming Manual, publication 1756-PM001. The term Logix5000 controller refers to any controller that is based on the Logix5000 operating system.
Preface Resource Description Logix5000 Controllers General Instructions Reference Manual, publication 1756-RM003 Describes the available instructions for a Logix5000 controller. Logix5000 Controllers Process and Drives Instructions Reference Manual, publication 1756-RM006 Describes how to program a Logix5000 controller for process or drives applications.
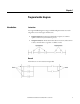
Chapter 1 Program ladder diagram Introduction Instruction You organize ladder diagram as rungs on a ladder and put instructions on each rung. There are two basic types of instructions: • Input instruction: An instruction that checks, compares, or examines specific conditions in your machine or process. • Output instruction: An instruction that takes some action, such as turn on a device, turn off a device, copy data, or calculate a value. Branch A branch is two or more instructions in parallel.
Chapter 1 Program ladder diagram There is no limit to the number of parallel branch levels that you can enter. This example shows a parallel branch with five levels. The main rung is the first branch level, followed by four additional branches. You can nest branches to as many as 6 levels. This example shows a nested branch. The bottom output instruction is on a nested branch that is three levels deep.
Program ladder diagram Chapter 1 Rung condition The controller evaluates ladder instructions based on the rung condition preceding the instruction (rung-condition-in). Only create instructions that affect the rung-condition-in of subsequent instructions on the rung. • • Write ladder logic If the rung-condition-in to an input instruction is true, the controller evaluates the instruction and sets the rung-condition-out to match the results of the evaluation.
Chapter 1 Program ladder diagram Tip: • Logix5000 Controllers General Instructions Reference Manual, publication 1756-RM003 • Logix5000 Controllers Process and Drives Instructions Reference Manual, publication 1756-RM006 • Logix5000 Controllers Motion Instruction Set Reference Manual, publication 1756-RM007 I/O module data updates asynchronously to the execution of logic. If you reference an input multiple times in your logic, the input could change state between separate references.
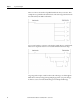
Program ladder diagram Chapter 1 Arrange the input instructions Determine how to arrange the input instructions on the rung, as shown below. To check multiple input conditions when: Arrange the input instructions: • All conditions must be met in order to take action. In series: For example, If condition_1 AND condition_2 AND condition_3… • Any one of several conditions must be met in order to take action.
Chapter 1 Program ladder diagram Arrange the output instructions Place at least one output instruction to the right of the input instructions. You can enter multiple output instructions on a rung of logic: Option Example Place the output instructions in sequence on the rung (serial). Place the output instructions in branches (parallel). Place the output instructions between input instructions. The last instruction on the rung must be an output instruction.
Program ladder diagram Chapter 1 For a structure within a structure, add .member_name.
Chapter 1 Program ladder diagram Append an element to the cursor location Important: Use caution when copying and pasting components between different versions of the Logix Designer application. The application only supports pasting to the same version or newer version. Pasting to a prior version of the application is not supported. When pasting to a prior version, the paste action may succeed but the results may not be as intended. 1.
Program ladder diagram Chapter 1 4. In the New Parameter or Tag dialog box, in the Usage box, choose the usage. 5. In the New Parameter or Tag dialog box, in the Data Type box, click the button. 6. In the Select Data Type dialog box, choose the data type for the tag. If you want to define the tag as an array, in the Array Dimensions boxes, enter the number of elements in each dimension. 7. Click OK. 8. In the New Parameter or Tag dialog box, choose the scope for the tag. 9. Click OK.
Chapter 1 Program ladder diagram Choose a name or an existing tag 1. Double-click the operand area, and then click . The Tag Browser window appears. 2. Select the name or tag: To select a: Do this: Label, routine name, or similar type of name Click the name. Tag Double-click the tag name. Bit number A. Click the tag name. B. To the right of the tag name, click . C. Click the required bit. 3. Press the Enter key or click a different spot on the ladder diagram to close the Tag Browser.
Program ladder diagram Chapter 1 2. Type the value and press the Enter key. Enter a rung comment When entering a rung of ladder logic, you can add comments that explain the purpose of your rung. To enter a rung comment, perform this procedure. 1. Right-click the rung number of your ladder logic and then click Edit Rung Comment. The Rung Comment dialog box appears. 2. Type your rung comment, and then click the green check to save your changes or click the red X to discard your changes.
Chapter 1 Program ladder diagram define all the localized languages that the project supports and set the current, default, and optional custom localized language. The application uses the default language if the current language's content is blank for a particular component of the project. However, you can use a custom language to tailor documentation to a specific type of project file user.
Index B branch ladder logic 9 buffer input 12 V verify routine 20 C create tag 16 I immediate value ladder logic 18 L ladder logic arrange input instructions 13 arrange output instructions 14 assign immediate value 18 branch 9 develop 11 rung condition 11 N name tag name 14 R routine verify 20 rung condition 11 T tag assign 16 choose name 14 create 16 enter 16 ladder logic 14, 16 Rock well Automation Publication 1756-PM008E-EN-P - Oct ober 2014 21
Rockwell Automation support Rockwell Automation provides technical information on the web to assist you in using its products. At http://www.rockwellautomation.com/support you can find technical and application notes, sample code, and links to software service packs. You can also visit our Support Center at https://rockwellautomation.custhelp.com for software updates, support chats and forums, technical information, FAQs, and to sign up for product notification updates.