
User Manual Instruction Manual


8-2
GV6000 AC Drive User Manual
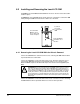
8.2 Installing and Removing the Local LCD OIM
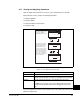
To install the local LCD OIM, slide the OIM into the slot on the front of the drive until it
clicks into place.
To remove the local LCD OIM, press the tab at the top of the drive to release the OIM
while pushing the OIM from the bottom to slide it out of the drive.
8.2.1 Removing the Local LCD OIM While the Drive is Powered
If the local LCD OIM is the selected control source, removing the OIM while the drive
is powered will cause a drive fault.
If the local LCD OIM is not the selected control source, but is the reference source,
removing the OIM while the drive is powered will result in a zero reference value.
When the OIM is replaced, the drive will ramp to the reference level supplied by the
OIM.
If the local LCD OIM is not the selected control source or reference source, removing
the OIM while the drive is powered will have no effect on drive operation.
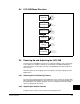
Figure 8.2 – Installing and Removing the Local LCD OIM
Press tab
to release the
To r em ov e :
OIM
Push the OIM up
and slide it out of
the drive.
To install: Slide
OIM into slot on
front of drive until
it clicks into place.
!
ATTENTION: Removing and replacing the LCD OIM while the drive is running
may cause an abrupt speed change if the LCD OIM is the selected reference
source, but is not the selected control source. The drive will ramp to the reference
level provided by the OIM at the rate specified in Accel Time 1 (140), Accel Time
2 (141), Decel Time 1 (142) and Decel Time 2 (143). Be aware that an abrupt
speed change may occur depending upon the new reference level and the rate
specified in these parameters. Failure to observe this precaution could result in
bodily injury.