
Software Start-Up and Ref. Owner manual
Table Of Contents
- GV3000/SE AC General Purpose (V/Hz) and Vector Duty Drive, 1 - 20 HP, 230V AC Software Start-Up and Reference Manual D2-3387-5
- Important User Information
- Document Update
- Summary of Changes
- Table of Contents
- List of Figures
- List of Tables
- Preface
- Chapter 1 - Starting Up the Drive for Volts/Hertz Regulation
- Chapter 2 - Starting Up the Drive for Vector Regulation
- Chapter 3 - Using the Keypad/Display To Program, Monitor, and Control the Drive
- Chapter 4 - Programming Reference
- Chapter 5 - Troubleshooting the Drive Using Error Codes
- Appendix A - Alphabetical Listing of Parameters
- Appendix B - Record of User Parameter Settings
- Appendix C - Power Module-Dependent Parameter Default Values (230 V Series)
- Appendix D - Default Parameter Settings
- Appendix E - Configuring the Digital Inputs When the RMI Board Is Installed in the Drive
- Appendix F - Using the Terminal Strip Analog Input
- Appendix G - Drive Regulation Overview
- Back Cover / Publication D2-3387-5 July 2013
2-2
GV3000/SE 230 VAC Drive, Software Reference Version 6.04
2.1 Preparing for Start Up (Vector)
Read through the following sections to prepare for the start-up procedure.
What You Need To Know:
• You must be qualified to perform the procedure and be familiar with vector
regulation.
• You should be familiar with the keypad/display. If you are not familiar with the
keypad/display, refer to chapter 3, which describes it.
What You Need To Do:
• Complete all hardware installation as described in the hardware reference
manual. This includes connecting input power, input transformers (if required),
disconnects, fuses, the encoder (if used), and the terminal strip on the drive.
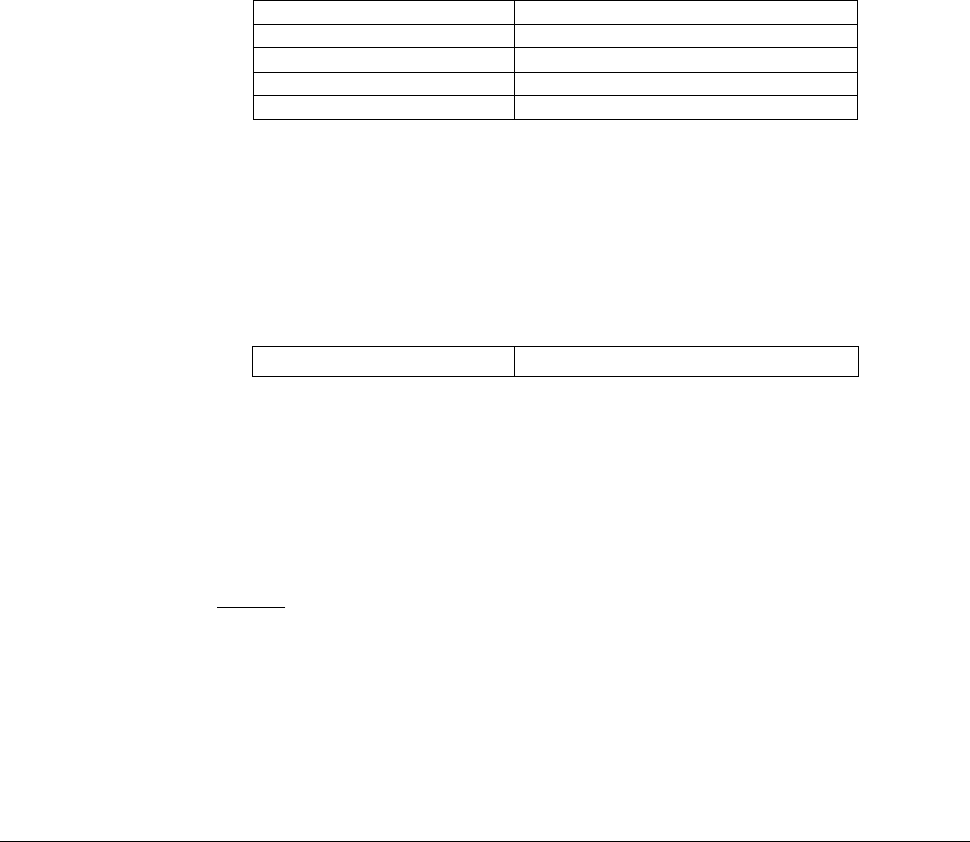
• Record the following motor data from motor nameplate for use during the
procedure:
Motor rated horsepower:
Motor rated amps:
Motor rated volts:
Motor base frequency:
Number of motor poles
1
:
1
Reliance RPM
TH
AC motors are 4-pole regardless of base RPM. Standard NEMA motors are
as follows:
3600 RPM = 2 poles
1800 RPM = 4 poles
1200 RPM = 6 poles
900 RPM = 8 poles
Consult your motor supplier if you are unsure of the motor design you are using.
• If an encoder is used, record the following encoder data. Make sure the
encoder is mounted to the motor and connected to the drive.
Encoder PPR:
• Connect the drive to the motor and disconnect the motor from the load.
• Check that you have not been prevented from programming the drive. If the
PASSWORD LED on the keypad is on, programming has been prevented in
parameter P.051, Programming Disable. Refer to section 4.4 in this manual for
the procedure to enable programming.
If You Have a Problem:
To Exit:
During most of the start-up procedure, you will be in program mode, which is used
to program parameters. If you want to stop programming parameters, you can exit
program mode. You can do this by pressing the PROGRAM key until the
PROGRAM LED has turned off. This will place the keypad/display in monitor mode,
the default. You can read more about these modes in chapter 3.