
Software Start-Up and Ref. Owner manual


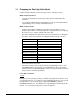

Table Of Contents
- GV3000/SE AC General Purpose (V/Hz) and Vector Duty Drive, 1 - 20 HP, 230V AC Software Start-Up and Reference Manual D2-3387-5
- Important User Information
- Document Update
- Summary of Changes
- Table of Contents
- List of Figures
- List of Tables
- Preface
- Chapter 1 - Starting Up the Drive for Volts/Hertz Regulation
- Chapter 2 - Starting Up the Drive for Vector Regulation
- Chapter 3 - Using the Keypad/Display To Program, Monitor, and Control the Drive
- Chapter 4 - Programming Reference
- Chapter 5 - Troubleshooting the Drive Using Error Codes
- Appendix A - Alphabetical Listing of Parameters
- Appendix B - Record of User Parameter Settings
- Appendix C - Power Module-Dependent Parameter Default Values (230 V Series)
- Appendix D - Default Parameter Settings
- Appendix E - Configuring the Digital Inputs When the RMI Board Is Installed in the Drive
- Appendix F - Using the Terminal Strip Analog Input
- Appendix G - Drive Regulation Overview
- Back Cover / Publication D2-3387-5 July 2013
1-3
Starting Up the Drive for Volts/Hertz Regulation
To Restore a Default Parameter Value after Writing over It:
If you enter the wrong value while programming parameters, you can restore the
default if you have not yet pressed the ENTER key. To do so:
1. Press the PROGRAM key.
2. Press the ENTER key. The default value of the parameter will be displayed
again. You can select it with ENTER or enter a new one and press ENTER.
To Restore All the Default Values to General (P) Parameters:
If you need to restore all the default values for General (P) parameters after
programming them, you can do so using the Restore Defaults parameter (P.050).
1.2 Start-Up Procedure (Volts/Hertz)
This section describes the start-up procedure for drives set up for V/Hz regulation.
Before using this procedure, you should have read section 1.1 for information you
need to know before working with the drive.
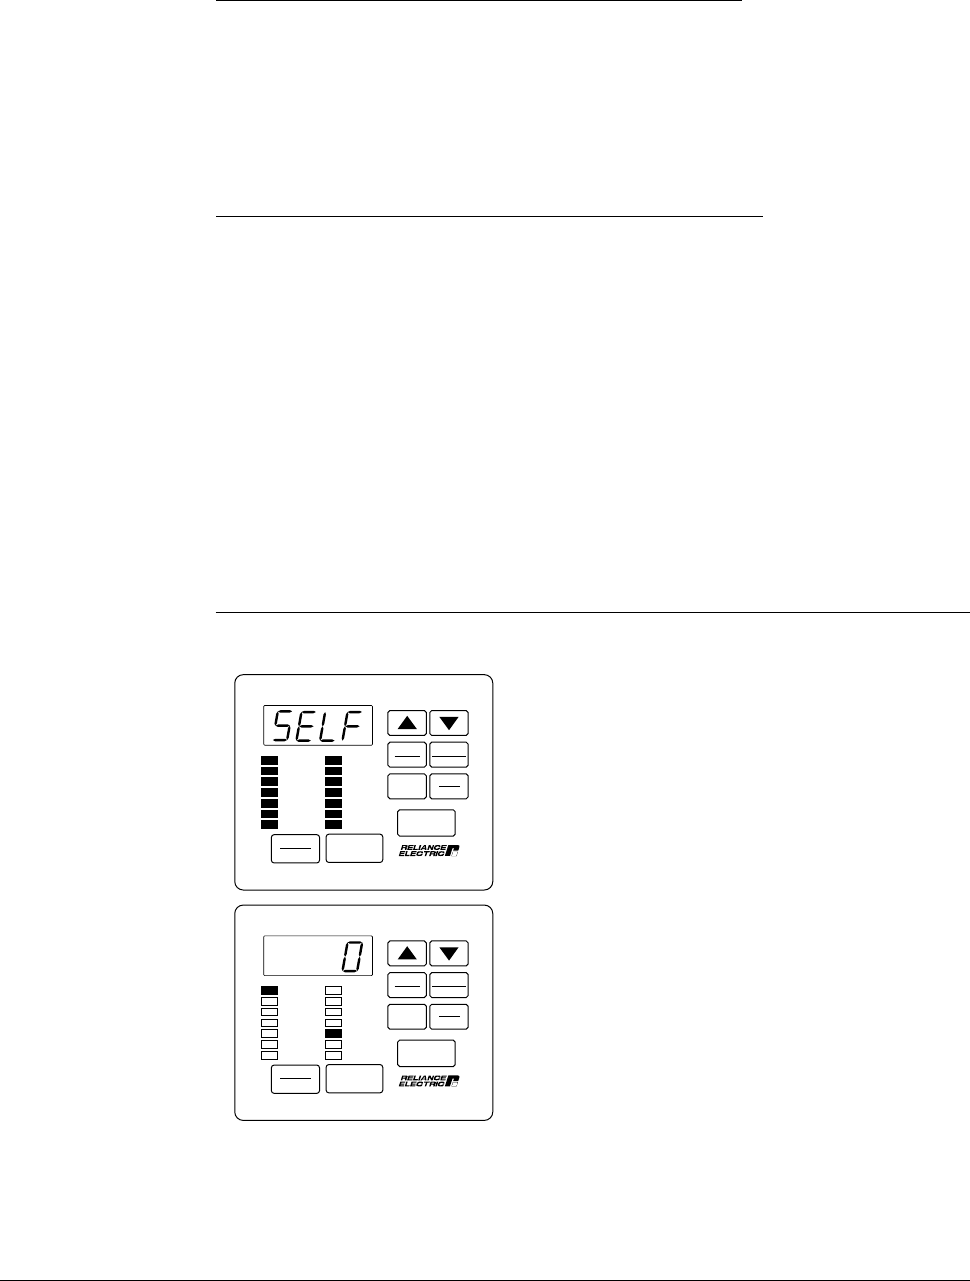
Step 1. Power Up the Drive
This step verifies that the drive powers up and passes the power-up diagnostics.
After the drive passes the diagnostics, the keypad/display automatically enters
monitor mode, with speed displayed.
Turn power on.
AUTO
MAN
Forward
Reverse
PROGRAM
RUN
JOG
STOP
RESET
START
ENTER
SPEED
VOLTS
AMPS
Hz
Kw
TORQUE
Password
RUNNING
REMOTE
JOG
AUTO
FORWARD
REVERSE
PROGRAM
The initial display shows SELF, with all
monitor mode and status LEDs on, indicating
the drive is performing power-up
diagnostics.
After diagnostics are complete (5-6
seconds), the SPEED LED is on and the
keypad/display is in monitor mode. The
displayed value is zero. You can move
through the five items accessible in monitor
mode - Speed, Volts, Amps, Hz, and Kw - by
pressing the ENTER key.
AUTO
MAN
Forward
Reverse
PROGRAM
RUN
JOG
STOP
RESET
START
ENTER
SPEED
VOLTS
AMPS
Hz
Kw
TORQUE
Password
RUNNING
REMOTE
JOG
AUTO
FORWARD
REVERSE
PROGRAM