INSTALLATION AND CONFIGURATION GUIDE Rockwell Automation Publication HSE-IN024A-EN-E–December 2012 Supersedes Publication HSE-IN023A-EN-E–May 2012
Contact Rockwell Automation Customer Support Telephone — 1.440.646.3434 Online Support — http://www.rockwellautomation.com/support Copyright Notice © 2012 Rockwell Automation Technologies, Inc. All rights reserved. Printed in USA. © 2010 OSIsoft, Inc. All rights reserved. This document and any accompanying Rockwell Software products are copyrighted by Rockwell Automation Technologies, Inc. Any reproduction and/or distribution without prior written consent from Rockwell Automation Technologies, Inc.
Table of Contents Chapter 1 Overview Integration with Other Rockwell Automation Products .................... 8 FactoryTalk Historian Installation Package ........................................... 9 Typical Architecture ..................................................................................... 9 User Documentation ..................................................................................10 On the Installation DVD .....................................................................
Table of Contents Install RSLinx Enterprise (Data Server) ........................................... 31 Installing FactoryTalk Historian Suites ................................................. 32 Install FactoryTalk Historian Asset Framework ............................ 33 Installation Modes for FactoryTalk Historian Asset Framework .........................................................................................34 Install FactoryTalk Historian Asset Framework Server ..........
Table of Contents Types of Licenses .............................................................................. 78 How Licenses Are Distributed Between License Pools ........... 80 Assigning License Activations to the Historian Server ........... 85 Allocating Licenses to Interface Types ........................................ 86 Viewing Allocated Licenses ............................................................ 89 Configuring Points .................................................................
Table of Contents Firewall-related Errors ....................................................................... 114 Configuring Windows Firewall with WFCU ........................ 115 Appendix A Configuring Historian Servers in High Availability Mode High Availability (HA) Architecture .................................................. 117 Working with Server Collectives .......................................................... 119 Creating Server Collectives ..........................................
Chapter 1 Overview FactoryTalk Historian Site Edition (SE) provides the capability to collect, store, analyze, and visualize data using a powerful engine and a set of reporting tools such as time-series trends, bar charts, pie charts, pareto and tabular trends, and a method of generating reports using Microsoft Excel. It also uses compressed-storage data algorithms to contain a vast amount of data in a small format.
Chapter 1 Overview Integration with Other Rockwell Automation Products FactoryTalk Historian SE is closely integrated with FactoryTalk Services Platform and the following Rockwell Automation applications: Application Description FactoryTalk Live Data A direct data interface to FTLD delivers native FTLD data directly to (FTLD) FactoryTalk Historian SE without requiring intermediate interfaces and standards such as OPC.
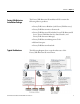
Overview Chapter 1 FactoryTalk Historian Installation Package The FactoryTalk Historian SE installation DVD contains the following software products: • FactoryTalk Services Platform (with FactoryTalk Directory) • FactoryTalk Historian Asset Framework • FactoryTalk Historian SE (includes FactoryTalk Historian SE Server, FactoryTalk Historian Live Data Interface, and FactoryTalk Activation Manager) • FactoryTalk Historian Management Tools • RSLinx Enterprise • FactoryTalk Historian DataLink Typical Archite
Chapter 1 Overview User Documentation The user documentation on FactoryTalk Historian SE is available in the following locations: • The FactoryTalk Historian SE installation DVD (page 10). • The computer on which you have installed FactoryTalk Historian SE (page 11). • The Help folder in the Start menu (page 11).
Overview Chapter 1 • Adobe Reader required to open the PDF files. • A link to the Redist\Docs folder on the installation DVD that stores all the user documentation. • A link to the Rockwell Automation Literature Library (http://literature.rockwellautomation.com/idc/groups/pu blic/documents/webassets/browse_category.hcst). • The Watch Historian How-to Videos on YouTube link on the main page of the installation wizard.
Chapter 1 Overview • FactoryTalk Historian SE AF 2010 R2 Installation and Maintenance Guide (.pdf) • FactoryTalk Historian SE Applications User Guide (.pdf) • FactoryTalk Historian SE Buffering User Guide (.pdf) • FactoryTalk Historian SE High Availability Administrator Guide (.pdf) • FactoryTalk Historian SE Interface Configuration Utility User Guide (.pdf) • Introduction to Historian SE Server System Management (.pdf) • FactoryTalk Historian SE MDB to AF Transition Guide (.
Overview Chapter 1 Technical Support and Resources Rockwell provides dedicated technical support internationally, 24 hours a day, 7 days a week. You can read complete information about technical support options, and access all of the following resources at the Rockwell Automation Support Web site (http://www.rockwellautomation.com/support/). Technical Support Please visit Rockwell Automation Customer Support Center (http://www.rockwellautomation.
Chapter 1 Overview (http://www.rockwellautomation.com/services/training/) or call 1.440.646.3434. If you are not located in North America and want to contact Rockwell Automation Support, use the Worldwide Locator (http://www.rockwellautomation.com/locations/) for worldwide contact information. TechConnect Support With TechConnect Support, your site has unlimited, real-time access to Rockwell Automation's global network of Customer Support Centers and technical resources.
Overview Chapter 1 Find the Version and Build Numbers To find version and build numbers for each Historian Server subsystem (which vary depending on installed upgrades, updates, or patches), use either of the following methods: To check the numbers with System Management Tools (SMT): 1. Go to Start > All Programs > Rockwell Software > FactoryTalk Historian SE > System Management Tools. The System Management Tools dialog box appears. 2.
Chapter 1 Overview 16 Rockwell Automation Publication HSE-IN024A-EN-E–December 2012
Chapter 2 System Requirements The hardware required with FactoryTalk Historian Site Edition depends on the demands an application places on the system. The greater the demand, the more powerful a system is required. In any application, faster processors and more memory will result in better performance. In addition, there should always be sufficient disk space to provide virtual memory that is at least twice the size of the physical memory.
Chapter 2 System Requirements Item Description Operating systems Microsoft Windows Server 2008 R2 with Service Pack 1 64-bit FactoryTalk Historian Live Data Interface Machine Item Description Hardware Operating systems Minimum: Intel Celeron D, 3.
System Requirements FactoryTalk Historian Asset Framework Chapter 2 FactoryTalk Historian Asset Framework requirements Item Description Hardware Operating systems (both 32-bit and 64-bit versions, if available) Processor: a single quad-core processor, minimum 2.
Chapter 2 System Requirements SQL Server requirements Item Description • Express • Standard Supported SQL Server versions (both SQL Server 2008 32-bit and 64-bit versions, if available) • Database Engine Required SQL Server components • Agent (backup and replication) • 1GB for databases with up to 50000 elements Required memory • 4 GB for databases with up to 200000 elements Supported SQL Server editions NOTE FactoryTalk Historian DataLink For databases with up to 1000 elements, Asset Framework may be
System Requirements Item Other software NOTES Rockwell Automation Publication HSE-IN024A-EN-E–December 2012 Chapter 2 Description • Microsoft Excel Versions: • Microsoft Excel 2010 (32-bit) *, ** • Microsoft Excel 2007 * • FactoryTalk Services Platform 2.50 (CPR 9 SR 5) * If this is a Microsoft Office upgrade and there is a pre-existing installation of DataLink 4.x on that machine, a removal and reinstallation of DataLink may be necessary. Refer to the KB article 254380 (http://rockwellautomation.
Chapter 2 System Requirements 22 Rockwell Automation Publication HSE-IN024A-EN-E–December 2012
Chapter 3 Pre-Installation Tasks Before you install FactoryTalk Historian SE, do the following: • Synchronize time settings on Historian system computers (page 23). • Disable the Windows time zone (page 23). • Learn about installation-related recommendations (page 24). Synchronize Time Settings on FactoryTalk Historian System Computers For all machines that are part of the FactoryTalk Historian system, you must ensure that the time is set correctly and synchronized with the FactoryTalk Historian server.
Chapter 3 Pre-Installation Tasks Disable the Windows Time Zone (TZ) Environment Variable The Windows time zone (TZ) environment variable adversely affects the Historian server. You must ensure that TZ is not set on the Historian server computer. To confirm that the TZ variable is not set on computers prior to Windows 2008: 1. Go to Start > My Computer. 2. Right-click and select Properties. 3. In the System Properties dialog box, click the Advanced tab. 4. Click Environment Variables. 5.
Chapter 4 Installing FactoryTalk Historian In this chapter you will find instructions on how to install the following: • Core components of the product (page 25). • FactoryTalk Historian suites (page 32).
Chapter 4 Installing FactoryTalk Historian If you already have an SQL Server, you will be able to point to it during the installation of FactoryTalk Historian Asset Framework. If you are going to use FactoryTalk VantagePoint as your Historian client, you can use Microsoft SQL Server 2008 R2 that is provided on the FactoryTalk VantagePoint installation DVD.
Installing FactoryTalk Historian Chapter 4 Install FactoryTalk Services Platform When you select this option, the following components will be installed: • FactoryTalk Diagnostics • Windows Firewall Configuration Utility (WFCU) • FactoryTalk Services Platform FactoryTalk Services Platform is an underlying architecture and a set of common services (such as diagnostic messages, health monitoring services, access to real-time data, and shared plant resources such as tags and graphic displays) that Rockwell A
Chapter 4 Installing FactoryTalk Historian The system checks if you have all the required components installed. If any components are missing, a dialog box appears prompting you to install the missing components. Click Install to install the components. The installation wizard appears. 3. On the Welcome... page, click Next. 4. On the License Agreement page, read and accept the terms of the license agreement, selecting the I accept... option. Click Next. 5.
Installing FactoryTalk Historian Chapter 4 To specify the FactoryTalk Directory server location: 1. Run the FactoryTalk Historian SE installation DVD. 2. On the welcome page of the installation wizard, click Install FactoryTalk Historian SE > Install FactoryTalk Services Platform > Specify FactoryTalk Directory Server Location. The FactoryTalk Directory Server Location Utility dialog box appears. 3.
Chapter 4 Installing FactoryTalk Historian 8. Click OK. The system connects to the FactoryTalk Directory server. NOTE Install FactoryTalk Activation Manager On the computers that have FactoryTalk Services Platform installed, you can open the Specify FactoryTalk Directory Server Location Utility dialog box also from Start > All Programs > Rockwell Software > FactoryTalk Tools > Specify FactoryTalk Directory Location.
Installing FactoryTalk Historian Chapter 4 5. On the License Agreement page, read and accept the terms of the license agreement, selecting the I accept... option. Click Next. 6. On the Ready to Install the Program page, click Install to start the installation. The Installing page appears with the status of the installation. 7. On the InstallShield Wizard Completed page, click Finish to exit the wizard. You may be prompted to restart your computer to complete the installation.
Chapter 4 Installing FactoryTalk Historian The system checks if you have all the required components installed. If any components are missing, a dialog box appears prompting you to install the missing components. Click OK. The installation wizard appears. 3. On the Welcome page, click Next. 4. On the License Agreement page, read and accept the terms of the license agreement, selecting the I accept... option. Click Next. 5. On the Setup Type page, select Standard Feature Set Installation, and click Next. 6.
Installing FactoryTalk Historian Chapter 4 • (Optional) FactoryTalk Historian Management Tools (page 47) Applicable only to the customers who want to administer the FactoryTalk Historian SE server from a remote computer.
Chapter 4 Installing FactoryTalk Historian AF itself requires Microsoft SQL Server. See "Install Microsoft SQL Server (page 25)" for more information. NOTE Before installing FactoryTalk Historian Asset Framework, learn about the installation options it offers. See "Installation Modes for FactoryTalk Historian Asset Framework (page 34)" for more information.
Installing FactoryTalk Historian Chapter 4 Installation mode Description Only the service is installed on the machine. If you select this option, you need to provide in the DB Server Name text box the name of the SQL Server machine and (optionally) the name of the instance of the SQL Server with which the AF service will communicate. AF SQL Database Note: This option must be executed on the machine with the Microsoft SQL Server installed. Only the database is installed on the machine.
Chapter 4 Installing FactoryTalk Historian Install FactoryTalk Historian Asset Framework Server NOTE If you want to install the Asset Framework SQL database only, you need to run the installation on the machine with the Microsoft SQL Server installed. To install FactoryTalk Historian Asset Framework Server: 1. Run the FactoryTalk Historian SE installation DVD. 2.
Installing FactoryTalk Historian Chapter 4 requirements, refer to the FactoryTalk Historian SE Release Notes. NOTE You can choose the destination drive only if you install the component on the selected machine for the first time. If there have been any FactoryTalk Historian components installed on the machine before, the Installation drive list will not be enabled. Click Next. 8. On the AF Server Components Configuration page, choose the Microsoft SQL Server name and the installation mode. 1.
Chapter 4 Installing FactoryTalk Historian Choose this mode: To: (5) AF SQL Database with unprocessed database scripts Prepare the system for the database installation, and copy the database executable scripts to the machine. NOTE For more information on using the database scripts to manually create the database, see "Manually Create the Asset Framework Database (page 56)". 9. Click Next.
Installing FactoryTalk Historian Chapter 4 NOTE See "Add the AF Service Computer to the AFServer Group 55" for more information. The Installation Progress page appears. It lists the components that are going to be installed. The status of the installation is displayed in the Status column of the component table. 10. Click Install to start the installation. 11. Wait until the components are installed. The installation time will vary depending on the selected installation mode and the computer performance.
Chapter 4 Installing FactoryTalk Historian NOTE The FactoryTalk Historian SE Server must be installed on Microsoft Windows Server 2008 R2 with Service Pack 1 64-bit. If you try to install it on any other operating system, the message presented below will appear and the installation will be aborted. To install the FactoryTalk Historian SE server: 1. Run the FactoryTalk Historian SE installation DVD. 2.
Installing FactoryTalk Historian Chapter 4 7. On the Review Component Installation page, review the list of the components that are already installed and those that will be installed during the installation process. Click Next. 8. On the Destination Drive page, select the drive on which you want to install the product. If the space available on the drive is not sufficient for the installation, a warning message will appear below the Installation drive list.
Chapter 4 Installing FactoryTalk Historian 11. In the message box that appears: • Click Yes, if you want to install the software for Rockwell Automation USB dongles. The drivers are used to support mobile activations which are locked in a hardware dongle. Follow the on-screen instruction to install the software. • Click No, if you want to skip this step. The installation wizard appears. 12. Follow the instructions displayed on the screen to complete the installation. 13.
Installing FactoryTalk Historian Chapter 4 7. In the Log On to FactoryTalk (New Server) dialog box, type the user name and password to the newly selected FactoryTalk Directory machine. 8. Click OK. The system connects to the FactoryTalk Directory server. 14. On the Installation Wizard Completed page, click Show the installation log, if you want to view the installation log after the installation wizard closes. NOTE See "View the Installation Log File (page 53)" for more information.
Chapter 4 Installing FactoryTalk Historian purposes rather than real-life production environments. It is recommended to install the FactoryTalk Historian Live Data Interface on a different computer than the FactoryTalk Historian server, typically on a data server computer. NOTE For more information on buffering, see "Enable Buffering (page 100)". To install the FactoryTalk Historian Live Data Interface on the data server computer: 1. Run the FactoryTalk Historian SE installation DVD. 2.
Installing FactoryTalk Historian Chapter 4 Installation drive list. In such a case, select another drive or increase the available space on the drive you have originally selected. NOTE You can choose the destination drive only if you install the component on the selected machine for the first time. If there have been any FactoryTalk Historian components installed on the machine before, the Installation drive list will not be enabled. Click Next. The Installation Progress page appears.
Chapter 4 Installing FactoryTalk Historian The installation wizard appears. 11. Follow the instructions displayed on the screen to complete the installation. 12. In the FactoryTalk Directory Server Location Utility dialog box, identify the computer that hosts the FactoryTalk Directory server. If it is the current computer, leave localhost in the text box. Otherwise, do the following to point to the proper FactoryTalk Directory computer: 1. Click the ellipsis button ( ). The Login User dialog box appears.
Installing FactoryTalk Historian Chapter 4 If any of the installed components requires rebooting the computer, a relevant message will appear on the installation wizard page, and you will be prompted to restart the machine after the installation wizard closes. 15. Click Finish to exit the installation wizard. 16. If prompted, restart the computer.
Chapter 4 Installing FactoryTalk Historian installation wizard Welcome page. Click Cancel and Finish to exit the wizard, install the prerequisites, and start the installation wizard again. 3. On the Welcome... page, click Next. 4. On the License Agreement page, read and accept the terms of the license agreement, selecting the I accept... option. Click Next. 5.
Installing FactoryTalk Historian Chapter 4 During the installation process, the Release Notes appear. Close the dialog box to proceed with the installation. If the FactoryTalk Activation Manager has not been installed yet, the wizard for installing USB dongles software appears. The FactoryTalk Activation Manager installation wizard appears with a list of prerequisite packages. Click Continue. 9.
Chapter 4 Installing FactoryTalk Historian 4. Select the machine that hosts the FactoryTalk Directory and click OK. The name of the machine appears in the FactoryTalk Directory Server Location Utility dialog box. 5. Click OK. 6. In the message box informing you that you will need to restart the computer, click OK. 7. In the Log On to FactoryTalk (New Server) dialog box, type the user name and password to the newly selected FactoryTalk Directory machine. 12. Click OK.
Installing FactoryTalk Historian Chapter 4 • OPC DA Server • OPC HDA Server • OPC HDA DA Server • WebServices • Notifications for using Microsoft Lync Unified Communication Server New users may activate the Advanced Server components with the FTHSE.Advanced license activation. For the users upgrading their license activations from FactoryTalk Historian SE 2.2/2.
Chapter 4 Installing FactoryTalk Historian Install FactoryTalk VantagePoint (Optional) The data from multiple FactoryTalk Historian SE servers and FactoryTalk Historian ME servers can be brought together into a single information management and decision support system using FactoryTalk VantagePoint. For detailed instructions on installing FactoryTalk VantagePoint and its components, refer to the FactoryTalk VantagePoint documentation.
Chapter 5 Post-Installation Tasks In this chapter you will learn about the following tasks that you should perform after installing FactoryTalk Historian SE: • View the Historian server installation log file. (page 53) • Verify that Historian services are running. (page 53) • Verify that Historian server is updating data for default tags. (page 54) • Add the AF Service computer to the AFServer group. (page 55) • Manually create the Asset Framework database.
Chapter 5 Post-Installation Tasks view the status, errors, and thread details for services used by the connected Historian server, and export a list of Historian services. To open Historian services: 1. Click Start > Program Files > Rockwell Software > FactoryTalk Historian SE > System Management Tools. The System Management Tools dialog box appears. 2. Under Collectives and Servers, select the server for which you want to view the information. 3.
Post-Installation Tasks Chapter 5 Verify that the Historian Server is Updating Data for Default Tags To verify that the Historian server is updating data for default tags: 1. On the computer with the Historian server installed, go to Start > All Programs > Rockwell Software > FactoryTalk Historian SE > System Management Tools. The System Management Tools dialog box appears. 2. Under Collectives and Servers, select the Historian server whose data you want to view. 3.
Chapter 5 Post-Installation Tasks To add the computer with the AF service installed to the AFServer group: 1. Go to Start > All Programs > Administrative Tools > Computer Management. The Computer Management dialog box appears. 2. In the explorer tree, select System Tools > Local Users and Groups > Groups. 3. In the right pane, right-click the AFServers group, and select Add to Group. 4. In the AFServers Properties dialog box, click Add. 5.
Post-Installation Tasks Chapter 5 To manually create the Asset Framework SQL PIFD database: 1. On the computer to which the unprocessed database scripts were copied during the FactoryTalk Historian Asset Framework installation process, open the Command Prompt window and navigate to the following folder in the Program Files directory: Rockwell Software\FactoryTalk Historian\PIPC\AF\SQL. 2. Call the GO.
Chapter 5 Post-Installation Tasks Manually Configure the Asset Framework Service NOTE Perform the steps described below on each computer with the Asset Framework service installed. To configure the AF service to communicate with the PIFD SQL database: 1. In Windows Explorer, navigate to the following folder in the Program Files directory: Rockwell Software\FactoryTalk Historian\PIPC\AF\. 2. Open the AFService.exe.config file in a text editor. 3.
Post-Installation Tasks Chapter 5 • If you want to enable the encrypted communication between the AF service and the AF SQL database, add the encrypt=Yes attribute to the code, for example: • If you want to configure other options, refer to the Microsoft SQL Native Client documentation. 4. Save the file. 5. If the Asset Framework service is running, restart it for the changes to take effect: 1. Go to Start > All Programs > Administrative Tools > Services. 2.
Chapter 5 Post-Installation Tasks 2. Under System Management Tools, select Operation > MDB to AF Synchronization. 3. Select the Historian server for which you want to verify the synchronization. • If the synchronization is operating correctly, a green icon appears next to the name of the server. in • If the synchronization fails, a red icon appears. Click the System Management Tools dialog box for information on how to diagnose and solve the problem.
Chapter 6 Configuring FactoryTalk Historian In this chapter you will find the following information on configuring FactoryTalk Historian SE and its components: • Activating the Historian server. (page 61) • Securing the Historian server. (page 62) • Configuring Windows Firewall for FactoryTalk Historian SE. (page 73) • Configuring the Historian server. (page 75) • Configuring the Data server. (page 96) • Configuring Historian interface connections.
Chapter 6 Configuring FactoryTalk Historian 2. Follow the instructions displayed in the wizard to configure your activations. NOTE Securing the Historian Server Click Help for more information, or refer to the instructions from the Activate Rockwell Software Products leaflet, available with your FactoryTalk Historian SE installation package. FactoryTalk Historian SE allows you to manage the Historian server authentication through Windows and Microsoft Active Directory (AD).
Configuring FactoryTalk Historian Chapter 6 groups and relevant Historian server users or groups. In this way the Window users and/or groups adopt the permissions from the Historian users to which they are mapped. This is the safest, quickest and most convenient way of distributing the Historian server privileges. You can manage the Historian server security with the System Management Tools.
Chapter 6 Configuring FactoryTalk Historian Identities Description and privileges PISupervisors A sample identity with supervisory duties with no pre-configured settings. An identity with preconfigured access permissions to Historian server resources. It represents the "everyone" concept of Windows, and specifies the rights of non-explicit users or groups. All authenticated Historian server users are given at least PIWorld privileges.
Configuring FactoryTalk Historian Chapter 6 Identities Description and privileges • Use it in a mapping. • Use it in a trust. Users Description and privileges FTHEngineer A preconfigured user, member of the FTHEngineers and FTHSupervisors groups. A preconfigured user, member of the FTHOperators group. A preconfigured user, member of the FTHSupervisors group. A preconfigured administrative PI User with unrestricted access to Historian server resources.
Chapter 6 Configuring FactoryTalk Historian Groups Description and privileges FTHAdministrators It represents Historian server administrators and has read-and-write access to all Historian server resources and default points, except the following database tables: • PIDS • PIHeadingSets • PIPOINT You can or cannot do the following with the FTHAdministrators group: • You can: • Map it to the AD group that represents your Historian server system administrators.
Configuring FactoryTalk Historian Chapter 6 Groups Description and privileges piusers A generic PI Group formerly named "piuser". This group has no preconfigured access permissions. You can or cannot do the following with the piusers group: • You can: • Fully disable it. • You cannot: • Delete it. Use the System Management Tools to manage the security components and security of your Historian server database.
Chapter 6 Configuring FactoryTalk Historian 4. Click the tab containing the security component type you want to view and manage. 5. In the selected tab, right-click the security component that you want to view or modify, and select Properties. The Properties dialog box appears.
Configuring FactoryTalk Historian Chapter 6 The content of the dialog box differs depending on the security component type you select. 6. View the settings of the selected security component presented in the tabs. You can modify the privileges of the security component to the extent that is allowed by the component’s configuration. See "Historian Security Components and Their Privileges (page 63)" for more information. 7. Click OK.
Chapter 6 Configuring FactoryTalk Historian 2. Under Collectives and Servers, select the server for which you want to create the mapping. 3. Under System Management Tools, select Security > Mappings & Trusts. 4. In the Mappings tab, click dialog box appears. . The Add New Mapping 5. Click next to Windows Account. The Select User, Computer, or Group dialog box appears. 6. In the text box, type the name of the user, for which you want to create the mapping. 7.
Configuring FactoryTalk Historian Chapter 6 Managing Security of the Historian Server Database NOTE To manage security of the Historian server database, you need administrative rights to the Historian server. To view and manage security privileges of the Historian server database: 1. Go to Start > All Programs > Rockwell Software > FactoryTalk Historian SE > System Management Tools. The System Management Tools dialog box appears. 2.
Chapter 6 Configuring FactoryTalk Historian To modify the type of information displayed, right-click a column name and add or remove columns from the context menu. 4. Right-click the name of the database table for which you want to manage the security information, and select Properties. The Security for… dialog box appears.
Configuring FactoryTalk Historian Chapter 6 5. Click a security component to check its privileges in the Permissions for… list. You can modify the privileges of the component for the database table to the extent that is allowed by the component’s configuration. See "Historian Security Components and Their Privileges (page 63)" for more information. 6. Click OK.
Chapter 6 Configuring FactoryTalk Historian For this FactoryTalk Open these ports: Historian suite: Of this type: Historian Server TCP TCP TCP TCP TCP TCP Live Data Interface 5450 5454 5455 5456 5458 6000 • Allow FactoryTalk Historian Live Data Interface to communicate through the firewall: See the table below to learn which settings you need to use when configuring the firewall. Item Description The absolute path to Interfaces\LDInterface\FTLDInt.
Configuring FactoryTalk Historian Chapter 6 Example: If the PIHOME value points to the following location: C:\Program Files (x86)\Rockwell Software\FactoryTalk Historian\PIPC\ The complete path to the Live Data interface would be: C:\Program Files (x86)\Rockwell Software\FactoryTalk Historian\PIPC\\Interfaces\LDInterface\FTLDInt.exe NOTE For more information on firewall configuration, refer to the documentation of your firewall.
Chapter 6 Configuring FactoryTalk Historian • If the connection is successful, the Server found message appears next to the Test Server Connection button. • If the connection is not successful, the No server found message appears next to the Test Server Connection button. In such a case, check the status of your server in the Connection Manager. 6. Click Finish. The new server connection with the default Live Data interface instance FTLD1 appears under the Historical Data folder.
Configuring FactoryTalk Historian Chapter 6 Verifying the FactoryTalk Historian Live Data Local Interface To verify that the local interface is configured: 1. Go to Start > All Programs > Rockwell Software > FactoryTalk Administration Console. The FactoryTalk Administration Console appears. 2. In the Select FactoryTalk Directory dialog box, select Network, and click OK. 3. In the Explorer tree, expand System > Connections > Historical Data, and the FactoryTalk Historian SE server node. 4.
Chapter 6 Configuring FactoryTalk Historian Types of Licenses The license activations you get for your Historian server are various types of licenses that you can use in either of the following pools of licenses: • Rockwell Groups license activations for Rockwell sources only. • General Groups license activations for tags from both Rockwell and third-party devices.
Configuring FactoryTalk Historian Chapter 6 Type of license activation Point sources Description FTHSE.Advanced not applicable FTBAInt.XXX FTBOINT PIFTBOINT FHSE3ADD.XXX Third-party and Rockwell point sources.
Chapter 6 Configuring FactoryTalk Historian The maximum number of individual licenses that can be allocated to an interface type (or point source). Each license corresponds to a single point with which the server can collect data from the interface. For example, for the FTHSE license activation, the quantity ranges from 250 to 100K points. • For some types of license activations, instead of the part there is a combination of digits and/or characters that further describe the activation, e.g.
Configuring FactoryTalk Historian Chapter 6 The system takes into account the following license activations to calculate the volume of the individual license pools: • FHSE3ADD • FHSE • FHLD • PTY3 If you want to calculate how licenses from your license activations will be distributed between the license pools, follow the steps described below. To calculate the distribution of licenses between the General and Rockwell license pools: 1. Calculate the value.
Chapter 6 Configuring FactoryTalk Historian 2. Calculate the number of licenses for the Rockwell license pool. Take the number of your FHLD licenses, FHSE licenses, and the value, and then substitute them into the following equation: = ∑ + ∑ - 3. Calculate the number of licenses for the General license pool.
Configuring FactoryTalk Historian Chapter 6 = 2400 2. Calculate the number of licenses for the Rockwell license pool. = ∑ + ∑ - = 5000 + 12000 - 2400 = 14600 3. Calculate the number of licenses for the General license pool.
Chapter 6 Configuring FactoryTalk Historian Activation Value ∑ FHLD.5K PTY3.500 Total 5000 500 5000 500 17500 To distribute licenses between the license pools: 1. Calculate the value. = Max (Min(1000, ∑ ), 20% * ∑ ) = Max (Min(1000, 12000), 20% * 12000) = Max (Min(1000, 12000), 2400) = Max (1000, 2400) = 2400 2.
Configuring FactoryTalk Historian Chapter 6 In this example, the total of 17500 licenses has been distributed in the following way: Assigning License Activations to the Historian Server Licenses and license pools Values License total Rockwell license pool General license pool 17500 14600 2900 NOTE In order to assign the activations to a FactoryTalk Historian SE server, the server must be added to the FactoryTalk Directory.
Chapter 6 Configuring FactoryTalk Historian 7. Click Apply. Allocating Licenses to Interface Types By allocating a license to an interface type (or point source), you specify the maximum number of points with which the server will collect data from a given interface type (or point source). To allocate licenses to interface types: 1. In the Historian Server Connection Properties dialog box, click the Point Sources tab.
Configuring FactoryTalk Historian Chapter 6 Item name Description Limit The maximum number of licenses that is allocated to a license pool or an interface type. • For the license pools, the limits are collected from the license activations. This information cannot be edited. • For the FTLD interface type, the limit equals the total number of unallocated licenses from both Rockwell and General license pools. This information is updated automatically and cannot be edited. 2.
Chapter 6 Configuring FactoryTalk Historian If you type incorrect information in the Interface Type Allocation or Limit columns, a relevant message will appear. Read the message to learn about the error, for example: NOTE For PINotifications, you allocate the maximum number of licenses for individual notifications instead of points. The licenses are taken from the Rockwell pool. 4. Click Apply. The license limit of the FTLD interface type is updated accordingly: 5.
Configuring FactoryTalk Historian Chapter 6 Viewing Allocated Licenses To view the information on the allocated licenses: 1. Go to Start > All Programs > Rockwell Software > FactoryTalk Historian SE > System Management Tools. 2. Under Collectives and Servers, select the server for which you want to view the license information. 3. Under System Management Tools, select Operation > Licensing. 4. Click Resources > PointSourcesLimit..
Chapter 6 Configuring FactoryTalk Historian NOTE Configuring Points The numbers provided for PINotifications in Total, Amount Used, and Amount Left are multiplied by 7 against those set in the FactoryTalk Administration Console. It is because each notification uses 7 points from the Rockwell pool. For example, if you set the limit for PINotifications to 50 in the FactoryTalk Administration Console, the Total number of allocated licenses in the System Management Tools will equal 350.
Configuring FactoryTalk Historian Chapter 6 Historian Points. The Add Historian Points dialog box appears. 4. In the Add points to server list, select the FactoryTalk Historian SE server to which you want to add the points. 5. In the respective lists, select the data collection interface, default scan rate, and tag attributes for new points. 6. Click Browse Tags. The Tag Browser dialog box appears. 7. In the Tag Browser dialog box, select the folder from which you want to collect data points.
Chapter 6 Configuring FactoryTalk Historian However, the rules defined in the user-defined XML file take precedence over the rules defined in the default XML file. To automatically discover Historian points with the wizard: 1. Go to Start > All Programs > Rockwell Software > FactoryTalk Administration Console. The FactoryTalk Administration Console appears. 2. In the Select FactoryTalk Directory dialog box, choose either Network or Local directory that you want to use, and click OK. 3.
Configuring FactoryTalk Historian Chapter 6 10. Select Enable data type filter to perform the search using the default discovery rule. NOTE When you check the Enable data type filter option, the auto-discovery mechanism will get all attributes that match the name, UDT, and data type rule. When you leave the option cleared, the mechanism will ignore the data type filter and only check the name and UDT rule. 11. Click Next to begin discovering points.
Chapter 6 Configuring FactoryTalk Historian 3. Under System Management Tools, select Data > Current Values. 4. From the menu bar, select Tools > Tag Search. The Tag Search dialog box appears. 5. Use the default settings and click Search. 6. From the list of tags that appears in the search results, select the tags you want to view, and click OK. The current values of the tags are displayed in the right pane of the System Management Tools dialog box.
Configuring FactoryTalk Historian Chapter 6 The list of events of the selected tag is displayed in the tab in the right pane of the System Management Tools dialog box. NOTE For more information on the Archive Editor, click . 7. Verify that the system has returned archived values, and close the System Management Tools. Archiving and Backups After you have installed and verified the Historian server, configure your Historian server automatic daily backups.
Chapter 6 Configuring FactoryTalk Historian Restarting FactoryTalk Historian SE Server NOTE You need administrative rights to perform these steps. To restart the server: 1. Stop the server: 1. Go to Start > All Programs > Rockwell Software > FactoryTalk Historian SE > Stop FactoryTalk Historian SE. The server stopping process begins. The progress is displayed in the Command Prompt window. 2. Wait until the server is stopped and the Command Prompt window is closed. 2. Start the server: 1.
Configuring FactoryTalk Historian Chapter 6 Under Explorer, the tree of the FactoryTalk Directory you have selected using the FactoryTalk Directory Server Location Utility (page 28) is displayed. 2. From the menu bar, select Help > Contents to open FactoryTalk Help and learn more about configuring the data server.
Chapter 6 Configuring FactoryTalk Historian Configuring FactoryTalk Historian Live Data Interface The interface collects data points (tags) from the data server and passes them to the FactoryTalk Historian SE server. Install the FactoryTalk Historian Live Data Interface component on the same computer as the data server. After installing the interface, configure the buffering service on the data server computer.
Configuring FactoryTalk Historian Chapter 6 7. Click Start to start the data collection service. Wait until the service status changes to Started. 8. Click OK. The new Live Data Interface instance is added to the server connection branch. Live Data Interface Services For each instance of the FactoryTalk Historian Live Data Interface, a service (FTLD) is created and started when you start the interface.
Chapter 6 Configuring FactoryTalk Historian The services are removed when you delete the interface instances in FactoryTalk Administration Console. Enable Buffering NOTE If you want to take advantage of the buffering feature, Rockwell Automation recommends that you install the FactoryTalk Historian Live Data Interface on a remote computer, typically the computer where the data server is installed.
Configuring FactoryTalk Historian Chapter 6 4. Close the Connection Manager. 4. Under System Management Tools, select Security > Mappings & Trusts. 5. Verify that PIBuffSubSystemService is listed in the Trusts tab. 6. Exit the System Management Tools. 7. Go to Start > All Programs > Rockwell Software > FactoryTalk Historian SE > Interface Configuration Utility. The Interface Configuration Utility dialog box appears. 8.
Chapter 6 Configuring FactoryTalk Historian As a general rule, you must always disable buffering on the interface before you delete it. If you forget to disable buffering, you will have to restart the computer to make sure the buffering subsystem is restarted. 12. Select Buffered Servers in the left pane of the dialog box.
Configuring FactoryTalk Historian Chapter 6 NOTE Manually Enabling Excel Add-ins If you want to configure a remote FactoryTalk Historian Live Data Interface to start from a local cache file with or without a valid connection to the host FactoryTalk Historian Server, enable the Disconnected Startup feature. For more information, refer to the KB article 66883 (https://rockwellautomation.custhelp.com/app/answers/detail/a_i d/66883).
Chapter 6 Configuring FactoryTalk Historian • PITagCnf.xla • for MDB Builder: ...\Program Files (x86)\Rockwell Software\FactoryTalk Historian\PIPC\MDBBuilder\: • MDBBuilder.xla 7. Click OK after selecting each file. The file is added to the Add-Ins available list. 8. Click OK to close the dialog box. The tabs with the selected Excel Add-ins are added to the ribbon.
Configuring FactoryTalk Historian Chapter 6 Item name Description User Name The name of the user that performed or requested an operation that generated the error message. Note: If you plan to track user IDs in FactoryTalk Diagnostics for auditing purposes, you must create identical user IDs in the FactoryTalk Historian SE. Refer to the FT Historian SE System Management Guide for information on creating user IDs in the Historian server. The full name of the user.
Chapter 6 Configuring FactoryTalk Historian 106 Rockwell Automation Publication HSE-IN024A-EN-E–December 2012
Chapter 7 Troubleshooting FactoryTalk Historian In this chapter you will learn how to: • Use FactoryTalk Historian ME modules with FactoryTalk Security (page 107). • Verify the Windows Administrator privileges (page 108). • Resolve error and warning messages (page 109).
Chapter 7 Troubleshooting FactoryTalk Historian The folder should include the four FactoryTalk Historian user groups: If you do not see the four user groups, do the following on the FactoryTalk Directory server computer: 1. Log on to Windows as the local Administrator. 2. Log on to FactoryTalk as a member of the FactoryTalk Administrators user group. 3. Open the FactoryTalk Administration Console, and create a computer account for each FactoryTalk Historian SE host. 4.
Troubleshooting FactoryTalk Historian Chapter 7 The Windows Administrators group should appear in the Members list. If it does not, do the following: 1. Click Add. The Select User or Group dialog box appears. 2. Select Windows Administrators and click OK. The group is added to the FTHAdministrators group. 3. Click OK to close the dialog box.
Chapter 7 Troubleshooting FactoryTalk Historian Error: Server Not Found Message Cause Resolution The requested server was not found in the known servers table. The error occurs when you try to create a new Data Collection Interface from a computer that has FactoryTalk Historian SE Live Data Interface installed. Your client computer could not locate the FactoryTalk Historian SE server. Manually create a connection to the FactoryTalk Historian SE server computer. See the instruction below.
Troubleshooting FactoryTalk Historian Error: Failure to Retrieve Interface Information Message Cause Resolution Chapter 7 Failure to get/update interface information because the Historian MDB content was bad. The error occurs if, during an upgrade, you manually remove the earlier version of FactoryTalk Historian SE server using Control Panel > Programs > Programs and Features. Delete the FTLD1 interface and create it again. See the instruction below. To delete the FTLD1 interface: 1.
Chapter 7 Troubleshooting FactoryTalk Historian Schema Creation Message Cause Resolution Due to the lack of connection to the network, some of the FactoryTalk Historian components have not been correctly configured. The warning occurs if you try to create the schema in the FactoryTalk Directory when your client computer is not connected to the network. Manually create a connection to the FactoryTalk Directory and add the schema information. See the instruction below.
Troubleshooting FactoryTalk Historian Folders Creation Message Cause Resolution Chapter 7 Due to the lack of connection to the network, some of the FactoryTalk Historian components have not been correctly configured. The warning occurs if you try to create new folders in the FactoryTalk Directory when your client computer is not connected to the network. Manually create a connection to the FactoryTalk Directory and add folders. See the instruction below.
Chapter 7 Troubleshooting FactoryTalk Historian Firewall-related Errors During the installation, the FactoryTalk Historian suites attempt to update the configuration of the system firewall using the Rockwell Firewall Configuration Utility (WFCU) that has been installed along with FactoryTalk Services Platform. If the update of the firewall configuration cannot be completed during the installation, a relevant error message is displayed on the last page of the FactoryTalk Historian installation wizard.
Troubleshooting FactoryTalk Historian Chapter 7 Error number Description 120 130 300 The .WFCU file contains incorrect data. The .WFCU file is missing. The configuration of Windows Firewall is not supported by WFCU. The .WFCU file contains incorrect configuration settings. The Microsoft Firewall service is stopped. Rockwell Windows Firewall Configuration Utility (WFCU) could not be found. 310 400 -999 See "Configuring Firewall for FactoryTalk Historian (page 73)" for details.
Chapter 7 Troubleshooting FactoryTalk Historian For this FactoryTalk Historian suite: Run these commands: Asset Framework %COMMONFILESFOLDERX86%\Rockwell\WFCU\wfcu.exe -I "%COMMONFILESFOLDERX86%\Rockwell\WFCU\FTHistoria nSEAF.wfcu" %COMMONFILESFOLDERX86%\Rockwell\WFCU\wfcu.exe -I "%COMMONFILESFOLDERX86%\Rockwell\WFCU\FTHistoria nSEServer.wfcu" %COMMONFILESFOLDERX86%\Rockwell\WFCU\wfcu.exe -I "%COMMONFILESFOLDERX86%\Rockwell\WFCU\FTHistoria nSELiveDataInterface.
Appendix A Configuring Historian Servers in High Availability Mode In this chapter you will learn about the following: • High availability (HA) architecture (page 117). • Working with server collectives (page 119). • Creating server collectives (page 120). • Verifying communication between server collective members (page 122). • Verifying replication of configuration changes in the primary server (page 124). • Assigning license activations to server collectives (page 125).
Appendix A Configuring Historian Servers in High Availability Mode and write identical data on each server. Together, this set of servers, called a FactoryTalk Historian server collective, acts as the logical FactoryTalk Historian server for your system. The server collective receives data from one or more interfaces and responds to requests for data from one or more clients. Because more than one server contains your system data, system reliability increases.
Configuring Historian Servers in High Availability Mode Appendix A • Clients (user workstations) To implement HA, configure clients to connect to either server in a collective and seamlessly switch to another server if necessary. Working with Server Collectives A server collective consists of two FactoryTalk Historian SE servers (primary and secondary) that have the same configuration database.
Appendix A Configuring Historian Servers in High Availability Mode Console will not recognize any of the third-party tag licenses you may have on your servers. • To create a server collective on computers that have Windows Firewall turned on, you must manually open the TCP 445 port between the two computers. Please refer to the Microsoft documentation for more information. • The Windows user that configures server collectives must be a domain user and must be mapped to the piadmin user.
Configuring Historian Servers in High Availability Mode Appendix A 8. On the Existing Or New Primary page, select A newly installed Historian Server, and click Next. The Select Primary and Collective Name page appears. 9. Review the following for additional information: Item name Description Collective Primary From the drop-down list, select the name of the server you want to make primary. If the name is not in the list, click , and select the server from the Connection Manager dialog box.
Appendix A Configuring Historian Servers in High Availability Mode Click Next. 16. On the Verify Selections page, verify the collective data, and click Next. The Conversion Progress page displays the status and individual steps of the conversion process. Wait until the conversion is complete. 17. If the Server ID Mismatch dialog box appears, select Accept the new ID, and click OK. 18. On the Finished page, click Finish. The new collective is displayed in the Collective Manager dialog box.
Configuring Historian Servers in High Availability Mode Appendix A If the server collective is not listed in the Connection Manager, add it: 1. Select Server > Add Server. 2. In the Network Node text box, type the fully qualified domain name (FQDN) for the primary server in the collective. 3. Click OK. 3. Select the server collective. 4. Click Save to close the Connection Manager. 2. Under Collectives, select your server collective.
Appendix A Configuring Historian Servers in High Availability Mode Verifying Replication of Configuration Changes in the Primary Server To verify that a Historian server collective replicates primary server configuration changes to all secondary servers, you can edit a point on the primary server and verify the change on the secondary server in the collective. To verify configuration replication in a Historian server collective: 1.
Configuring Historian Servers in High Availability Mode Appendix A 2. In the General tab, change the text in the Descriptor text box. For example, change 12 Hour Sine Wave to 12-hour sine wave. 3. Click . The Point Builder shows the updated Descriptor text for this point on the primary server. 6. Click . If the replication is working properly, the modified Descriptor text appears for the sinusoid point on all the servers in the collective.
Appendix A Configuring Historian Servers in High Availability Mode server to be used by both servers in a collective. In the FactoryTalk Activation Manager, the number of activations in use is reflected only for the primary server in a collective. It is because the assignment of activations to the secondary server in a collective is performed outside the FactoryTalk Activation mechanism. For example, if you want to assign 1 license activation of type FHSE.
Configuring Historian Servers in High Availability Mode Appendix A To assign license activations to the primary server in a collective: 1. Go to Start > All Programs > Rockwell Software > FactoryTalk Administration Console. 2. In the Select FactoryTalk Directory dialog box, select Network and click OK. 3. In the Explorer tree, expand System > Connections > Historical Data. 4. Right-click the name of the server to which you want to assign the license activations, and click Properties. 5.
Appendix A Configuring Historian Servers in High Availability Mode If you have an insufficient number of the license activations that need to be assigned separately to the primary and secondary server in a collective, you are prompted to reassign the licenses. 7. Click Apply. The license activations are saved. Configuring Interfaces and Buffering Services for Historian Server Collectives To implement HA, configure interfaces to support failover and n-way buffering.
Appendix B Configuring Live Data Interface Redundancy Overview For detailed information on the installation and configuration of the interface redundancy, refer to the KB article 59932 (https://rockwellautomation.custhelp.com/app/answers/detail/a_i d/59932).
Appendix B 130 Configuring Live Data Interface Redundancy Rockwell Automation Publication HSE-IN024A-EN-E–December 2012
Appendix C FactoryTalk View SE TrendX The FactoryTalk View TrendX display object supports FactoryTalk Historian SE server as a data source. In this chapter you will learn how to configure FactoryTalk View TrendX to trend the data points (tags) from FactoryTalk Historian SE server. A trend is a visual representation or a chart of real-time or historical data. It provides a way to track plant activity as it is happening.
Appendix C FactoryTalk View SE TrendX View running) and the FactoryTalk Historian SE server. You can achieve it by creating a trust between the IP address of the device and the FTHOperator user of the FactoryTalk Historian SE server security model. NOTE For more information on the FactoryTalk Historian SE server users, see "Historian Security Components and Their Privileges (page 63)". To create a security trust for the FactoryTalk View TrendX object: 1.
FactoryTalk View SE TrendX Appendix C Item name Description NetMask PI Identity Type 255.255.255.255. 1. Click . The Select PI Identity, PI Group, or PI User dialog box appears. 2. From the Type list, select PI Users. 3. From the list, select FTHOperator, and click OK. 7. Click OK. The new trust appears in the Trusts tab. Now you can start using the FactoryTalk View TrendX object with your FactoryTalk Historian SE server.
Appendix C FactoryTalk View SE TrendX Configuring Trend Properties To configure trend properties for an existing application: 1. On the computer with FactoryTalk View Studio installed, go to Start > All Programs > Rockwell Software > FactoryTalk View > FactoryTalk View Studio. 2. In the Application Type Selection dialog box, select the type of the application and click Continue. 3. In the application dialog box, select the existing application name, the language for the application, and click Open. 4.
FactoryTalk View SE TrendX Appendix C 10. In the Pens tab, select Historian Server from the Pen Source list. 11. Click Add Pen(s). The Add Pen Configuration dialog box appears. NOTE You can add new or existing FactoryTalk Historian data points (tags) in pen for trending - one pen per tag. 12. From the FT Historian Server list, select the FactoryTalk Historian SE server for which you have created the trust (page 131).
Appendix C FactoryTalk View SE TrendX 18. Click on the toolbar to test the display. The trend starts displaying data from the selected tag.
Appendix D Upgrading FactoryTalk Historian In this chapter you will learn how to upgrade your FactoryTalk Historian 3.0 to the current version of the product. Upgrading FactoryTalk Historian to the Current Version NOTE You need administrative rights to perform these steps. To upgrade your Historian 3.0 to FactoryTalk Historian SE 3.01: 1. Stop the server: 1. Go to Start > All Programs > Rockwell Software > FactoryTalk Historian SE > Stop FactoryTalk Historian SE. The server stopping process begins.
Appendix D Upgrading FactoryTalk Historian The server starting process begins. The progress is displayed in the Command Prompt window. 2. Wait until the server is started and the Command Prompt window is closed. 5. If prompted, restart the computer.
Appendix E Removing FactoryTalk Historian IMPORTANT Do not remove FactoryTalk Historian SE unless you have decided not to use Historian SE server, or you are resetting your FactoryTalk Historian plant floor operations. Removing FactoryTalk Historian SE will result in the loss of data. To remove FactoryTalk Historian SE, choose either of the following methods: • Using the Start menu (page 140). • Using Control Panel (page 140). • Using the FactoryTalk Historian SE installation DVD (page 141).
Appendix E Removing FactoryTalk Historian Click OK to complete the removal process. NOTE Removing the Suite Using the Start Menu The FactoryTalk Historian removal wizard does not remove the components that are shared by other FactoryTalk products. If you want to remove them as well, you need to do it manually using Control Panel. To remove the suite using the Start menu: 1. Go to Start > All Programs > Rockwell Software > FactoryTalk Historian SE. 2.
Removing FactoryTalk Historian Appendix E 4. Click Finish. 5. In the message that appears, click OK to complete the removal process. Removing the Suite Using the Installation DVD To remove FactoryTalk Historian SE using the FactoryTalk Historian SE installation DVD: 1. Run the FactoryTalk Historian SE installation DVD. 2. On the welcome page of the installation wizard, click Install FactoryTalk Historian SE > Uninstall FactoryTalk Historian Site Edition. 3.
Appendix E 142 Removing FactoryTalk Historian Rockwell Automation Publication HSE-IN024A-EN-E–December 2012
Index A Activating the Historian Server 61 Add the AF Service Computer to the AFServer Group 55 Adding Individual Data Points Manually 90 Adding Multiple Data Points Automatically 91 Adding the Server to the FactoryTalk Directory 75 Allocating Licenses to Interface Types 86 Archiving and Backups 95 Assigning License Activations to Server Collectives 125 Assigning License Activations to the Historian Server 85 C Configuring FactoryTalk Historian 61 Configuring FactoryTalk Historian Live Data Interface 98 C
Index H High Availability (HA) Architecture 117 Historian Security Components and Their Privileges 63 How Licenses Are Distributed Between License Pools 80 I In the Start Menu 11 Install Additional Historian Components 52 Install Advanced Server (Optional) 50 Install FactoryTalk Activation Manager 30 Install FactoryTalk Historian Asset Framework 33 Install FactoryTalk Historian Asset Framework Server 36 Install FactoryTalk Historian Live Data Interface (Optional) 43 Install FactoryTalk Historian Managemen
Index Removing FactoryTalk Historian 139 Removing the Suite Using Control Panel 140 Removing the Suite Using the Installation DVD 141 Removing the Suite Using the Start Menu 140 Resolving Error and Warning Messages 109 Restarting FactoryTalk Historian SE Server 96 Rockwell Automation Support 146 S Schema Creation 112 Securing the Historian Server 62 Specify FactoryTalk Directory Server Location 28 Synchronize Time Settings on FactoryTalk Historian System Computers 23 System Requirements 17 T TechConnect
Rockwell Automation Support Rockwell Automation provides technical information on the Web to assist you in using its products. At http://www.rockwellautomation.com/support/, you can find technical manuals, a knowledge base of FAQs, technical and application notes, sample code and links to software service packs, and a MySupport feature that you can customize to make the best use of these tools.