P–1 Allen Bradley Offline Development System (ODS) User's Manual Publication XXXX XX.
Important User Information Because of the variety of uses for the products described in this publication, those responsible for the application and use of this control equipment must satisfy themselves that all necessary steps have been taken to assure that each application and use meets all performance and safety requirements, including any applicable laws, regulations, codes and standards.
Preface Using this Manual Manual Objective Manual Content This manual provides information about the outer shell of Allen-Bradley’s Offline Development System (ODS) software. We divided this manual into seven chapters.
P –2 Preface Warnings, Cautions, and Important Information We indicate in these ways information that is especially important: ! ! Important: Audience CAUTION: identifies information about practices or circumstances that can lead to damage to the control, machine, or other equipment identifies information that is important for successful application of the control This manual assumes these conditions: • • • • Terms and Conventions WARNING: identifies information about practices or circumstances
Preface P –3 Screens We show screens and screen text in several different ways: • full screens • partial screens • pop-up windows • screen text Installing Disk # 2 Publication MCD-5.
P –4 Preface Related Publications Publication MCD-5.
Preface What to Do Next P –5 Publication Number Document Title Catalog Number 8520 5.1.4 9/Series CNC Grinder Programming and Operation Manual 8520 GUM 8520 5.1.5 9/Series Data Highway Plus Communication Module User Manual 8520 DHM 8520-5.2 9/Series CNC OCI User Manual Supplement 8520-OUM 8520 6.2 9/Series CNC Integration and Maintenance Manual 8520 IMM 8520 6.4 9/Series CNC AMP Reference Manual 8520 ARM2 8520-6.6 9/Series CNC OCI API Developer's Guide 8520-9API 8520 6.
Table of Contents Chapter 1 Introducing ODS Chapter 2 Installing ODS Chapter Objective . . . . . . . . . . . . . . . . . . . . . . . . . . . . . . . . . . . . . . . . . . . . . . . . . . What is the Offline Development System (ODS)? . . . . . . . . . . . . . . . . . . . . . . . . . . . . ODS Main Features . . . . . . . . . . . . . . . . . . . . . . . . . . . . . . . . . . . . . . . . . . . . . . . . . Hardware Requirements for ODS . . . . . . . . . . . . . . . . . . . . . . . . . . . . . . . . . . . . .
ii Table of Contents Chapter 4 Configuring ODS Chapter Objective . . . . . . . . . . . . . . . . . . . . . . . . . . . . . . . . . . . . . . . . . . . . . . . . . . Specifying the Text Editor . . . . . . . . . . . . . . . . . . . . . . . . . . . . . . . . . . . . . . . . . . . . . Keyboard Setup . . . . . . . . . . . . . . . . . . . . . . . . . . . . . . . . . . . . . . . . . . . . . . . . . . . Configuring the Serial Communication Setup . . . . . . . . . . . . . . . . . . . . . . . . . . . . . . .
iii Table of Contents Chapter 7 Using ODS Communication Configuration Chapter Objective . . . . . . . . . . . . . . . . . . . . . . . . . . . . . . . . . . . . . . . . . . . . . . . . . . Selecting the Communication Code . . . . . . . . . . . . . . . . . . . . . . . . . . . . . . . . . . . . . Menu Structure . . . . . . . . . . . . . . . . . . . . . . . . . . . . . . . . . . . . . . . . . . . . . . . . . . . . Configuring a 1784-KL . . . . . . . . . . . . . . . . . . . . . . . . . . . . . . . . . . . . .
Chapter 1 Introducing ODS Chapter Objective This chapter provides you with an overview of the Allen-Bradley Offline Development System (ODS) and provides important information on what you need to run the ODS software.
1–2 Introducing ODS This figure shows a flowchart of the typical ODS process. START ODS Main Features The main features of the ODS software include: Start a session Configure the ODS Select or create a project Create machine configuration files Download configuration files Create machine interface files Build interface files Download interface files Back up project files Exit the ODS to DOS END Publication MCD-5.
Introducing ODS Hardware Requirements for ODS 1–3 ODS requires this hardware: • a fully IBM-compatible personal computer (see compatible computers listed below) • 640 KB of conventional RAM • 3.5-inch floppy-disk drive • 50-Mbyte of memory available on hard-disk drive (approximately .
Chapter 2 Installing ODS Chapter Objective This chapter contains information to help you install and remove ODS software on a personal computer. If you want to: Before You Begin See page: make a backup copy of ODS software 2-1 check the PATH command 2-1 install ODS software 2-1 modify the CONFIG.SYS file 2-6 modify the AUTOEXEC.
2–2 Installing ODS 1. Turn on the computer and boot DOS. The computer displays the DOS prompt. Important: Be sure that the PATH command includes the directory that contains the COMMAND.COM file. 2. Insert ODS disk 1 into drive A. 3. Change to the source drive, i.e., the drive in which the disk is inserted. For example, if disk 1 is in drive A, but your system boots on C, you must change to drive A to install the software. See your DOS manual for more information. 4.
Installing ODS If you see the message: then: A directory called \IMC already exists (on drive c:). If you are certain that this directory was created by an earlier version of Allen-Bradley’s ODS, then proceed with the installation. Otherwise, press CTRL-C now and verify that this directory may be overwritten. Press any key to continue... The hard disk contains the directory \IMC. Important: 2–3 IMC files already exist in the directory. Follow the instruction on the screen.
2–4 Installing ODS The installation utility installs the files from disk 1 onto the hard disk and displays this message: Phase 2 Installation will now be invoked. If the message “Bad command or filename” appears, it means that the DOS command processor (COMMAND.COM) could not be located. Make sure your PATH command includes the directory that COMMAND.COM resides in. Then re-start this Installation procedure. See your DOS manual for further information. Strike a key when ready . . . 6.
Installing ODS 2–5 12.Select [1], [2], or [3], depending on the type of computer. Choose selection [1] if you are using an Allen-Bradley Series 6120, 6121, 6122, or 618X computer. The installation utility configures ODS to the type of computer selected. If the installation utility includes any update notices, it displays the first page under this heading: mm/dd/yy PLEASE NOTE THE FOLLOWING ITEMS: * * notice text * * --MORE-13.Read the first page, then press any key to display the next page. 14.
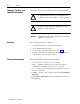
2–6 Installing ODS Using Windows NT Important: This procedure assumes that drive A is a 3.5-inch floppy-disk drive and that drive C is a hard-disk drive. If the drive designations on your computer are different, substitute the appropriate designations. 1. Turn on the computer and insert ODS disk 1 into drive A. 2. Click the Windows NT Start button and select Run. A similar box appears: If the correct path does not appear by default in the Open: pulldown menu box, type the correct path (e.g.
Installing ODS 2–7 When selecting any other CONFIG.SYS commands, be aware of the memory requirements. 2. Reboot the computer to read the data from this file. Modifying the AUTOEXEC.BAT File If you are using a DOS–based system, you can directly start ODS. You must modify the PATH command in the AUTOEXEC.BAT file by adding this entry to the path: ;C:\IMC If you want ODS to start automatically when you turn on the computer, add this entry to the last line of the AUTOEXEC.
2–8 Installing ODS 4. Select the drive that contains the ODS software. For this example, select drive C and press [ENTER]. The arrangement of the list may vary slightly from what currently appears on your screen. The removal utility displays a message similar to this: The menu highlights the installed ODS software and ghosts unavailable software. Select the control family you want to remove or ALL controls for all of the installed ODS software. 5. Select a control type.
Installing ODS 2–9 6. If applicable, select an application type. If all projects or files have not been deleted from a specific application before being removed, this warning appears: With the appearance of this screen, the removal utility begins deleting files from the hard disk: Removing ODS The removal utility looks for a particular list of files and directories.
2–10 Installing ODS When removal is complete, the removal utility displays this message: Removal Complete Press any key to continue . . . 7. Remove the disk from the floppy-disk drive. What to Do Next Chapter 3 tells you how to use the ODS software. END OF CHAPTER Publication MCD-5.
Chapter 3 Getting Started with ODS Chapter Objective This chapter tells you how to create and edit these types of ODS files: • machine configuration • machine interface • machine motion control If you want to: Getting Started See page: get started using ODS 3-1 use pull down menus 3-4 use online help 3-5 read the status line 3-7 define projects 3-8 define applications 3-9 define utility 3-10 use directory 3-10 enter file and project names 3-11 interpret error messages 3-12 use the
3–2 Getting Started with ODS Continue to step 4 on page 3–3. Using DOS 1. Turn on the computer and boot DOS. If IMC was included as the last record in the AUTOEXEC.BAT file, ODS starts automatically when you turn on the computer. 2. At the DOS prompt, type: IMC [ENTER] If the message Bad command or filename appears, this is an indication that the PATH command in the AUTOEXEC.BAT file does not contain the directory \IMC. 3.
Getting Started with ODS 3–3 4. Press any key to continue. A screen similar to this appears: ODS installs the DOS print driver in RAM, which allows you to download files to a printer. Important: You must first install the print driver to be able to print files from ODS menus.
3–4 Getting Started with ODS ODS displays the first line of its menu. the Application the Project A project is a directory you create to store files for a particular controller or job. An application is a group of programs used for creating and managing files. the Utility A utility is one of the programs in an application. status line The first line of the ODS screen layout (referred to as the status line) identifies the project, the application, and the utility.
Getting Started with ODS 3–5 Pulling Down a Menu To pull down a menu, press the function key indicated on the menu bar. ODS then displays it on the screen. For example, when you press [F1] to pull down the F1-File menu, you see this screen: Selecting a Menu Option There are two ways to select the menu options: • Press the key indicated between the parentheses on the menu. For example, press ? to select the About option.
3–6 Getting Started with ODS The box at the upper right of the screen below tells you how to display other pages of the help screens. If there is more text in the help message than can fit in one window, you can access the next page of help by selecting the [PgDn]. Notice that the Previous Page [PgUp] choice is ghosted, indicating that it is not available for selection. Since the page of help text displayed is the first page, there are no previous pages to access.
Getting Started with ODS 3–7 Refer to the example below: When you select a specific function, use the arrow up [↑] or arrow down [↓] keys and highlight the desired entry. When you enter [ALT-H], a help message appears describing the functional details of the selected entry. For this example, the help messages are for the Copy file entry. Additional help messages are available for other ODS screens. If no help is available, ODS displays: Sorry, no further help is available.
3–8 Getting Started with ODS Figure 3.
Getting Started with ODS 3–9 Figure 3.2 Project Organization PROJECT NAME PROJECT CONTOL TYPE DIRECTORY COMMUNICATION MODE CONTROL FIRMWARE REVISION INTEGRATORS NAME IDATE DESCRIPTION AND COMMENTS You can create a project directory for each motion controller/machine system. This lets you use ODS on many different motion controller and machine applications. The F2-Project pull-down menu is used to manage project directories.
3–10 Getting Started with ODS Figure 3.3 Application Organization Applications machine interface Applications machine configuration Applications machine motion control Each project contains several applications that include these files: • machine configuration • machine interface • machine motion control You can access the F3-Application pull-down menu when you create or select a project.
Getting Started with ODS 3–11 For example, while one directory lists AMP parameter files, another might list PAL source programs, and another might list Projects. All ODS directories share two common characteristics: • One page of a directory can list as many as 66 items. If a directory contains more than 66 items, it displays on more than one page. To access the second page of a directory, press the [PgDn] key. To access the previous page, press the [PgUp] key.
3–12 Getting Started with ODS Interpreting Error Messages If you make a mistake while entering a file name, selecting an option, or performing some other task, ODS displays a message giving information on the situation. On color monitors, these messages appear in red boxes. Press [ALT-H] to request on-line help if you need more information about an error message. Using the [ESC] Key Exiting from ODS If you decide to discontinue an operation in ODS, pressing the [ESC] key usually cancels the operation.
Chapter 4 Configuring ODS Chapter Objective This chapter tells you how to use the five functions available under the F5-Configuration menu.
4–2 Configuring ODS If the text editor name was entered previously, the name appears in the Enter Name box on the screen. 3. If the text editor name needs to be changed or if there is no name, type in the DOS path and file name for the text editor and press [ENTER]. Assume, for example, that you are using Edit (a text editor supplied with DOS) and that it is stored in a file named EDIT.COM in a directory named DOS.
Configuring ODS Configuring the Serial Communication Setup 4–3 ODS allows you to configure the serial communication baud rate. Use the [F5]–Configuration pulldown menu to access Serial comm setup. Use this procedure to configure your serial communication device: 1. Select the Serial comm setup option from the [F5]–Configuration menu. The following list box appears: Select the appropriate baud rate for your serial communication device. To abort this activity, select . 2.
4–4 Configuring ODS Configuring Print Device (Windows NT only) If your are using Windows NT, ODS allows you to select your default printer from a list of printers that are currently available to your system. Use the [F5]–Configuration pulldown menu to access Print device setup. Use this procedure to select your print device: 1. Select the Print device setup option from the [F5]–Configuration menu. The following list box appears: Select the appropriate baud rate for your serial communication device.
Configuring ODS Turning the Verify Feature ON/OFF 4–5 When the verify feature is set to ON, ODS displays a screen when you select the Delete file option: To delete a file, select [Y]. If you select [N], ODS aborts the delete operation. This gives you the opportunity to cancel a delete operation after selecting it. If the verify feature is OFF, ODS does not display the OK to delete this file? box before deleting a file. The F5-Configuration menu lets you turn the Verify feature ON or OFF.
4–6 Configuring ODS Executing DOS Commands from within ODS Use the following procedure to enter the DOS shell and execute DOS commands without exiting ODS. 1. Select [F5] and pull down the F5-Configuration menu. 2. Select the Enter DOS Shell option. The ODS screen disappears, and this prompt appears: O.D.S. - Type EXIT to quit> When this prompt appears, DOS commands can be entered and executed. 3. To return to ODS, type: EXIT 4. Press [ENTER]. The ODS screen reappears.
Chapter 5 Using ODS for Project Management Chapter Objective This chapter tells you how to use ODS for project management activities such as creating a new project, opening an existing project, and selecting a utility. Other functions of the project management feature are listed below. A project is a directory that stores configuration, interface, and motion control files for a particular control or application. You cannot access an application until you have selected or created a project.
5–2 Using ODS for Project Management 2. Select the New option. ODS displays the message New project and a directory of existing projects. 3. Select a name for the new project and press[ENTER] to continue, or press [ESC] to cancel. If ODS accepts the project name, it displays a box that asks what is the control type of the new project. The order in which the products are listed may vary slightly from what currently appears on your screen.
Using ODS for Project Management 5–3 4. Select a control type. If you select one of the 9/Series controls, a similar screen appears: 5. If applicable, select an application type. For this example, we chose (a). ODS asks you to determine the type of communication required for your control. Important: For standard RS232 communication, select (C). For use with the DH+ network, select (D). If you are using OCI, you can either select the Ethernet (E) or Control Serial Port (C) option.
5–4 Using ODS for Project Management If your control type is 9/PC (the default selection for Communication Mode is PC to 9/PC ), the following steps must be completed: A. Enter the location of the 9/PC host computer in the text box. The host computer is the computer name on the network where the 9/PC is installed. This name should typically be 20 characters or less. “Local” (or the name that you enter) denotes the default location of your host computer where your 9/PC is installed.
Using ODS for Project Management 5–5 Project subdirectories are directories that are stored within the project directory. They store the created configuration and interface files. ODS displays a list of alternative control firmware revision levels and asks you to select one of the items. You can select: • one of the revision levels listed • the Read from control option to read the revision level of the control that is connected to ODS.
5–6 Using ODS for Project Management ODS displays the information screen and asks you to verify that it is correct. For example: 9. Respond to the question: Is this info correct? If the information displayed is: correct press: [Y] then: ODS activates the project and displays the top level screen. Notice that the status line indicates that the newly created project is active. incorrect [N] repeat steps 5 - 8 or press [ESC] to or cancel the current operation.
Using ODS for Project Management Opening an Existing Project 5–7 You do not have to create a new project every time ODS is used. ODS stores project files that you can open at any time. Use this procedure to open an existing project: 1. Press [F2] and pull down the F2-Project menu. 2. Select the Open option. ODS displays the message Open project and a directory of projects. 3. Select the project to be opened and press [ENTER]. If you want to cancel, press [ESC].
5–8 Using ODS for Project Management Displaying Project Information The Information option displays the following information about the active project: • control family • date • project name • firmware • developer’s name created revision level of the control • comments (2 lines) This is the information entered when you create the project. Use this procedure to display project information: 1. Press [F2] and pull down the F2-Project menu. 2. Select the Information option.
Using ODS for Project Management Changing Project Information 5–9 The Change Info option lets you change the following information for the active project: • communication • developer’s selection name • date created • comments (2 lines) If you want to change the control type or the firmware revision, you must create a new project. Use F2-Copy Project to copy the original project. 1. Press [F2] and pull down the F2-Project menu. 2. Select the Change Info option.
5–10 Using ODS for Project Management If your control type is 9/PC, the following steps must be completed: A. Enter the location of the 9/PC host computer in the text box. The host computer is the location that you will be uploading and downloading files from. This name should typically be 20 characters or less. “Local” denotes the default location of your host computer. Once you enter the location, select [ENTER]. B. By default, CNC_1 will appear in the box as the 9/PC topic name.
Using ODS for Project Management 5–11 4. Press [ESC] or [ENTER] to retain the current name, or type in a new name and press [ENTER]. ODS saves the name and displays a box that asks for the date. The most recently entered date is displayed in the box. For example: 5. Press [ENTER] to retain the current date, or type in a new date. Press [ESC] to cancel. ODS stores the date and displays the first of 2 boxes that asks for comments. The most recently entered comments are displayed in the box.
5–12 Using ODS for Project Management 8. Respond to the question: Is this info correct? If the information displayed is: press: correct incorrect Copying a Project [Y] then: go on to another task [N] repeat steps 5 - 8 or press [ESC] to or cancel the current operation. [ESC] You can copy files from an existing project as the basis for a new project. Entire sets of files from an existing project of a compatible type can be copied to either a new project or another existing project.
Using ODS for Project Management 5–13 3. Select the project that you are copying from the directory or press [ESC] to cancel. ODS displays the message, Copy project TO and displays a directory of projects that are compatible to the project chosen to be copied from. 4. Select the project to which you are copying. You can enter a new name or you can select an existing name from the directory.
5–14 Using ODS for Project Management Notice that the WARNING box in the lower left corner appears only if you try to overwrite the active project. 5.
Using ODS for Project Management 5–15 7. Respond to the question: Is this info correct? If the data is: press: then: correct [Y] or [ENTER] go on to another task incorrect or needs to be changed [N] ODS gives you another opportunity to enter data for each item. ODS activates the project just created, and displays the main menu. The status line indicates that the project just entered is active. Renaming a Project This procedure lets you change the name of an existing project.
5–16 Using ODS for Project Management 4. Type in the new name to be given to the selected project, then press [ENTER]. ODS renames the project, then asks you to enter project information. It also displays the information that was entered and asks if it is correct. 5. Respond to the question: Is this info correct? If the data is: press: then: correct [Y] or [ENTER] ODS stores the information and returns to the top level screen.
Using ODS for Project Management 5–17 3. Select the project to be deleted and press [ENTER], or press [ESC] to cancel. ODS displays the information for the selected project and asks for permission to delete it. Notice that the WARNING box in the lower left corner appears only if you try to delete the active project. 4.
5–18 Using ODS for Project Management Use this procedure to back up a project to floppy disk: 1. Press [F2] and pull down the F2-Project menu. 2. Select the Backup option. ODS displays the message BACKUP project and the directory of projects. 3. Select the project to be backed up and press [ENTER]. Press [ESC] to cancel. ODS asks you which floppy-disk drive to send project files to: 4. Select one of the drives according to the computer’s configuration, and press [ENTER]. Press [ESC] to cancel.
Using ODS for Project Management 5–19 5. Insert the floppy disk into the drive then press any key. ! CAUTION: The Backup option lets you save only one project per floppy disk. At least one floppy per project is needed to back up more than one project and some projects may require more than one floppy disk, depending on the size. The are files as they are being copied. When the backup is complete, ODS displays the message: Backup completed. . . . . . remove floppy . . . . . . label floppy disks... 6.
5–20 Using ODS for Project Management 3. Select the drive that will be used and insert the floppy disk that contains the backed-up project into the selected drive. If the project was backed up on a computer that is running a version of DOS between 2.1 and 3.2 (inclusive), ODS reads the project information from the floppy disk, displays it on the CRT, and asks if it is permissible to restore this project. For example: If the project was backed up on a computer using a version of DOS or 3.
Using ODS for Project Management Selecting an Application 5–21 After opening or creating a project, you can select an application in which to work. ODS offers various applications for each of the products: • AMP — (IMC 110, 120, 121, 123, 9/Series, and 9/PC) lets you create, edit, and document files of system parameter values • PAL — (9/Series) lets you create, edit, document, and compile PAL programs (machine interface ladder logic).
5–22 Using ODS for Project Management Selecting a Utility What to Do Next After you select an application and its name appears on the status line, you can pull down the F4-Utility menu and select a utility. The utilities available depend on which application is active. Refer to chapters specific to an application for a description of the application’s utilities. The example screen is the F4-Utility for the PAL application on a 9/Series control.
Chapter 6 Using ODS File Management Chapter Objective This chapter tells you how to use the common options of the F1-File menu. The F1-File menu appears on the top-level menu bar, and on the menu bars of several utilities. It provides options for handling files in the active project and application. The F1-File menu options vary depending on the active utility.
6–2 Using ODS File Management Choosing the File Type Within a PAL Application When you are executing a PAL file management function on PAL files, you must first select a PAL file type, such as Source, Build List, Build Map, etc. The list of file types that are available to you depend on the file management function that you are doing. File type descriptions are in the operation and programming manuals. To Print or Type a file, you must run the Document utility under F4-Utility menu.
Using ODS File Management 6–3 ODS displays the message Copy To File and the directory of files for the active project/application. 4. Type the new name of the file to which you want to copy, then press [ENTER], or press [ESC] to cancel. ODS copies the specified file(s) and displays: Copying File When the copy is complete, ODS returns to the original menu bar. Renaming a File from a Current Project Use the Rename option to change a file in an active project/application.
6–4 Using ODS File Management 3. Select the file that you want to rename, or press [ESC] to cancel. • use the ARROW keys to move the cursor to the selected file, then press [ENTER], or • type in the file name, then press [ENTER] ODS displays the message Rename To and the directory of files for the active project/application. 4. Type in the new name for the file you are renaming, then press [ENTER].
Using ODS File Management 6–5 3. Select the file that you want to delete, or press [ESC] to cancel. • use the ARROW keys to move the cursor to the selected file, then press [ENTER], or • type in the file name, then press [ENTER] If the verify feature1 is enabled: then ODS: no deletes the file without checking for confirmation yes asks you if it is OK to delete the file 1 Refer to chapter 4. 4.
6–6 Using ODS File Management 2. Select the Copy from proj option. ODS displays the message Copy From Project and a directory of applicable projects. 3. Select the project that contains the file that you want to copy, or press [ESC] to cancel. • use the ARROW keys to move the cursor to the selected file, then press [ENTER], or • type in the file name, then press [ENTER] ODS displays the message Copy From File and a directory of files for the active application and selected project. Publication MCD-5.
Using ODS File Management 6–7 4. Select the file that you want to copy, or press [ESC] to cancel. • use the ARROW keys to move the cursor to the selected file, then press [ENTER], or • type in the file name, then press [ENTER] ODS displays the message Copy To File and a directory of files for the active project. 5. Type the name of the file to which you want to copy (the destination file), then press [ENTER], or press [ESC] to cancel. You must type a new name. ODS copies the specified file(s).
6–8 Using ODS File Management Printing an ODS File Use the Print option to send the contents of a file to a printer that is connected to the computer being used for ODS development. Refer to Chapter 3 for more information. Using the Documentor Prior to printing your ODS file, you must use the Documentor utility to make it printable. The Documentor option is available for AMP. PAL, and I/O Assignments applications only. To enable (unghosted) the Documentor, you must have at least one file saved.
Using ODS File Management 6–9 Printing Your File 1. Verify that the printer is connected to the computer. 2. Verify that the DOS print spooler was properly invoked when ODS was started. 3. Select [F1] and pull down the F1-File menu. 4. Select the Print option. ODS displays the message Print File and a directory of files for the active project/application. 5. Select the file that you want to print, or press [ESC] to cancel.
6–10 Using ODS File Management Displaying an ODS File Use the Type option to display a file on the ODS screen. Prior to displaying your file, you must document it using the Documentor utility. Refer to page 6–8 for more information. To Type a file: 1. Select [F1] and pull down the F1-File menu. 2. Select the Type option. ODS displays the message Display File and a directory of files for the active project/application. 3. Select a file to display, or press [ESC] to cancel.
Using ODS File Management What to Do Next 6–11 Chapter 7 tells you how to use the ODS software to configure communication through various communication links. END OF CHAPTER Publication MCD-5.
Chapter 7 Using ODS Communication Configuration Chapter Objective Refer to this chapter when you use ODS to configure communication through these communication links: • • • • • 1784-KL 1784-KT 1784-KTK1 Serial port INTERCHANGE– this is a separate product used to communicate to a CNC via DH+ if you are using DOS or Windows 95 . INTERCHANGE is a separate purchase and installation. It is not packaged with ODS.
7–2 Using ODS Communication Configuration Selecting the Communication Code Initial project definitions include the new project’s name, control family, and communication mode. Figure 7.1 describes the menus you see when you select: • communication mode • processor type Figure 7.1 Communication Selection Flow Chart Communications Communication Mode 1.
Using ODS Communication Configuration Menu Structure 7–3 Configuring the required information for the various driver types as shown in Figure 7.2 is identical for all of the menus: • • • • lets you review previous menus previews the next menu exits from the configuration menu saving the data exits without saving Figure 7.2 Drive Type Menu Configuring a 1784-KL The 1784-KL module lets a T45 and T47 communicate with the PLC-5 processor.
7–4 Using ODS Communication Configuration Figure 7.3 Configuration Flow for the 1784 KL or 1784 KT 1784 KT Driver Type 1784 KL Driver Type 1. Select the communications port that will be used for Data Highway Plus communications. 2. Select the address of the driver card that will communicate over the Data Highway Plus (PLC). This address must match the address selected on the switch setting on the 1784 KTmodule.
Using ODS Communication Configuration KT Address Considerations 7–5 Figure 7.4 lists the valid KT addresses. Figure 7.
7–6 Using ODS Communication Configuration Programming from DH+ to DH+ Programming from DH+ to DH+ provides access to devices on other DH+ links that are attached to your DH+ link through a DH network. These remote programming configurations are available with the 1784-KT and 1784-KL modules. Figure 7.5 shows a possible programming configuration from DH+ to DH+. Figure 7.
Using ODS Communication Configuration Configuring the 1784-KTK1 7–7 To configure the information for the 1784-KTK1 module, select (A) from the Driver Type menu. Figure 7.6 describes the menu flow used to configure the KTK1 module. Figure 7.6 Configuration Flow for the 1784 KTK1 1784 KT Driver Type Port Type Desired 1. Select the communications port that will be used for Data Highway Plus communications. 2. Select the address of the driver card that will communicate over the Data Highway Plus (PLC).
7–8 Using ODS Communication Configuration KTK1 Address Considerations Figure 7.7 lists the valid KTK1 addresses. Figure 7.
Using ODS Communication Configuration Configuring a Serial Driver 7–9 You can use a serial port (COM1 or COM2) that is connected to the terminal and you can use the serial port with one of these communication modules: • 1770-KF2 • Series B Communication Interface Module • 1785-KE Communication Interface Module (resides in 1770 I/O rack) To configure the information for the Serial Driver module, select (D) from the Driver Type menu. Figure 7.8 describes the menu flow used to configure the serial port.
7–10 Using ODS Communication Configuration Using INTERCHANGE To configure the information for INTERCHANGE, select (E) from the Driver Type menu. Figure 7.9 describes the menu flow used to configure INTERCHANGE. Figure 7.9 Configuration Flow for Using INTERCHANGE (CNCs only) INTERCHANGE Driver Type 1. DH+ Station Address of Logic Controller Network Access Bridge Address 9/Series Rack Address 9/Series Group Address Handshake Delay INTERCHANGE Pushwheel Number Publication MCD-5.
Using ODS Communication Configuration Configuring DH+ Under Windows NT In ODS 7–11 Use the following instructions to configure DH+ under Windows NT via ODS: 1. In your Windows NT application, launch ODS in a DOS shell. With RSLinx running, follow steps 1 through 4 as described in Creating a Project (refer to Chapter 5). 2. Select DH+ Network as your application type by choosing . 3. When the system prompts you for your desired driver type, RSLinx is selected by default.
7–12 Using ODS Communication Configuration Configuring RSLinx for Ethernet Refer to Figure 7.10 to see the menu flow used to configure RSLinx for Ethernet. Figure 7.10 Configuration Flow for Using RSLinx for Ethernet (CNCs only) RSLinx for Ethernet AB_ETH Driver Number RSLinx Station Address of 9/Series Downloading AMP Files for Use with the 9/PC 1.
Using ODS Communication Configuration 7–13 Downloading an AMP File from the Host PC to a 9/PC When you download locally to the 9/PC, no external connections are required. The download is done across the computer’s PCI buss. This procedure loads the selected AMP file into the memory of the 9/PC card, then force the 9/PC restart. This restart will either be manually or automatically, depending on how you configured your 9/PC settings during installation. 1.
7–14 Using ODS Communication Configuration 4. After downloading any new AMP file, you must restart the 9/PC. Depending on how your 9/PC Support Service is configured, this restart can be initiated in one of two ways: • If you selected the AutoStart After AMP Download option, the 9/PC will restart as soon as the download completes.
Using ODS Communication Configuration 7–15 Downloading from the Serial Port of a Second PC ODS can use the serial ports of your workstation and the host computer to download an AMP file. Important: These computer configurations are required for correct operation of this capability : • The computer running ODS and initiating the download must also be running Windows NT • The 9/PC host computer must have Remote Access Services (RAS) installed and configured.
7–16 Using ODS Communication Configuration 5. Click OK to add COM1 – Dial–Up Networking Serial Cable Between 2 PCs. The Remote Access Setup window appears. 6. Select the Configure button in the Remote Access Setup window. 7. Select Dial out and Receive calls, to allow the host computer to be both the RAS Client and Server. 8. Click OK 9. On the remote Access Setup click Network... Publication MCD-5.
Using ODS Communication Configuration 7–17 10.Select the following Dial out Protocols: NetBEUI and TCP/IP. Select the encryption setting Require encrypted authentication. This setting is required. Click the Configure button next to NetBEUI. 11. Select Entire Network in the RAS Server NetBEUI Configuration box. Click OK. You can use TCP/IP, but you must either assign a pool of static IP addresses to be available for the clients, or if you have a DHCP server, allow it to assign client IP addresses.
7–18 Using ODS Communication Configuration 12.Click on the Configure button next to TCP/IP to get RAS Server TCP/IP configuration dialog. 13.Check the Entire Network button. If you are setting up the ODS (client) computer, go to step 2 of the next section. If you are setting up the 9/PC host (server) computer, go to the next step. 14.Check the Use static address pool button if you are assigning static addresses. If you are using DHCP, click the Use DHCP button and skip the next step. 15.
Using ODS Communication Configuration 7–19 21.Under Call Back, select No Call Back, then click OK. 22.Select: Server → Start Remote Access Server. In the Server field, the name of the local computer should already be present. If not, enter the computer name preceded by two back slashes (e.g., \\yourcomputername). Click OK to start the service. Setting Up the ODS (or Client) Computer 1. Repeat steps 1. through 13. from the previous section. 2. Relog in. Double click the My Computer icon. 3.
7–20 Using ODS Communication Configuration 5. Click Configure next to Dial using:. 6. Select a baud rate that is available on this and the server PC. 7. Click OK on this and the Edit Phonebook Entry windows. 8. Disconnect your EtherNet cable. 9. Start the RAS server on the 9/PC Host (server PC) if you did not already do so in the last section: A. Click the Windows NT Start button and select Settings. B. Select Control Panel. Publication MCD-5.
Using ODS Communication Configuration 7–21 C. Double click the Services control panel to view the available services. D. Locate and highlight the Remote Access Server. Click Start. 10.Click Dial to connect to the 9/PC host (server PC) from your ODS workstation (client PC).
Index Symbols B [CTRL-C], 2-3 Backup copy, 2-1 [ESC] key, 3-6 using the, 3-12 Backup option, 5-17, 5-19 [PgDn], 3-6 Bad command or filename, 2-4, 3-1, 3-2 [PgUp], 3-6 Beeper, On/Off, 4-4 Backup project, 5-18 Buffers, 2-6 Numbers 1770 KF2, 7-9 C 1784 KL, configuring, 7-3 Cancel operation, 3-12 print request, 6-9 1784 KT, configuring, 7-3 CNC, 1-1 1771 I/O rack, 7-9 1784 KTK1, configuring, 7-7 1785 KE Communication Interface Module, 7-9 6122 considerations, 7-8 8100 HS110, software, 2-6 A
I–2 Index DH+ Under Windows NT (TM), 7-11 INTERCHANGE, 7-10 RSLinx for Ethernet, 7-12 serial driver, 7-9 1770 KF2, 7-9 1771 I/O rack, 7-9 1785 KE Communication Interface Module, 7-9 Series B Communication Interface Module, 7-9 download RAS software, 7-15 Serial port, 7-15 Drive Type menu, 7-3 E Control family, 7-2 9/PC, 5-4 9/Series, 5-3 select, 5-2 EDLIN.
Index IMC.
I–4 Index R RAS, 7-15 RAS Configuration, troubleshooting, 7-21 READ.
I–2 Index Allen Bradley, a Rockwell Automation Business, has been helping its customers improve productivity and quality for more than 90 years. We design, manufacture and support a broad range of automation products worldwide. They include logic processors, power and motion control devices, operator interfaces, sensors and a variety of software. Rockwell is one of the world's leading technology companies. Worldwide representation.