
Instruction Manual
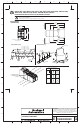

Latch Attachment Contact
Cartridges Reconfiguration
Install contact
cartridge.
4
5
Install cover.
6
2
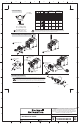
Unlatch Coil Replacement
14 - 20 lb-in
(1.6 - 2.3 Nm)
8 - 12 lb-in
(.9 - 1.4 N-m)
8 - 12 lb-in
(.9 - 1.4 N-m)
8 - 12 lb-in
(.9 - 1.4 N-m)
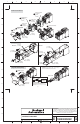
Timer Attachment Installation
(Single Deck Only)
Timer Attachment Contact
Cartridges Reconfiguration
Remove crossbar
screw.
1
Remove cover.
1
1
Remove old coil.
2
Install new coil.
3
Install terminal covers.
4
Remove terminal
covers.
2
Rotate arm 90˚
clockwise.
2
Remove contact
cartridge
and reconfigure
per page 2.
3
Rotate arm 90˚
counter clockwise.
Install contact
cartridge.
4
5
Install cover.
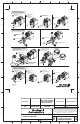
Install timer attachment
("ON-Delay" mode is
factory installed).
4
Convert to "OFF-Delay"
by removing timing unit
and rotating 180˚.
6
Remove cover.
1
2
Rotate arm 90˚
clockwise.
Remove contact
cartridge
and reconfigure
per page 2.
3
Rotate arm 90˚
counter clockwise.
PN-15096
Printed in U.S.A.
OFF Delay
ON Delay
8 - 12 lb-in
(.9 - 1.4 N-m)
8 - 12 lb-in
(.9 - 1.4 N-m)
8 - 12 lb-in
(.9 - 1.4 N-m)
B-vertical.ai
1234 56 78
A
B
C
D
E
F
G
H
CONFIDENTIAL AND PROPRIETARY INFORMATION. THIS DOCUMENT
CONTAINS CONFIDENTIAL AND PROPRIETARY INFORMATION OF
ROCKWELL AUTOMATION, INC. AND MAY NOT BE USED, COPIED OR
DISCLOSED TO OTHERS, EXCEPT WITH THE AUTHORIZED WRITTEN
PERMISSION OF ROCKWELL AUTOMATION, INC.
BULLETIN 700P INSTALLATION
INSTRUCTION SHEET
10000005242
Sheet
Size Ver
Of
44
B00
Dr. Date
- - - - - - - - - - - -
MATERIAL
NO.
MATERIAL
SIZE
FOLDFLAT
17" W x 11" H 4-1/4" W x 2-3/4" H
TWO SIDES PRINTED
BODY STOCK WHITE
BODY INK BLACK
PN-15096
SUPERSEDES
- - - - - - - -