Installation Instructions Compact Industrial Non-display Computers Catalog Numbers 6155R-NSXP, 6155R-NPXP, 6155R-NPXPDC, 6155F-NPXP, 6155F-NPWE, 6155F-NPXPDC, 6155F-NPWEDC Topic Page Important User Information 2 Precautions 3 Computer Options 4 Operating Systems 4 Parts List 5 Hardware Features 6 Install the Computer 8 Connect Peripherals 12 Apply Power 13 Connect to a Network 15 Real-time Clock (RTC) Battery 16 Ship or Transport the Computer 17 Specifications 17 Additional Reso
Compact Industrial Non-display Computers Important User Information Solid-state equipment has operational characteristics differing from those of electromechanical equipment. Safety Guidelines for the Application, Installation and Maintenance of Solid State Controls (publication SGI-1.1 available from your local Rockwell Automation sales office or online at http://www.rockwellautomation.
Compact Industrial Non-display Computers 3 Precautions Read and follow these precautions for use. Environment and Enclosure Information ATTENTION: This equipment is intended for use in a Pollution Degree 2 industrial environment, in overvoltage Category II applications (as defined in IEC publication 60664-1), at altitudes up to 2000 m (6561 ft) without derating. This equipment is considered Group 1, Class A industrial equipment according to IEC/CISPR Publication 11.
Compact Industrial Non-display Computers Computer Options This table summarizes the computer options available for the 200R compact non-display industrial computers. Cat. No. Series 6155R-NSXP E 6155R-NPXP Package Standard Storage Hard-disk drive Windows Operating System XP Professional.
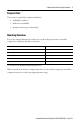
Compact Industrial Non-display Computers 5 Parts List The computers are shipped with these items: • • • • • • Mounting hardware AC power cord for AC power models Ground bus strip, pre-installed for DC power models Installation instructions Production test report Industrial Computer System Cloning Utility CD (red CD) Rockwell Automation Publication 6155R-IN002E-EN-P - July 2013
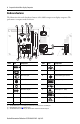
Compact Industrial Non-display Computers Hardware Features The illustration shows the hardware features of the 200R compact non-display computer. The performance computer model is shown.
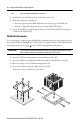
Compact Industrial Non-display Computers 7 Required Tools These tools are required for computer installation: • #2 Phillips screwdriver • Drill motor and drill bit • Antistatic wrist strap (recommended) Mounting Clearances Review the computer dimensions to make sure you allow adequate clearance around the computer for ventilation and cable connections. Use this clearance For 25 mm (1 in.) Sides of computer 51 mm (2 in.) 13 mm (0.5 in.
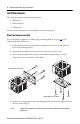
Compact Industrial Non-display Computers Install the Computer The computers support various mounting options: • Wall mount • DIN rail mount • VESA mount A bracket with mounting screws is provided for each mounting option. Mount the Computer on a Wall You can mount the computer on a wall by using a mounting bracket. See page 11 for the wall-mount bracket dimensions. 1. Drill and tap four M4 holes in the wall, a minimum of 5 mm, that correspond to the holes in the mounting bracket. 2.
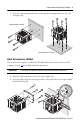
Compact Industrial Non-display Computers 9 5. Insert the remaining M4 panhead screws through the mounting bracket into the wall and tighten (4). Mounting Bracket on the Back Mounting Bracket on the Bottom Mount the Computer on a DIN Rail You can mount the computer on a DIN rail. The DIN-rail bracket mounts to the back of the computer. See page 11 for the DIN-rail bracket dimensions. IMPORTANT Do not mount the computer on a DIN rail in high shock and vibration environments. 1.
Compact Industrial Non-display Computers TIP If you are using an existing DIN rail, skip step 3. 3. Attach and secure the DIN rail to the installation surface (3). 4. Mount the computer on a DIN rail. a. Insert the upper lip of the DIN-rail bracket into the top edge of the DIN rail. a. Press the computer firmly against the lower edge of the DIN rail (4). 5. Secure the installation by tightening the fastener on the DIN-rail bracket and torque to 1.18 N•m (10.42 lb•in) (5).
Compact Industrial Non-display Computers 11 Figure 1 - Mounting Bracket Dimensions Wall Mounting Bracket All dimensions are in mm (in.) 172 (6.77) 212 (8.346) 6 (0.236) 46 (1.811) 92 (3.622) 64 (2.52) 114.6 (4.512) 140 (5.511) 11.3 (0.444) 150 (5.90) 192 (7.56) DIN-rail Mounting Bracket 86 (3.385) 46 (1.811) 49 (1.929) 92 (3.622) 114 (4.488) 80 (3.149) 140 (5.511) 172 (6.771) 8.5 (0.334) 16 (0.629) VESA Mounting Bracket 2 (0.079) 100 (3.94) 84 (3.318) 156 (6.14) 100 (3.94) 176.4 (6.
Compact Industrial Non-display Computers Computer Dimensions Computer dimensions for the computer are given in mm (in). Top View 158 (6.22) 115 (4.51) 172 (6.77) Front View 158 (6.22) Side View Connect Peripherals Connect the required peripherals such as the keyboard, mouse, and monitor to the corresponding I/O ports on the computer. Refer to Hardware Features on page 6 for required connections.
Compact Industrial Non-display Computers 13 Apply Power The computer connects to either a 100…240V AC or 9…36V DC power source, depending on the model. SHOCK HAZARD: Connect the AC power cord or the DC ground connection to a power source with an earth ground to prevent electrical shock. Failure to follow this warning could result in electrical shock. We recommend that the computer circuit have its own disconnect.
Compact Industrial Non-display Computers Connect DC Power Computers with a catalog number ending in DC have a DC input terminal block for connecting to a 9…36V DC power source. The DC power option supports operation from either a Safety Extra Low Voltage (SELV) or Protective Extra Low Voltage (PELV) power source. A pre-installed ground bus strip connects the DC common and functional ground terminals together. This is to support SELV cases where the end user requires grounding at the computer.
Compact Industrial Non-display Computers 15 Functional Ground Screw You are not required to use the functional ground screw for safety and regulatory compliance. However, if you want a supplemental ground, use the functional ground screw below the power input. Connect to a Network The computers have one or two Gigabit LAN ports, depending on the model. The computer connects to the Ethernet network by using twisted-pair Ethernet cabling with RJ45 connectors.
Compact Industrial Non-display Computers Real-time Clock (RTC) Battery This computer contains a lithium battery that must be replaced during the life of the computer. The computers use nonvolatile memory that require a battery to retain system information when power is removed. The RTC battery is on the computer’s CPU board. On Time (hrs/wk) Expected Battery Life (yrs) 0 4 40 5.5 80 7 The battery life depends on the amount of time the computer is powered on.
Compact Industrial Non-display Computers 17 Ship or Transport the Computer If you need to ship the computer via common carrier or otherwise transport it to another location, you must first uninstall the computer and place it in its original packing material. ATTENTION: Do not ship or transport the computer when it is installed in a machine, panel, or rack. Doing so can cause damage to the computer. You must uninstall the computer and place it in its original packing material before shipping.
Compact Industrial Non-display Computers Environmental Attribute 6155R-NSXP, 6155R-NPXP, 6155R-NPXPDC, 6155F-NPXP, 6155F-NPWE, 6155F-NPXPDC, 6155F-NPWEDC Temperature, operating 0…55 °C (32…131 °F) Temperature, nonoperating -20…60 °C (-4…140 °F) Relative humidity 10…90% noncondensing Shock, operating (1) 15 g (1/2 sine, 11 ms) Shock, nonoperating Vibration, operating 6155R 6155F (1) Vibration, nonoperating(1) (1) 30 g (1/2 sine, 11 ms) (1) 0.006 in.
Compact Industrial Non-display Computers 19 Additional Resources For additional information on compact non-display computers, refer to the following publications. Resource Description Industrial Non-display Computer User Manual, publication 6155R-UM002 Gives an overview of the system and provides procedures to install the computer, set up computer connections, operate the computer, and troubleshoot the computer.
Rockwell Automation Support Rockwell Automation provides technical information on the Web to assist you in using its products. At http://www.rockwellautomation.com/support, you can find technical manuals, technical and application notes, sample code and links to software service packs, and a MySupport feature that you can customize to make the best use of these tools. You can also visit our Knowledgebase at http://www.rockwellautomation.