
User guide


3Ć3
Step 8. Connect the programmer to the system and run the
ReSource Software. Use the I/O MONITOR function.
If a baud rate other than 4800 is required, configure the
serial port by writing the baud rate used by the
transmitting device to register 21 and then writing the
value 255 to register 20. The sevenĆsegment LED should
now be blank.
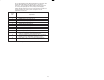
Monitor registers 14,16,17 and 18 using the ReSource
Software. Register 14 should be changing at the rate that
messages are being received.
Use the following procedure to replace a module:
Step 1. Turn off power to the rack and all connections.
Step 2. Use a screwdriver to loosen the screws holding the
connector to the module. Remove the connector from the
module.
Step 3. Loosen the screws that hold the module in the rack.
Remove the module from the slot in the rack.
Step 4. Place the module in the antiĆstatic bag it came in, being
careful not to touch the connectors on the back of the
module. Place the module in the cardboard shipping
container.
Step 5. Take the new module out of the antiĆstatic bag, being
careful not to touch the connectors on the back of the
module.
Step 6. Insert the module into the desired slot in the rack. Use a
screwdriver to secure the module into the slot.
Step 7. Attach the DĆshell connector to the mating half on the
module. Make certain that the connector is the proper one
for this module. Use a screwdriver to secure the connector
to the module.
Step 8. Turn on power to the rack.