
Instruction Manual


3Ć4
WARNING
BE CAREFUL WHEN WRITING TO THE OUTPUTS TO INSURE THAT NO
UNEXPECTED MACHINE MOTION WILL RESULT. FAILURE TO OBSERVE THIS
PRECAUTION COULD RESULT IN BODILY INJURY OR DAMAGE TO EQUIPMENT.
3.3 Module Replacement
Use the following procedure to replace a module:
Step 1. Turn off power to the rack and all connections.
Step 2. Use a screwdriver to loosen the screws holding the
connector to the module. Remove the connector.
Step 3. Loosen the screws holding the module to the rack.
Remove the module from the slot in the rack.
Step 4. Place the module in the antiĆstatic bag it came in, being
careful not to touch the connectors on the back of the
module. Place the module in the cardboard shipping
container.
Step 5. Take the new module out of the antiĆstatic bag, being
careful not to touch the connectors on the back of the
module.
Step 6. Insert the module into the desired slot in the rack. Use a
screwdriver to secure the module into the slot.
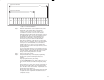
Step 7. Attach the field terminal connector (M/N 57C370) to the
mating half on the module. Make certain that the
connector keys are oriented correctly and that the
connector is the proper one for this module (see step 6 in
3.2 Initial Installation). Use a screwdriver to secure the
connector to the module.
Step 8. Turn on power to the rack.