Installation Instructions ControlLogix AutoMax DCSNet and AutoMax Remote I/O Communication Interface Module (Catalog Number 56AMXN/B) Use this document as a guide to install the ControlLogix AutoMax DCS and AutoMax Remote I/O communication interface module. The following table lists what this manual contains and where to find specific information.
DCSNet/RE RIO Module Important User Information Because of the variety of uses for the products described in this publication, those responsible for the application and use of this control equipment must satisfy themselves that all necessary steps have been taken to assure that each application and use meets all performance and safety requirements, including any applicable laws, regulations, codes and standards.
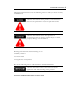
DCSNet/RE RIO Module 3 Throughout this manual we use the following notes to make you aware of safety considerations: Identifies information about practices or circumstances that have the potential to create an explosion hazard. Identifies information about other practices or circumstances that can lead to personal injury or death, property damage or economic loss.
DCSNet/RE RIO Module Understand Compliance to European Union Directive If this product bears the CE marking, it is approved for installation within the European Union and EEA regions. It has been designed and tested to meet the following directives.
DCSNet/RE RIO Module 5 Enclosure and Environmental Requirements Specific To This Product The 56AMXN/B is NOT suitable for use in hazardous locations. This product must be mounted within a suitable system enclosure to prevent personal injury resulting from accessibility to live parts. The interior of this enclosure must be accessible only by the use of a tool.
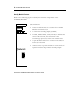
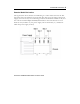
DCSNet/RE RIO Module ATTENTION Identify Module Features Refer to the following figure to identify the hardware components of the 56AMXN/B module.
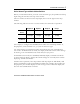
DCSNet/RE RIO Module 7 Set the Network Type and Node Address Switches Before you install the module, you must set the network type, drop number and drop depth using the switches at the top of the module. The two switches at the left set the drop depth, the two at the right set the drop number. The following table shows how to set the switches for each mode of operation.
DCSNet/RE RIO Module Prepare the Chassis for Module Installation Before you install the 56AMXN/B module, you must install and connect a ControlLogix chassis and power supply. For information on installing these products, refer to the publications listed in the following table. Chassis Type Chassis Power Power Supply Installation Supply Installation Series B: 1756-A4, -A7, Pub. No. 1756-PA72/B Pub. No. -A10, -A13 1756-IN080 1756-PB72/B 1756-5.67 1756-PA75/A Pub. No. 1756-PB75/A 1756-5.
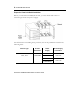
DCSNet/RE RIO Module 9 Determine Module Slot Location The figure below shows chassis slot numbering in a 4-slot chassis. Slot 0 is the first slot and is always the leftmost slot in the rack (the first slot to the right of the power supply). You can use any size ControlLogix chassis and install the module in any slot. You can also install multiple 56AMXN/B modules in the same chassis. You can install as many modules as your power supply can accommodate (i.e., number for which the power supply is rated).
DCSNet/RE RIO Module Installing or Removing the Module While Power Is Applied Versions of the 56AMXN hardware prior to O-57677-1 do NOT support removal and insertion under power. The hardware version can be identified by looking for a sticker with the part number O-57677-1 or above on the module’s printed circuit (near the serial number – you do not need to disassemble the 56AMXN to find the sticker).
DCSNet/RE RIO Module 11 Install the Module Do not force the module into the backplane connector. If you cannot seat the module with firm pressure, check the alignment. Forcing the module into the chassis can damage the backplane connector or the module.
DCSNet/RE RIO Module Removing or Replacing the Module (When Applicable) If you are replacing an existing module with an identical one, and you want to resume identical system operation, you must install the new module in the same slot. You must also set the switches to the same settings and run the configuration program and download the appropriate configuration to the module.
DCSNet/RE RIO Module 13 Wire the Connector for the AutoMax Network Use a drop cable, 612574-36R, available through Rockwell Automation Systems Business, and passive tap M/N 57C380 to connect the module to the coaxial network cable. This cable turns down and has a ferrite to reduce EMI. This cable must be used in CE applications. You can also use drop cable 612403-036R but it points up. The drop cable is a 3-foot long multi-conductor cable with 9-pin D-shell connectors at each end.
DCSNet/RE RIO Module Check Power Supply and Module Status The rack power supply indicator should be green. The module OK LED should be solid red, then solid green. The alphanumeric display shows the following messages at powerup. Alphanumeric Status Display Powerup Messages B#nn Stages in the startup processes Boot 56AMXN Ver 1.xx.
DCSNet/RE RIO Module 15 Interpreting the Alphanumeric Display The 56AMXN/B module displays alphanumeric messages that provide diagnostic information about your module. The alphanumeric display displays warning messages twice, then resumes the normal display. The following table summarizes the messages. Message Description 56AMXN Ver x.xx.xx The module’s firmware version, displayed at powerup.
DCSNet/RE RIO Module Message Description Error: Heard Another RIO Master The module is configured as a Remote I/O master and has heard another Remote I/O master active on the network. RIO Master The module is configured as a Remote I/O master. Displayed during normal operation. Drop x Config Mismatch The configuration for remote I/O drop x in Flash memory on the module doesn’t match the drop on the network. Drop x OffLine Remote I/O drop x is offline.
DCSNet/RE RIO Module 17 Interpreting the LED Status Indicators The three LED status indicators on the module provide information about your module and the status of each channel. The following tables outline the indicator condition and the corresponding status, and explain what each condition means. NET LED – DCS/RIO Network Status The NET LED indicates the status of the network connection. It is green if the network status is good. If it is red, the following table shows possible causes.
DCSNet/RE RIO Module OK LED – Module Health A bicolor OK LED indicates module health. A red LED indicates that module startup diagnostics have failed or a major module fault such as watchdog bite or jabber inhibit has occurred. Green indicates that the card has passed all power-up diagnostics and is functioning normally. This LED is red during powerup. If all three LEDs are solid red and the 4-character display shows something like M#66, this indicates that a fatal error has occurred.
DCSNet/RE RIO Module 19 Hazardous Location information The following information applies when operating this equipment in hazardous locations: The 56AMXN is NOT suitable for use in hazardous locations. Products marked “CL I, DIV 2, GP A, B, C, D” are suitable for use in Class I Division 2 Groups A, B, C, D, Hazardous Locations and nonhazardous locations only. Each product is supplied with markings on the rating nameplate indicating the hazardous location temperature code.
DCSNet/RE RIO Module Specifications Parameter Specification Module Location ControlLogix chassis Maximum Backplane Current Load 650mA @ +5.
DCSNet/RE RIO Module 21 Local Drive Solutions Contact Directory New England Ph. 508.357.8431 Fax 508.485.5059 Boston MA Southeast Ph. 770.277.0277 Fax 770.682.6491 Atlanta GA Gulf Coast Ph. 281.233.0300 Fax 281.233.0101 Houston TX West Coast Ph. 626.969.7647 Fax 626.334.8320 Los Angeles CA Eastern Ph. 732.225.1360 ext. 110 Fax 732.225.7833 Edison NJ Carolinas Ph. 704.525.1455 Fax 704.525.9025 Charlotte NC Midwest Ph. 630.860.1090 Fax 630.787.0309 Chicago IL St. Ph. Fax St. Ohio Valley Ph: 513.943.
DCSNet/RE RIO Module Publication 56AMXN-IN002A-EN-P November 2002
DCSNet/RE RIO Module 23 Publication 56AMXN-IN002A-EN-P November 2002
DCSNet/RE RIO Module www.rockwellautomation.com Corporate Headquarters Rockwell Automation, 777 East Wisconsin Avenue, Suite 1400, Milwaukee, WI, 53202-5302 USA, Tel: (1) 414.212.5200, Fax: (1) 414.212.5201 Headquarters for Allen-Bradley Products, Rockwell Software Products and Global Manufacturing Solutions Americas: Rockwell Automation, 1201 South Second Street, Milwaukee, WI 53204-2496 USA, Tel: (1) 414.382.2000, Fax: (1) 414.382.