
INSTALLATION MANUAL Manual

Chapter 5
Installing the Peripherals
5-9
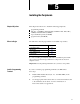
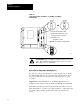
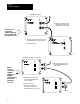
To connect the 4-port distribution panel, follow the steps below.
1. Route the cable from the back of the distribution panel to the
information processor.
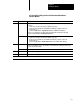
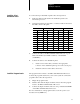
2. Using the following pin-outs table to construct a cable for the device
that will connect to the panel.
Port 0 Port 1 Port 2 Port 3
Pin Signal Pin Signal Pin Signal Pin Signal
2 TXD0 2 TXD1 2 TXD2 2 TXD3
3 RXD0 3 RXD1 3 RXD2 3 RXD3
7 SIG GND 7 SIG GND 4 RTS2
1
7 SIG GND
5 CTS2
1
6 DSR2
7 SIG GND
8 DCD2
1
20 DTR2
22 RI
1
1
5731CPU1
and 5731CPU2 do not support line signals.
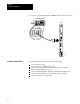
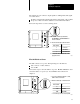
3. Connect the cable to the MicroVAX Information Processor’s port
labeled Comm Port (5731-CPU-1, CPU-2) or Serial CH A
(5730-CPU1).
4. Connect the device to the distribution panel.
a. Attach one end of the cable you made to the appropriate
connector on the distribution panel (port 3 is the console port).
b. Attach the other end of the cable to the device.
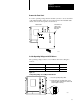
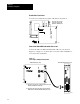
The program loader connects to the MicroVAX Information Processor.
Connect the program loader before you boot the system. To connect the
program loader, follow the steps below.
1. Plug in the program loader.
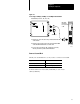
2. Run the cable with the 50-pin, D-shell connector from the program
loader to the MicroVAX Information Processor.
3. Connect the 50-pin, D-shell connector to the port labeled LOADER
on the MicroVAX Information Processor.
For more information on the program loader, see the Program Loader
Installation Data (5000-2.93).
Install the 4Port
Distribution Panel
Install the Program Loader