
User guide

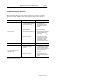
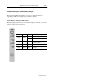

Table Of Contents
- Front Cover
- Important User Information
- Table of Contents
- Preface
- 1 - Scanner Features
- 2 - Installing Your Hardware
- Important Notes on Scanner Systems
- 1. Unpacking the Equipment
- 2. Setting the Address of the Base/Charger Unit
- 3. Connecting the Host Cable to the Base/Charger Unit
- 4. Mounting the Base/Charger Unit
- 5. Mounting the Power Supply
- 6. Connecting the Power Supply to the Base/Charger Unit and Power Receptacle
- 7. Connecting the Host Cable to the Host Device
- 8. Charging the Battery
- 9. Pairing the Scanner to the Base/Charger Unit
- 3 - Configuring Your Scanner
- 4 - Scanner Operation
- 5 - Maintenance and Troubleshooting
- A - Specifications
- B - Cable Pinouts
- C - Advanced Data Formatting
- Glossary
- Index
- Test Symbols
- Back Cover

Maintenance and Troubleshooting 5–13
Publication 2755-6.3
Troubleshooting the Scanners
The following table provides a list of the most common operating
problems, the probable causes, and suggested corrective actions.
Problem Probable Cause(s) Corrective Action
1. Power supply not
connected to base/charger
unit or power source.
1. Make sure power supply is
connected to the
base/charger unit and
plugged into a power
source.
2. Depleted battery. 2. Recharge battery.
No Scan Beam
3. Scan beam has timed out.
3. Normal operation. Release
trigger completely and
scan again.
4. Defective scanner.
4. If possible, try another
scanner using the same
connections. Contact
Allen-Bradley Global
Technical Services (GTS).
Weak Scan Beam 1. Depleted battery. 1. Recharge battery.
Scan Beam Appears as a
Dot, Not a Line
1. Trigger on long range
scanner is not fully
pressed.
1. Long range scanner has a
2 position trigger. The first
position is for the spotter
beam. Press the trigger to
the next position for
scanning.
2. Defective scanner.
2. Contact Allen-Bradley
Global Technical Services
(GTS).
Table continued on the next page.