
User guide
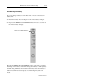


Table Of Contents
- Front Cover
- Important User Information
- Table of Contents
- Preface
- 1 - Scanner Features
- 2 - Installing Your Hardware
- Important Notes on Scanner Systems
- 1. Unpacking the Equipment
- 2. Setting the Address of the Base/Charger Unit
- 3. Connecting the Host Cable to the Base/Charger Unit
- 4. Mounting the Base/Charger Unit
- 5. Mounting the Power Supply
- 6. Connecting the Power Supply to the Base/Charger Unit and Power Receptacle
- 7. Connecting the Host Cable to the Host Device
- 8. Charging the Battery
- 9. Pairing the Scanner to the Base/Charger Unit
- 3 - Configuring Your Scanner
- 4 - Scanner Operation
- 5 - Maintenance and Troubleshooting
- A - Specifications
- B - Cable Pinouts
- C - Advanced Data Formatting
- Glossary
- Index
- Test Symbols
- Back Cover

Maintenance and Troubleshooting 5–11
Publication 2755-6.3
3. Slide the battery pack out from the handle.
Battery Pack
Handle Release Button
4. Insert the new battery into the scanner handle. Make sure the
handle release button is pressed in below the outer housing when
sliding a charged battery into place.
5. Pair the scanner with the base/charger unit. Refer to page 2–16
for information regarding pairing the scanner to the base/charger
unit.