
User guide
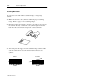
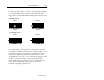

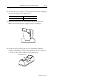
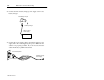
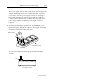
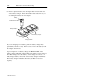
Table Of Contents
- Front Cover
- Important User Information
- Table of Contents
- Preface
- 1 - Scanner Features
- 2 - Installing Your Hardware
- Important Notes on Scanner Systems
- 1. Unpacking the Equipment
- 2. Setting the Address of the Base/Charger Unit
- 3. Connecting the Host Cable to the Base/Charger Unit
- 4. Mounting the Base/Charger Unit
- 5. Mounting the Power Supply
- 6. Connecting the Power Supply to the Base/Charger Unit and Power Receptacle
- 7. Connecting the Host Cable to the Host Device
- 8. Charging the Battery
- 9. Pairing the Scanner to the Base/Charger Unit
- 3 - Configuring Your Scanner
- 4 - Scanner Operation
- 5 - Maintenance and Troubleshooting
- A - Specifications
- B - Cable Pinouts
- C - Advanced Data Formatting
- Glossary
- Index
- Test Symbols
- Back Cover
5–8 Maintenance and Troubleshooting
Publication 2755-6.3
5. Insert a depleted battery into an adapter that is inserted into the
4-slot battery charger. Press the handle release button in as you
are sliding the battery into the adapter.
4-Slot Battery Charger
Battery Adapter
Battery
Handle Release Button
Charging Station
If you are charging a new battery pack, the battery charger may
prematurely switch to ready. If this occurs, remove the battery from
the adapter and reinsert.
Upon completion of a battery charge, the READY LED on the
battery charger will flash. This indicates the battery is 95% charged.
For 100% charge, leave the battery on the charger for 3 hours. A
fully charged battery can be left on the battery charger indefinitely.
The battery charger maintains the battery at 100% of its rated
capacity.