
User guide
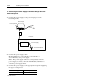
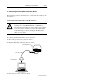
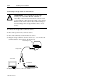
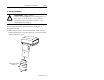
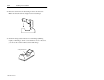
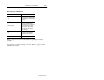
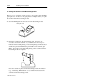
Table Of Contents
- Front Cover
- Important User Information
- Table of Contents
- Preface
- 1 - Scanner Features
- 2 - Installing Your Hardware
- Important Notes on Scanner Systems
- 1. Unpacking the Equipment
- 2. Setting the Address of the Base/Charger Unit
- 3. Connecting the Host Cable to the Base/Charger Unit
- 4. Mounting the Base/Charger Unit
- 5. Mounting the Power Supply
- 6. Connecting the Power Supply to the Base/Charger Unit and Power Receptacle
- 7. Connecting the Host Cable to the Host Device
- 8. Charging the Battery
- 9. Pairing the Scanner to the Base/Charger Unit
- 3 - Configuring Your Scanner
- 4 - Scanner Operation
- 5 - Maintenance and Troubleshooting
- A - Specifications
- B - Cable Pinouts
- C - Advanced Data Formatting
- Glossary
- Index
- Test Symbols
- Back Cover

3–2 Configuring Your Scanner
Publication 2755-6.3
Available Symbologies
The scanner automatically discriminates between all of the following
symbologies. The only exception is that the scanner cannot
discriminate between Code 39 and Code 39 Full ASCII (see glossary
definition). The scanner can read and decode these symbologies:
• UPC-A
• UPC-E
• Code 39 Full ASCII
• Code 39
• Code 128
• EAN 8
• EAN 13
• EAN 128
• Codabar
• Interleaved 2 of 5
• Discrete 2 of 5
• MSI Plessey
All bar code symbologies are enabled as the default. To disable a
symbology, scan the Delete bar code. To enable a symbology, scan
the Add bar code for the symbology.
Scanner Bar Codes
All programming codes may be found in the Hand-Held Cordless
Bar Code Scanners Programming Guide (Publication No. 2755-6.6).
The scanner is always enabled to read Code 128 labels since all
configuration codes use this symbology.