
Reference Manual

77Numerics
Publication 2711E-820 – January 1998
If you choose the PLC Controlled decimal point, assign a
Decimal Point Position control. For the Numeric Input Cursor
Point object, use the Numeric Decimal Point Position control (not
the Decimal Point Position control).
This control should use analog tags.
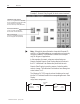
The following examples illustrate how the (Numeric) Decimal
Point Position control’s value affects the appearance of the
scratchpad:
• If the control’s value is zero, no decimal point is displayed.
• If the control’s value is three, three digits are displayed to the
right of the decimal point.
• If the control’s value is seven, seven digits are displayed to the
right of the decimal point.
• If the control’s value changes, the display changes
accordingly.
Note: If the Decimal Point control’s value is greater than 15, the
decimal point is replaced by a single asterisk (*). Pressing Enter
when the asterisk is displayed displays an error message.
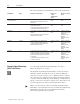
The number of digits after the decimal determines the minimum
number of digits in the value to be sent to the control. For
example, if the setting was for three digits after the decimal, an
operator’s entry would appear as follows:
Digits Entered Number Displayed Keypad Numeric Input Value
(to PLC)
1 .1 100
12 .12 120
123 .123 123
1234 1.234 1234
12345 12.345 12345
Note: Although you can configure up to 15 digits after the
decimal point, 10 or more digits may generate a Mistake message
on the PanelView terminal. PanelView converts the decimal
number into a signed long value, with a range of –2,147,483,648
to 2,147,483,647. If the converted number is outside this range,
the Mistake message appears.
If the setting was for 15 digits after the decimal, an operator’s
entry would appear as follows:
Digits Entered Number Displayed Keypad Numeric Input Value
(to PLC)
0000000000000015
0.000000000000015 15
0100000000000015 0.100000000000015 ERROR
(100000000000015)
"
"