
Quick Start User Manual
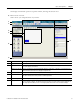


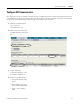
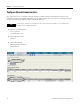
Table Of Contents
- 2711C-QS001F-EN-P PanelView Component HMI Quick Start
- Where to Start
- Preface
- Chapter 1
- Chapter 2
- Chapter 3
- Chapter 4
- Chapter 5
- Chapter 6
- Create the Motor Status Screen
- Introduction
- Before You Begin
- What You Need
- Follow These Steps
- Change the Screen Name
- Change the Grid Attributes
- Create the Start Motor Push Button
- Create the Stop Motor Push Button
- Create the Motor Speed Screen Button
- Create a Goto Config Button
- Create the Motor Control List Selector
- Create the Motor Status Indicators
- Save the Motor Status Screen
- Create the Motor Status Screen
- Chapter 7
- Create the Motor Speed Screen
- Introduction
- Before You Begin
- What You Need
- Follow These Steps
- Create a New Screen
- Create the Motor Status Screen Button
- Create a Numeric Entry Object
- Create a Heading for the Numeric Entry Object
- Create a Increment Decrement Object
- Create Increment Decrement Keys
- Create a Bar Graph
- Create a Bar Graph Scale
- Create Text Labels for the Scale
- Create a Bar Graph Heading
- Create a Numeric Display
- Create a Heading for the Numeric Display
- Update the Motor Speed Screen Button
- Create the Motor Speed Screen
- Chapter 8
- Chapter 9
- Appendix A
- Back Cover
Publication 2711C-QS001F-EN-P - November 2010 33
Open a New Application Chapter 3
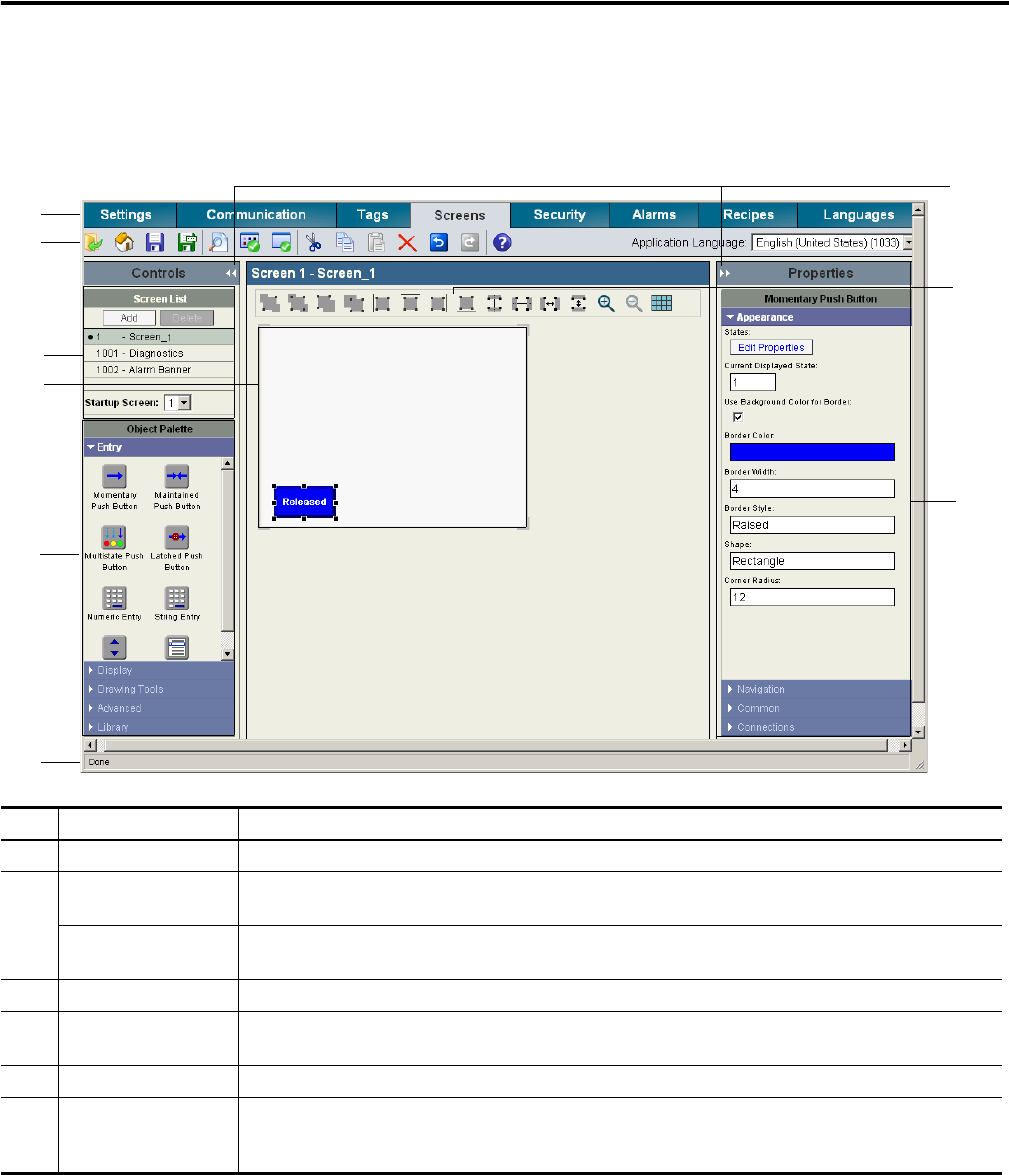
The design environment opens in a separate window, showing the Screens view.
2. Review areas of screen.
This is where you will spend most of your time.
1
2
4
6
7
8
9
3
5
# Screen area Description
1 Navigation tabs Provides access to the different functional areas of an application.
2 Application toolbar Provides common tools that are available to all views of the application. Drag your mouse over each tool
to see the purpose of each tool.
Application Language Selects a language for viewing and editing application components. Languages for an application are
defined and translated from the Languages navigation tab.
3 Cursor controls Hides or shows the Controls or Properties panel to increase the workspace area.
4 Screen list Contains a list of screens in the application including the alarm banner and diagnostics banner.
The bullet indicates the startup screen for runtime operations.
5 Screen workspace Contains objects that you drag to the screen from the object palette.
6 Object palette Contains panels of objects that you can drag to the screen workspace. Click the cursor on a tab to open
or close a panel of objects. The palette can occupy 25, 50 or 75% of the Controls panel. Right-click on
the object palette heading to resize it. The object palette and screen list are resized accordingly.