
User guide


184 Rockwell Automation Publication 23C-IN001B-EN-P - June 2013
Chapter 4 Electrical Installation
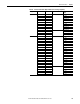
Control and Signal Wiring
The terminal block on the Main Control board provides terminals for 24V DC
power for the eight remote control inputs and outputs. The terminal block in the
options cabinet provides terminals for 115V AC power for the remote control
inputs and outputs. The options cabinet terminal block is factory-wired to the
terminal block on the Main Control board.
Installing Input Power
Wiring
To connect AC input power to the drive:
❏ Step 1. Wire the AC input power leads by routing them according to drive
type. Power wiring sizes are listed in Ta bl e 1 4
on page 183.
❏ Step 2. Connect the three-phase AC input power leads (three-wire V AC) to
the appropriate terminals. Connect the AC input power leads to
terminals R/L1, S/L2, T/L3 on the power terminal block.
❏ Step 3. Tighten the AC input power terminals to the proper torque according
to drive type as shown in Ta bl e 1 4
on page 183.
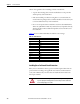
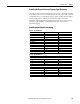
Output Power
T1(U), T2(V), T3(W)
A 3…10 3…20 16 AWG 8 AWG 26
15…30 25…40 8 AWG 2 AWG 45
– 50…60 12 AWG 2 AWG 49.5
40…50 75…150 1/0 AWG 4/0 AWG 173
– 200…250
(1) (1)
260
– 300…350
(1) (1)
354
B 3…7.5 3…7.5 22 AWG 8 AWG 13
10…20 10…30 14 AWG 4 AWG 19
25…30 40…75 12 AWG 1/0 AWG 40
– 100…150 6 AWG 350 MCM 275
40…50 200…300 (2) 4 AWG 350 MCM 500
– 350 (2) 250 MCM 750 MCM 375
(1) Threaded studs provided for wire lugs.
Name Package
Style
Hp Wire Size Range Torque
208V AC 480V AC Minimum Maximum
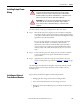
ATTENTION: Protect the contents of the options cabinet from metal chips and
other debris while drilling the conduit openings. Failure to observe this
precaution could result in damage to, or destruction of, the equipment.
ATTENTION: Do not route signal and control wiring with power wiring in the
same conduit. This can cause interference with drive operation. Failure to
observe this precaution could result in damage to, or destruction of, the
equipment.