
Instruction Manual


Publication 20P-IN060A-EN-P - May 2010
Copyright © 2010 Rockwell Automation. All rights reserved. Printed in USA.
www.rockwellautomation.com
A
mericas:
Rockwell
Automation,
1201
South
Second
Street,
Milwaukee,
WI
53204-2496
USA,
Tel:
(1) 414.382.2000
,
Fax:
(1)
414.382.4444
Europe/Middle East/Africa:
Rockwell
Automation
SA/NV,
Vorstlaan/Boulevard
du Souverain
36,
1170 Brussels,
Belgium,
Tel:
(32) 2 663
0600,
Fax:
(32) 2 663 0640
A
sia
Pacific:
Rockwell
Automation,
Level 14,
Core F,
Cyberport 3,
100 Cyberport Road,
Hong
Kong,
Tel:
(852) 2887 4788,
Fax:
(852) 2508 1846
Power, Control and Information Solutions
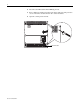
6. Loosen the bolts that secure the fuse to the bus bar and SCR leg
terminal. Rotate the top of the fuse out and downward and pull the fuse
off of the lower bolt and out of the drive.
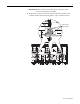
7. Replace the fuses using the following tightening torque: 45 N•m (398
lb•in).
8. Install the existing fuse switches on the fuse body using the existing
hardware. Verify that all wires are properly connected to the fuse
switches.
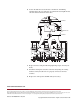
9. Replace the control panel and DPI cable (if necessary).
Loosen bolt
Loosen bolt
Remove fuse