
Owner manual

Operation 2-3
PowerFlex 700L Liquid-to-Liquid Heat Exchanger User Manual
Publication 20L-UM002A-EN-P
Adding Coolant to the Drive
Loop for Start-Up
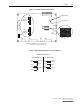
1. Make sure all hose connections are completed as described in Drive
Loop (from Heat Exchanger to Drive) on page 1-6.
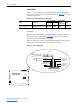
2. With the top and side covers removed from the heat exchanger, make
sure all wiring to the heat exchanger is completed as described in Power
Wiring on page 1-10 and Control Wiring on page 1-12, respectively.
3. Make sure both pipe plugs are tightened on the drains in front of the
heat exchanger.
4. Remove the fill tube cap from the top of the tank.
5. Fill the heat exchanger until the sight glass reaches the fill line with
approved coolant (see Drive Coolant Requirements
on page 1-3).
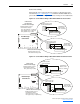
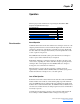
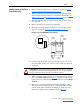
Figure 2.1 Fill Line, PRIME SWITCH, and Indicators
6. Loosely install the fill tube cap back on the tank to allow air to escape
the system while priming. Use caution as some coolant may splash out
of the tank.
7. While viewing the fluid level gauge on the front of the heat exchanger,
turn on the PRIME SWITCH (see Figure 2.1
). Fluid level will decrease
rapidly. When the tank level lowers to about ¼ full, turn off the PRIME
SWITCH.
8. Repeat steps 5 through 8 until the tank remains at the fill line. (The
drive loop system typically holds up to 5 gallons, depending on length
of hoses.) If the tank is not filled to the fill line, an alarm may occur —
indicated by a flashing amber STATUS indicator (Figure 2.1
).
FLUID
LEVEL
PRIME
SWITCH
STATUS
Indicator
POWER
Indicator
SUPPLY
DRAIN
DRIVE
DRAIN
!
ATTENTION: In Step 8 the fluid level in the tank will decrease rapidly. It
is important to not let the tank empty. Running the heat exchanger without
enough coolant may damage the unit and void the warranty.