
Owner's manual

Rockwell Automation Publication 20D-IN010B-EN-P - November 2010 7
SynchLink™ Board for PowerFlex® 700S Drives with Phase II Control
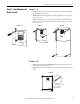
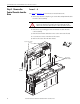
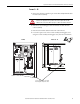
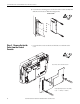
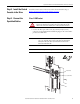
Step 5: Remove the
Existing SynchLink Board
If you are installing a new SynchLink board only, continue with Step 6: Install the
New SynchLink Board on page 8.
If you are replacing an existing SynchLink board continue with these steps.
1. Remove the two screws that secure the SynchLink board to the standoffs
on the main control board and remove the SynchLink board from the
stacker connector.
2. Remove the stacker connector from the mating connector on the main
control board.
3. Remove the two standoffs from the main control board.
=
Remove two screws
and board
Remove two standoffs
Remove the stacker connector