Quick Start Micro800 Programmable Controllers: Getting Started with PanelView Plus – Online Variable Browsing, Data Values Upload/Download, and Variable Import/Export Catalog Numbers Bulletin 2080-LC20, 2080-LC30, 2080-LC50
Important User Information Solid-state equipment has operational characteristics differing from those of electromechanical equipment. Safety Guidelines for the Application, Installation and Maintenance of Solid State Controls (publication SGI-1.1 available from your local Rockwell Automation sales office or online at http://www.rockwellautomation.com/literature/) describes some important differences between solid-state equipment and hard-wired electromechanical devices.
Preface About This Publication This publication is designed to provide quickstart instructions for using global variables of the Micro800® family of programmable logic controllers (PLC) together with PanelView™ Plus HMI terminals. It makes use of sample programs to illustrate the basic steps that a user needs to perform to use those global variables.
Preface • FactoryTalk View Studio version 8.0 or later FactoryTalk® View Studio provides a common development tool for FactoryTalk View Site Edition and FactoryTalk View Machine Edition, allowing users to create applications in a single design environment. FactoryTalk View Studio supports editing and reusing projects for improved portability between embedded machine and supervisory HMI systems.
Table of Contents Important User Information . . . . . . . . . . . . . . . . . . . . . . . . . . . . . . . . . . . . . . . 2 Preface About This Publication . . . . . . . . . . . . . . . . . . . . . . . . . . . . . . . . . . . . . . . . . . . . Audience . . . . . . . . . . . . . . . . . . . . . . . . . . . . . . . . . . . . . . . . . . . . . . . . . . . . . . . . . Required Software. . . . . . . . . . . . . . . . . . . . . . . . . . . . . . . . . . . . . . . . . . . . . . . . . Additional Resources . . . .
Table of Contents Notes: Rockwell Automation Publication 2080-QS003A-EN-E - September 2014
Where to Start Overview This quick start instructions illustrate how you can use the Micro800 controller global variables together with the PanelView Plus HMI terminals. Step-by-step instructions are provided on how to create a sample application and how to assign global variable tags to elements. You will also be shown how to export these global variables for editing on your PC.
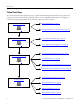
Where to Start Follow These Steps The major subsections for this quick start project are outlined in the following flowchart. Follow the steps under each subsection to become familiar with the required procedure to create your PanelView Plus application, configure it to communicate with the global variables of your controller, and interact with the variables.
Chapter 1 Build and Download a Project Introduction In this chapter, you will learn how to build a project in Connected Components Workbench, and download the project to the Micro800 controller. This project contains the Micro800 controller global variables which will be used in the subsequent chapters of this quick start. Build a Sample Project In this section, you will learn how to build a sample project for Connected Components Workbench. 1. Launch the Connected Components Workbench software.
Chapter 1 Build and Download a Project 2. The File Explorer dialog box appears and shows a list of sample projects that come with the latest version of Connected Components Workbench. Double-click on the folder named "Micro800 PVP Data Upload Download".
Build and Download a Project Chapter 1 3. In the "Micro800 PVP Data Upload Download" folder, double-click on the folder named "Micro800_CCW_Project". 4. In the "Micro800_CCW_Project" folder, double-click on the project file named "Micro800_PVP_Demo".
Chapter 1 Build and Download a Project 5. The Micro800 sample project file is loaded. The next step is to build the project and download it to your controller. 6. Click on the Build icon. 7. A Build progress icon appears. 8. When the build is complete, the output window is updated.
Build and Download a Project Chapter 1 You have finished building a sample project for Connected Components Workbench. See the next section to learn how to download this project to the Micro800 controller. Download the Project to the Controller In this section, you will learn how to download the sample project that you have built earlier to the Micro800 controller. 1. Click on the Download icon. 2. A Connection Browser window appears. Select your controller then click OK. 3.
Chapter 1 Build and Download a Project 4. A download progress icon appears. 5. When the download is complete, the output window is updated. 6. A dialog box appears to ask if you want to change the controller to Remote Run mode. Click Yes to continue. You have finished downloading the sample project to your Micro800 controller. See the next chapter to learn how to create a PanelView Plus project that can be used to interact with the global variables of the Micro800 controller.
Chapter 2 Create a PanelView Plus Project Introduction In this chapter, you will learn to use the FactoryTalk View Machine Edition software to create a PanelView Plus project and an application. This application will then be used in the next chapter to illustrate how to interact with the global variables of a Micro800 controller. Create a PanelView Plus Project In this section you will learn how to create a PanelView Plus project and configure it to communicate with your Micro800 controller.
Chapter 2 Create a PanelView Plus Project 1. For this example, we will create a new application. For the Application name, type in "Micro800_PVP". Click Create to continue. 2. In the project explorer window, right-click on Communication Setup and select Open. 3. In the Configuration Wizard dialog box, select Create a new configuration and click Finish. 4. Under the Device Shortcuts window, click Add to create a new shortcut.
Create a PanelView Plus Project Chapter 2 5. For the Shortcut Type field, click the drop-down arrow and select Symbolic. 6. Under the Design (Local) tab, select your Micro800 controller. Next, click Copy from Design to Runtime. Note that the Micro800 controller must be powered up and available on the chosen network. 7. A confirmation dialog box appears. Click Yes to continue.
Chapter 2 Create a PanelView Plus Project 8. Click OK 9. A confirmation dialog box appears. Click Yes to save the shortcut. 10. In the project explorer window, right-click on Project Settings and select Open.
Create a PanelView Plus Project Chapter 2 11. Select the appropriate project window size for your application, then click OK. You have finished creating a new PanelView Plus project and configured it to communicate with your Micro800 controller. See the next section to learn how to create an application to interact with the Micro800 controller global variables.
Chapter 2 Create a PanelView Plus Project Create a PanelView Plus Application In this section, you will learn how to create a simple application using various object and assigning tags to them that correspond to different Micro800 controller global variables. The variables support a wide range of data types and a variable can also be created as an array of a data type. For more information on the list of supported data types and how to use an array of data types, see Appendix A.
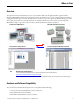
Create a PanelView Plus Project Chapter 2 Example of PanelView Plus Application in FactoryTalk View Machine Edition 2c 2a 2b 1a 1b Two types of objects are used in this example – numeric display object learn how to create these objects, see the respective sections below. and momentary push button object . To 1. Numeric Display Objects on page 22 a. CV Display Object b. PV Display Object 2. Momentary Push Button Objects on page 28 a. Key Press Button b. Reset Counter Button c.
Chapter 2 Create a PanelView Plus Project Numeric Display Objects In this section, you will learn how to create and configure numeric display objects. This object is used to display the value of a counter variable (CV) or a project variable (PV). CV Display objects PV Display objects 1. Create numeric display objects (CV and PV) on your application screen as shown in the example above. To configure each object, right-click the object and select Properties. A Numeric Display Properties window appears.
Create a PanelView Plus Project Chapter 2 2. Click on the Connection tab. To assign a tag to the object, click the "..." button. The Tag Browser window appears. 3. In the Tag Browser window, click Refresh All Folders.
Chapter 2 Create a PanelView Plus Project 4. Select the Online folder to display the list of available tags that you can assign to the object. The Tag Browser window will communicate to the Micro800 controller and show all available Micro800 global variables that can be referenced in PanelView Plus. Offline selection of variables is not supported. 5. For examples of how to assign the various tags to your display object, see the following sections below.
Create a PanelView Plus Project Chapter 2 Assign a CV Tag to the Display Object 1. For this example, select the tag "CV_1", then click OK. 2. The Tag Browser window closes and the Connections tab has been updated with the selected tag. Click OK to save the configuration.
Chapter 2 Create a PanelView Plus Project 3. Repeat the instructions from step 1 and create numeric display objects and assign global variable tags "CV_2" and "CV_3" to them. Assign a PV Tag to the Display Object 1. For this example, select the tag "PV_1", then click OK.
Create a PanelView Plus Project Chapter 2 2. The Tag Browser window closes and the Connections tab has been updated with the selected tag. Click OK to save the configuration. 3. Repeat the instructions from step 1 and create numeric display objects and assign global variable tags "PV_2" and "PV_3" to them. You have finished creating the numeric display objects and assigned the counter variable (CV) and project variable (PV) tags to each object.
Chapter 2 Create a PanelView Plus Project Momentary Push Button Objects In this section, you will learn how to create and configure momentary push button objects. This push button is used to increment the value of its associated counter variable (CV), to reset the CV, and to copy the values in the CV to the project variables (PV). Key Press buttons Copy CV to PV button Reset Counter button 1.
Create a PanelView Plus Project Chapter 2 2. Under the State tab, you can modify the look of the object in its various states. If you make any changes, click Apply after you have finished. 3. Click on the Connection tab. To assign a tag to the object, click the "..." button. The Tag Browser window appears.
Chapter 2 Create a PanelView Plus Project 4. In the Tag Browser window, click Refresh All Folders. 5. Select the Online folder to display the list of available tags that you can assign to the object. The Tag Browser window will communicate to the Micro800 controller and show all available Micro800 global variables that can be referenced in PanelView Plus. Offline selection of variables is not supported.
Create a PanelView Plus Project Chapter 2 6. For examples of how to assign the various tags to your momentary push button object, see the following sections below. To configure the button to increment the value of a counter variable (CV), see Assign a Key Press Tag to the Push Button on page 32. To configure the button to reset the counter variables (CV), see Assign a Reset Tag to the Push Button on page 33.
Chapter 2 Create a PanelView Plus Project Assign a Key Press Tag to the Push Button 1. For this example, select the tag "Key_Press_1", then click OK. 2. The Tag Browser window closes and the Connections tab has been updated with the selected tag. Click OK to save the configuration.
Create a PanelView Plus Project Chapter 2 3. Repeat the instructions from step 1 to create momentary push button objects and assign global variable tags "Key_Press_2" and "Key_Press_3" to them. Assign a Reset Tag to the Push Button 1. For this example, select the tag "Reset", then click OK.
Chapter 2 Create a PanelView Plus Project 2. The Tag Browser window closes and the Connections tab has been updated with the selected tag. Click OK to save the configuration.
Create a PanelView Plus Project Chapter 2 Assign a Copy CV_PV Tag to the Push Button 3. For this example, select the tag "Copy_CV_PV", then click OK. 4. The Tag Browser window closes and the Connections tab has been updated with the selected tag. Click OK to save the configuration. You have finished creating the momentary push button objects and assigned the Key Press, Reset, and copy CV to PV tags to each object.
Chapter 2 Create a PanelView Plus Project Notes: 36 Rockwell Automation Publication 2080-QS003A-EN-E - September 2014
Chapter 3 Data Values Upload/Download Introduction In this chapter you will learn to use the PanelView Plus application that you created in the previous chapter to interact with the Micro800 controller global variables in Connected Components Workbench software.
Chapter 3 Data Values Upload/Download In Connected Components Workbench, when in Debug mode and monitoring the live values of variables, Connected Components Workbench will display a column named Logical Values. Note that the Initial Value column is shown in both non-debug mode and in debug mode. When a project is downloaded and both the Initial Value and Project Value are configured, then Initial Value has precedence and will be downloaded in to the live Logical Value.
Data Values Upload/Download Chapter 3 To begin, open the sample Micro820 controller project in Connected Components Workbench. In this chapter you will learn how to do the following: 1. Download the Project on page 40 2. Change CV values and Upload the Project on page 43 3.
Chapter 3 Data Values Upload/Download Download the Project In this section, you will learn how to download the project to the Micro800 controller. 1. Click the M820-VAR tab to view the initial values assigned to the variables under the global variables tab. 2. Right-click on the controller project and select Download. 3. If your controller is in Remote Run mode, a dialog box appears to ask if you want to change to Remote Program mode. Click Yes to continue.
Data Values Upload/Download Chapter 3 4. A Download Confirmation dialog box appears. For this example, select Download. When the Download option is selected, Connected Components Workbench software downloads the project to the controller. If any initial values have been assigned to either local or global variables, they will also be downloaded. 5. A download progress icon appears. 6. When the download is complete, the output window is updated. 7.
Chapter 3 Data Values Upload/Download 9. Click the Micro820-VAR tab. In Debug mode, the controller has updated the values of the global variables from the project you just downloaded. Note that the Initial Value has precedence over Project Value when downloading. See Priority of Logical Values When Downloading on page 38 for more information. 10. The values of the global variables are also updated on the PanelView Plus application.
Data Values Upload/Download Chapter 3 Change CV values and Upload the Project In this section, you will change the value of the counter variables (CV), copy the values to the project variables (PV), and upload the changes to the controller. 1. Use the Key Press push button to increment the values of the counter variables (CV). Values have been incremented 2. Observe the new values of the counter variables (CV) in the controller.
Chapter 3 Data Values Upload/Download 3. Click the Copy CV to PV push button to copy the values from the counter variables (CV) to the project variables (PV). Values have been copied from CV 4. While connected to the controller but not in Debug mode, right-click on the controller project and select Upload. 5. A dialog box appears to ask if you want to replace the current project’s contents. Click Yes to continue.
Data Values Upload/Download Chapter 3 6. An Upload progress icon appears. 7. When the upload is complete, the output window is updated. 8. Click the Micro820-VAR tab. Since Connected Components Workbench is not in Debug mode, Connected Components Workbench will show the Project Value column which contains the recently uploaded logical values. You must click Save if you want to permanently save the values in the project.
Chapter 3 Data Values Upload/Download Download the Project With Project Values In this section, you will learn how to download the project with the project values to the Micro800 controller. 1. Right-click the controller project and select Download. 2. If your controller is in Remote Run mode, a dialog box appears to ask if you want to change to Remote Program mode. Click Yes to continue. 3. A Download Confirmation dialog box appears. For this example, select Download with Project Values.
Data Values Upload/Download Chapter 3 5. When the download is complete, the output window is updated. 6. A dialog appears to ask if you want to change the controller to Remote Run mode. Click Yes to continue. 7. Click on the Debug icon enter Debug mode. to 8. Click the Micro820-VAR tab. The controller has updated the values of the global variables from the project you just downloaded. Note that Project Values for local variables are also downloaded but not shown here.
Chapter 3 Data Values Upload/Download 9. The values of the global variables are also updated on the PanelView application. Values have been copied from CV 10. Use the Key Press push button to increment the values of the counter variables (CV).
Data Values Upload/Download Chapter 3 11. Observe the new values of the counter variables (CV) in the controller. You have finished downloading the project with project values. In the next chapter, you will learn how to Export and Import the global variables. Using Backup and Restore The Backup and Restore function works the same way as Data Value Upload and Download.
Chapter 3 Data Values Upload/Download Notes: 50 Rockwell Automation Publication 2080-QS003A-EN-E - September 2014
Chapter 4 Variable Export/Import Introduction In this chapter, you will learn how to export the Micro800 controller global variables from a Connected Components Workbench project to your PC, edit the variables, and import the global and local variables into your project. This can be useful for editing and managing your global and local variables among multiple projects and with FactoryTalk View Studio.
Chapter 4 Variable Export/Import To begin, open the sample Micro820 controller project in Connected Components Workbench. In this chapter you will learn how to do the following: 1. Export Global Variables on page 53 2. Edit Global Variables on page 55 3. Import Global Variables on page 56 For this example, only the steps to export/import global variables are shown. You can also use the following steps to export/import local variables by right-clicking on the POU/Program instead of the controller.
Variable Export/Import Chapter 4 Export Global Variables In this section you will learn how to export the global variables of your Micro800 controller project to an editable file. 1. Right-click the controller project and select Variable Export/Import. 2. In the Variable Export/Import dialog box, click the Export Variables tab, then click on Browse.
Chapter 4 Variable Export/Import 3. In the Import/Export File dialog box, enter a name for the file and choose the location where you want to save it, then click Save. 4. The Variable Export/Import dialog box reappears and the path of the file is now shown. Click Export to export the file. 5. When the file has been exported, the status is shown in the Output window. 6. A dialog box appears to ask if you want to view the workbook. Click Yes to continue.
Variable Export/Import Chapter 4 Edit Global Variables In this section, you will learn how to edit the values of the Micro800 controller global variables that you have exported in the previous section. The global variable file is saved in the (.xls) format and can be opened using the Microsoft Excel program. 1. Open the global variable file in Microsoft Excel to view the values of each variable. 2. To change the values of the variables, just enter the new value into the appropriate cell.
Chapter 4 Variable Export/Import Import Global Variables In this section you will learn how to import the global variable file that you have edited in the previous section into your project. 1. Right-click the controller project and select Variable Export/Import. 2. In the Variable Export/Import dialog box, click the Import Variables tab, then click on Browse.
Variable Export/Import Chapter 4 3. In the Import/Export File dialog box, locate the file you wish to import and select it, then click Save. 4. The Variable Export/Import dialog box reappears and the path of the file is now shown. Click Import to import the file. 5. When the file has been imported, the status is shown in the Output window. 6. Click the Micro820-VAR tab. The values have been updated. You have finished importing the edited global variable file into your project.
Chapter 4 Variable Export/Import Editing Array Data Types If your global variables contain array data types, the way it is displayed in Connected Components Workbench and Microsoft Excel is different. See the examples below. Array Data Type in Connected Components Workbench Array Data Type in Microsoft Excel Note how the Initial Value of the array indexes are displayed in the two examples shown above.
Appendix A Data Types Supported Data Types The following data types are supported. Data Type Hex Value Dec Value Description BOOL 0xC1 193 Logical Boolean with values TRUE(1) and FALSE(0) SINT 0xC2 194 Signed 8-bit integer value. INT 0xC3 195 Signed 16-bit integer value. DINT 0xC4 196 Signed 32-bit integer value. LINT(1) 0xC5 197 Signed 64-bit integer value. USINT 0xC6 198 Unsigned 8-bit integer value. UINT 0xC7 199 Unsigned 16-bit integer value.
Appendix A Data Types 3. The starting index of the array must be zero. An example of an array variable in Connected Components Workbench is shown below. The index of the array is shown in square brackets. When assigning a tag to an object in your PanelView Plus application, you can assign a specific index of an array by doing the following: 1. In the Tag Browser window, select the Online -> Array_Data_Type folder. A list of tags of the array and each of its index is displayed. 2.
Rockwell Automation Publication 2080-QS003A-EN-E - September 2014 61
Rockwell Automation Support Rockwell Automation provides technical information on the Web to assist you in using its products. At http://www.rockwellautomation.com/support/, you can find technical manuals, a knowledge base of FAQs, technical and application notes, sample code and links to software service packs, and a MySupport feature that you can customize to make the best use of these tools.