
User Manual


4-24 Configuring the I/O
20-COMM-C/Q ControlNet Adapter User Manual
Publication 20COMM-UM003F-EN-P
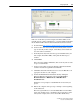
6. Use the procedure in the subsection Use RSNetworx for ControlNet
Software to Save the I/O to the Bridge on page 4-13 to:
– Change the I/O Not Responding box in the upper-left of the
RSLogix 5000 window from flashing green to steady green.
– Remove the yellow warning symbols in the treeview under the I/O
Configuration folder and drive profile.
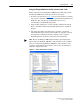
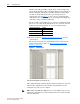
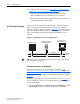
PLC-5 Controller Example
After the adapter is configured, the connected drive and adapter will be a
single node on the network. This section provides the steps needed to
configure a simple ControlNet network (see Figure 4.5
). In our example, we
will configure a PLC-5/40C controller to communicate with a drive using
Logic Command/Status, Reference/Feedback, and Datalinks over the
network.
Figure 4.5 Example PLC-5 Controller ControlNet Network
Configuring Parameters for Network I/O
Because the I/O for the drive is defined in the next subsection Use
RSNetWorx for ControlNet Software to Configure the I/O and Save It to the
Controller on page 4-25, there is no need to configure any I/O inside the
RSLogix 5 project, version 7.00 or later, until using the I/O as described in
Chapter 5
.
However, to get the adapter to operate with the I/O created in Chapter 5, you
need to configure the adapter to accept the I/O and the drive to point to the
appropriate Datalinks.
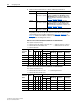
1. Set adapter Parameters 13 - [DPI I/O Cfg], 25 - [M-S Input], and 26 -
[M-S Output] to values that meet your application requirements.
PLC-5/40C Controller
PowerFlex 70 Drive with
20-COMM-C Adapter
Computer with
ControlNet Connection
(optional redundancy)
Channel A
Channel B
ControlNet
Network
TIP: Information for PowerFlex 750-Series drives has been added to this
manual where it is applicable.