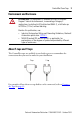
Installation Instructions ControlNet Coax Taps Catalog Numbers 1786-TPR, 1786-TPS, 1786-TPYR, 1786-TPYS Topic Page About This Publication 1 About T-taps and Y-taps 3 Parts (included) 4 Additional Parts (not included) 5 Required Tools 6 Install the Coax Tap 6 Connect the Taps 12 Specifications 14 Additional Resources 15 About This Publication This publication contains procedures and specifications for the installation of ControlNet coaxial taps.
ControlNet Coax Taps Important User Information Solid-state equipment has operational characteristics differing from those of electromechanical equipment. Safety Guidelines for the Application, Installation and Maintenance of Solid State Controls (Publication SGI-1.1 available from your local Rockwell Automation sales office or online at http://www.rockwellautomation.com/literature/) describes some important differences between solid-state equipment and hard-wired electromechanical devices.
ControlNet Coax Taps 3 Environment and Enclosure ATTENTION: This equipment is intended for use in a Pollution Degree 2 industrial environment, in overvoltage Category II applications (as defined in IEC publication 60664-1), at altitudes up to 2000 m (1.24 mi) without derating. Besides this publication, see: • Industrial Automation Wiring and Grounding Guidelines, Rockwell Automation publication 1770-4.1.
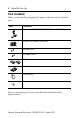
ControlNet Coax Taps Parts (included) Before you discard the packaging of the tap kit, verify that you have all of the parts. Item Description Tap, cat. no. 1786-TPR, 1786-TPS, 1786-TPYR, or 1786-TPYS Channel A and channel B cable labels Threaded screws Self-tapping screws BNC connector kits Universal mounting bracket Transition plate Dust cap If you are missing any part, contact your Rockwell Automation Sales Representative.
ControlNet Coax Taps 5 Additional Parts (not included) Depending on the type of tap mount and installation you choose, you may require additional parts not included with this tap kit. This list describes additional parts that may be required for your tap installation. • DIN rail, 35 x 7.5 mm (1.38 x .30 in.), EN 50022-35 x 7.5 • DIN rail, 35 x 15 mm (1.38 x .59 in.), EN 50022-35 x 15 IMPORTANT The ControlNet taps do not require the use of DIN rails made of specific materials.
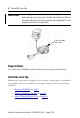
ControlNet Coax Taps IMPORTANT For securing coax cables (including the tap cable), use hook-and-loop wire straps (not included; local purchase). We do not recommend wire ties because excessively tightened ties may degrade cable transmission quality. Hook-and-loop wire strap Required Tools You will need a #1 Phillips-head screwdriver for most types of installation. Install the Coax Tap Because the coax taps are designed to be versatile, several types of installation are available.
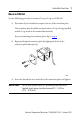
ControlNet Coax Taps 7 Mount to DIN Rail Use the following procedure to mount a T-tap or Y-tap to a DIN rail. 1. Determine if your installation requires the use of the transition plate. The transition plate should be used only when a T-tap is being installed and the T-tap needs to be mounted horizontally. If you are not using the transition plate, skip to step 4. 2. Begin attaching the transition plate by aligning the holes of the transition plate and tap body. 31642 3.
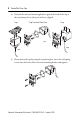
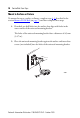
ControlNet Coax Taps 4. Position the universal mounting bracket against the back of the tap or the transition plate so the screw holes are aligned. T-tap T-tap Transition Plate Used Y-tap 31642 20084 20080 5. If you mount the tap by using the transition plate, insert the self-taping screws into the holes of the universal mounting bracket and tighten.
ControlNet Coax Taps 9 6. If you mount the tap without using the transition plate, insert the threaded screws into the holes of the universal mounting bracket and tighten. 7. Attach the tap to the DIN rail by snapping the universal mounting bracket onto the DIN rail.
ControlNet Coax Taps Mount to Surface or Fixture To mount the tap to a surface or fixture, complete steps 1…5 described in the section Mount to DIN Rail (on page 7), and then complete these steps. 1. If needed, pre-drill holes into the surface that align with holes in the outer corners of the universal mounting bracket. The holes of the universal mounting bracket have a diameter of 4.3 mm (0 .17 in.). 2.
ControlNet Coax Taps 11 Mount Through Holes in Tap To mount the tap by using the holes in the tap body, choose one of the following mounting methods: • Thread tie wrap through the holes in the tap and fasten to a fixture. • Insert two #8 or smaller screws with washers (not included) through the holes and tighten into the surface behind the tap IMPORTANT Do not over-tighten screws as tap body damage may result. Applied screw torque should not exceed 0.2…0.4 N•m (0.14…0.29 lb•ft).
ControlNet Coax Taps Connect the Taps After you have completed mounting your taps, you need to connect the taps. Choose the tap connection procedure that best suits your installation requirements. Connect Taps with a Jumper You can connect T-taps and Y-taps by using a plug-to-plug jumper (catalog no. 1786-TJPR, not included) when these considerations are made: • No more than 70 jumpers can be used per ControlNet segment. • Plug-to-plug jumpers cannot be bent beyond a 3.81 cm (1.5 in.) radius.
ControlNet Coax Taps 13 Connect Taps with Trunk Cable You can increase the distance between T-taps or between Y-taps by using sections of trunk cable between taps to create a segment. Connecting taps by using this method requires BNC connectors (included) and cable (not included) with the tap kit. Segment Connect Taps with Barrel Connectors You can connect T-taps installed on one DIN rail by using barrel (plug-to-plug) connectors. T-taps connected with barrel connectors (catalog no.
ControlNet Coax Taps Specifications Environmental Specifications - ControlNet Taps Attribute 1786-TPR, 1786-TPS, 1786-TPYR, 1786-TPYS Temperature, operating IEC 60068-2-1 (Test Ad, Operating Cold), IEC 60068-2-2 (Test Bd, Operating Dry Heat), IEC 60068-2-14 (Test Nb, Operating Thermal Shock) -25…70 °C (-13…158 °F) Temperature, nonoperating IEC 60068-2-1 (Test Ab, Unpackaged Nonoperating Cold), IEC 60068-2-2 (Test Bb, Unpackaged Nonoperating Dry Heat), IEC 60068-2-14 (Test Na, Unpackaged Nonoperating
ControlNet Coax Taps 15 Additional Resources Resource Description ControlNet Coax Media Planning and Installation Guide, publication CNET-IN002 Describes the required components of a ControlNet coax media system and how to plan for and install the required components. NetLinx Selection Guide, publication NETS-SG001 Describes considerations for selection and planning network components, including ControlNet components.
Rockwell Automation Support Rockwell Automation provides technical information on the Web to assist you in using its products. At http://www.rockwellautomation.com/support/, you can find technical manuals, a knowledge base of FAQs, technical and application notes, sample code and links to software service packs, and a MySupport feature that you can customize to make the best use of these tools.