ControlNet Universal PCI Communication Interface Card 1784-PCIC, 1784-PCICS Series B Installation Instructions
Important User Information Solid state equipment has operational characteristics differing from those of electromechanical equipment. Safety Guidelines for the Application, Installation and Maintenance of Solid State Controls (Publication SGI-1.1, available from your local Rockwell Automation sales office or online at http://www.literature.rockwellautomation.com) describes some important differences between solid state equipment and hard-wired electromechanical devices.
Table of Contents Chapter 1 Install the 1784-PCIC or 1784-PCICS Communication Interface Card European Hazardous Location Approval (1784-PCIC only) . European Zone 2 Certification. . . . . . . . . . . . . . . . . . . North American Hazardous Location Approval . . . . . . . . . Access the Computer’s PCI Local Bus Expansion Slots . . . . Insert the Card Into the Computer. . . . . . . . . . . . . . . . . . . Connect to the Network . . . . . . . . . . . . . . . . . . . . . . . . . .
ii Table of Contents Chapter 5 Once You Have Completed the Installation Register the EDS File . . . . . . . . . . . . . . . . . . . . . . . . . . . . Configure the ControlNet Communications Driver in RSLinx Software . . . . . . . . . . . . . . . . . . . . . . . . . . . . . . Connect a SoftLogix Controller to the ControlNet Network . Go Online With RSNetWorx for ControlNet Software . . . . .
Chapter 1 Install the 1784-PCIC or 1784-PCICS Communication Interface Card For Information On This Topic See Page Access the Computer’s PCI Local Bus Expansion Slots 1-5 Insert the Card Into the Computer 1-6 Connect to the Network 1-7 Connect the Card Directly to the ControlNet Network 1-9 Connect to a Device on the ControlNet Network 1-10 Before you install the card, be certain that you: • know how to install hardware in your computer.
1-2 Install the 1784-PCIC or 1784-PCICS Communication Interface Card ATTENTION This equipment is intended for use in a Pollution Degree 2 industrial environment, in overvoltage Category II applications (as defined in IEC publication 60664-1), at altitudes up to 2000 meters without derating. This equipment is considered Group 1, Class A industrial equipment according to IEC/CISPR Publication 11.
Install the 1784-PCIC or 1784-PCICS Communication Interface Card 1-3 European Hazardous Location Approval (1784-PCIC only) European Zone 2 Certification The following applies when the product bears the EEx Marking: This equipment is intended for use in potentially explosive atmospheres as defined by European Union Directive 94/9/EC.
1-4 Install the 1784-PCIC or 1784-PCICS Communication Interface Card North American Hazardous Location Approval The following information applies when operating this equipment in hazardous locations: Informations sur l’utilisation de cet équipement en environnements dangereux: Products marked CL I, DIV 2, GP A, B, C, D are suitable for use in Class I Division 2 Groups A, B, C, D, Hazardous Locations and nonhazardous locations only.
Install the 1784-PCIC or 1784-PCICS Communication Interface Card 1-5 To install the card, you need to: • access the computer’s expansion slots. • insert the card into the computer. IMPORTANT The card’s dimensions are shown below. 6.5 in. 16.5 cm 4.2 in. 10.7 cm 31474-M Access the Computer’s PCI Local Bus Expansion Slots To install the card, you must access the computer’s PCI local bus expansion slots. Follow these general steps, or refer to your computer’s user guide for further instructions. 1.
1-6 Install the 1784-PCIC or 1784-PCICS Communication Interface Card Insert the Card Into the Computer WARNING When used in a Class I, Division 2, hazardous location, this equipment must be mounted in a suitable enclosure with proper wiring method that complies with the governing electrical codes. If you insert or remove the card while host power is on, an electrical arc can occur. This could cause an explosion in hazardous location installations.
Install the 1784-PCIC or 1784-PCICS Communication Interface Card 1-7 Connect to the Network WARNING When used in a Class I, Division 2, hazardous location, this equipment must be mounted in a suitable enclosure with proper wiring method that complies with the governing electrical codes. If you connect or disconnect the ControlNet cable with power applied to this module or any device on the network, an electrical arc can occur. This could cause an explosion in hazardous location installations.
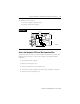
1-8 Install the 1784-PCIC or 1784-PCICS Communication Interface Card Figure 1.1 1784-PCIC or 1784-PCICS Card (1784-PCIC Card Shown) Diagnostic Status Indicators Network Access Port (NAP) RJ-45 connector for connecting programming terminals to devices on a ControlNet network ! Channel A BNC connectors for connecting directly to ControlNet network Redundant Media BNC Connectors ! A Channel B ! B ! Do not connect more than one ControlNet network to this card.
Install the 1784-PCIC or 1784-PCICS Communication Interface Card 1-9 Connect the Card Directly to the ControlNet Network To connect the card directly to a ControlNet network, follow the instructions in these publications: • ControlNet Coax Tap Installation Instructions, publication 1786-IN007 • ControlNet Coax Media Planning and Installation Manual, publication CNET-IN002 Figure 1.
1-10 Install the 1784-PCIC or 1784-PCICS Communication Interface Card Connect to a Device on the ControlNet Network The 1786-CP cable (Figure 1.3) connects a host computer to another ControlNet device. It has two RJ-45 8-pin connectors. Figure 1.3 1786-CP cable RJ-45 8-pin Connectors Connector 2 Connector 1 1786-CP Cable 30124-m ATTENTION Use only the 1786-CP cable when you connect a programming terminal to the network through the Network Acces Port (NAP).
Install the 1784-PCIC or 1784-PCICS Communication Interface Card 1-11 Table 1.2 Wiring For 1786-CP Cable (Connector 2) Connector 2 Wire Number Signal Mnemonic Signal Name 1 ISO-GND Isolated Ground 2 N.C. No Connection 3 PTRX-H Receive Data High 4 PTRX-L Receive Data Low 5 PTTX-L Transmit Data Low 6 PTTX-H Transmit Data High 7 N.C.
1-12 Install the 1784-PCIC or 1784-PCICS Communication Interface Card Figure 1.4 Connect a Programming Terminal to a ControlNet Network Through Another ControlNet Device Programming Terminal 1784-PCIC or 1784-PCICS 1786-CP Cable1 ControlNet Product ControlNet Network 42199 1 The 1786-CP cable can be plugged into any ControlNet product’s NAP to provide programming capability on the ControlNet network.
Chapter 2 Install the Driver in Windows XP For Information On This Topic See Page Install the Driver in Windows XP for the First Time 2-1 Update the Existing Driver in Windows XP 2-3 Install the Driver in Windows XP for the First Time Follow these steps to install the driver for the first time on a personal computer running Windows XP. 1. Shut down the computer. 2. Insert the 1784-PCIC or 1784-PCICS card into an unused PCI slot. Refer to Chapter 1 for installation information. 3.
2-2 Install the Driver in Windows XP After the computer restarts, the operating system detects the new PCI card and displays the Found New Hardware Wizard. 4. Select the Install from a list or specific location (Advanced) radio button. 5. Click Next. 6. On the screen that appears, click the Search for the best driver in these locations radio button. 7. Check the Include this location in the search checkbox. 8. Uncheck the remaining checkboxes.
Install the Driver in Windows XP 2-3 9. Click Browse. 10. Navigate to the folder that contains the installation files. The installation files can be found in the \Drivers\Win2K_WinXP folder on the 1784-PCIC(S) Driver CD-ROM. 11. Click OK. 12. Click Next. IMPORTANT If prompted to overwrite existing files, click Yes. 13. Click Finish. The driver is now ready to use. Go on to Chapter 5.
2-4 Install the Driver in Windows XP 3. Click Manage. 4. In the left window pane, click the + to the left of System Tools to open it. 5. Under System Tools, click Device Manager. 6. In the right window pane, click the + to the left of A-B Virtual Backplane to expand it. 7. Right-click A-B 1784-PCIC(S). TIP If you see more than one A-B 1784-PCIC(S) entry, perform the update on only one of the entries. 8. Click Update Driver.
Install the Driver in Windows XP 2-5 The Hardware Update Wizard appears. 9. Select the Install from a list or specific location (Advanced) radio button. 10. Click Next. 11. On the screen that appears, click the Don’t search. I will choose the best driver to install radio button. 12. Click Next. 13. Click Have Disk. 14. Click Browse.
2-6 Install the Driver in Windows XP 15. Navigate to the folder that contains the installation files. The installation files can be found in the \Drivers\Win2K_WinXP folder on the 1784-PCIC(S) Driver CD-ROM. 16. Click Open. 17. Click OK. 18. Select A-B 1784-PCIC(S) to highlight it. 19. Click Next. IMPORTANT If prompted to overwrite existing files, click Yes. 20. Click Finish. 21. Close the Device Manager screen. 22. Shut down and restart the computer. The driver is now ready to use. Go on to Chapter 5.
Chapter 3 Install the Driver in Windows 2000 For Information On This Topic See Page Install the Driver in Windows 2000 for the First Time 3-1 Update the Existing Driver in Windows 2000 3-4 Install the Driver in Windows 2000 for the First Time Follow these steps to install the driver for the first time on a personal computer running Windows 2000. 1. Shut down the computer. 2. Insert the 1784-PCIC or 1784-PCICS card into an unused PCI slot. Refer to Chapter 1 for installation information. 3.
3-2 Install the Driver in Windows 2000 4. Click Next. 5. Click the Search for a suitable driver for my device (recommended) radio button. 6. Click Next. . 7. Check the Specify a location checkbox and uncheck the remaining checkboxes.
Install the Driver in Windows 2000 3-3 8. Click Next. 9. Click Browse and navigate to the folder that contains the installation files. The installation files can be found in the \Drivers\Win2K_WinXP folder on the 1784-PCIC(S) Driver CD-ROM. 10. Click Open. 11. Click OK. 12. Click Next to install the new driver. IMPORTANT If prompted to overwrite existing files, click Yes. 13. Click Finish to close the Found New Hardware Wizard. The driver is now ready to use. Go on to Chapter 5.
3-4 Install the Driver in Windows 2000 Update the Existing Driver in Windows 2000 Follow these steps to update the existing device driver on a personal computer running Windows 2000. IMPORTANT During the update procedure, communication through the card will be disrupted. 1. If you are browsing with RSLinx software, close RSWho. 2. Right-click My Computer. 3. Click Manage. 4. In the left window pane, click the + to the left of System Tools to open it. 5. Under System Tools, click Device Manager. 6.
Install the Driver in Windows 2000 3-5 9. Click the Driver tab. 10. Click Update Driver. The Upgrade Device Driver Wizard appears. 11. Click Next. 12.
3-6 Install the Driver in Windows 2000 13. Click Next. 14. Click Have Disk. 15. Click Browse. 16. Navigate to the folder that contains the installation files. The installation files can be found in the \Drivers\Win2K_WinXP folder on the 1784-PCIC(S) Driver CD-ROM. 17. Click Open. 18. Click OK. 19. Select A-B 1784-PCIC(S) to highlight it.
Install the Driver in Windows 2000 3-7 20. Click Next. 21. Click Next to install the new driver. IMPORTANT If prompted to overwrite existing files, click Yes. 22. Click Finish. 23. Close the A-B 1784-PCIC(S) Properties screen. 24. Close the Device Manager screen. 25. Shut down and restart the computer. The driver is now ready to use. Go on to Chapter 5.
3-8 Install the Driver in Windows 2000 Notes: Publication 1784-IN003D-EN-P - January 2006
Chapter 4 Install the Driver in Windows 98/Me For Information On This Topic See Page Install the Driver in Windows 98/Me for the First Time 4-1 Install the Virtual Backplane Driver 4-3 Update the Existing Driver in Windows 98/Me 4-5 Install the Driver in Windows 98/Me for the First Time Follow these steps to install the driver for the first time on a personal computer running Windows 98/Me. 1. Shut down the computer. 2. Insert the 1784-PCIC or 1784-PCICS card into an unused PCI slot.
4-2 Install the Driver in Windows 98/Me 4. Click Next. 5. Click the Search for the best driver for your device (Recommended) radio button. 6. Click Next. 7. Check the Specify a location checkbox and uncheck the remaining checkboxes. 8. Click Browse and navigate to the folder that contains the installation files. The installation files can be found in the \Drivers\Win98 folder on the 1784-PCIC(S) Driver CD-ROM.
Install the Driver in Windows 98/Me 4-3 9. Click OK. 10. Click Next. 11. Click Next. IMPORTANT If prompted to overwrite existing files, click Yes. 12. Click Finish. Install the Virtual Backplane Driver So that the 1784-PCICS drivers work properly after you install them for the first time, you must install the Virtual Backplane Driver. Follow this procedure to install the Virtual Backplane Driver. 1. Select Start ⇒Settings ⇒Control Panel. 2. Double-click Add New Hardware.
4-4 Install the Driver in Windows 98/Me 5. Click the No, I want to select the hardware from a list radio button. 6. Click Next. 7. Select A-B Virtual Backplane from the list of hardware types. 8. Click Next. 9. Select A-B Virtual Backplane from the list of models. 10. Click Next. 11. Click Finish. The driver is now ready to use. Go on to Chapter 5.
Install the Driver in Windows 98/Me 4-5 Update the Existing Driver in Windows 98/Me Follow these steps to update the existing device driver on a personal computer running Windows 98/Me. IMPORTANT During the update procedure, communication through the card will be disrupted. 1. If you are browsing with RSLinx software, close RSWho. 2. Right-click My Computer. 3. Click on the Device Manager tab. 4. In the left window pane, click the + to the left of A-B Virtual Backplane to expand it. 5.
4-6 Install the Driver in Windows 98/Me 7. Click the Driver tab. 8. Click Update Driver. 9. Click Next. 10. Click the Display a list of all the drivers in a specific location so you can select the driver you want radio button.
Install the Driver in Windows 98/Me 4-7 11. Click Next. 12. Click Have Disk. 13. Click Browse, then navigate to the folder that contains the installation files. The installation files can be found in the \Drivers\Win98 folder on the 1784-PCIC(S) Driver CD-ROM. 14. Click OK. 15. Click OK. 16. Select A-B 1784-PCIC(S) to highlight it. 17. Click Next. 18. Click Next. 19. Click Next. IMPORTANT If prompted to overwrite existing files, click Yes. 20. Click Finish.
4-8 Install the Driver in Windows 98/Me 21. Close the A-B 1784-PCIC(S) Properties screen. 22. Close the System Properties screen. 23. Shut down and restart the computer. The driver is now ready to use. Go on to Chapter 5.
Chapter 5 Once You Have Completed the Installation Once you have installed the drivers, you can do the following: For Information On This Topic See Page Register the EDS File 5-1 Configure the ControlNet Communications Driver in RSLinx Software 5-2 Connect a SoftLogix Controller to the ControlNet Network 5-4 Go Online With RSNetWorx for ControlNet Software 5-7 Register the EDS File The EDS files can be found in the \EDS Files folder on the 1784-PCIC(S) Driver CD-ROM or they can be downloaded fr
5-2 Once You Have Completed the Installation Configure the ControlNet Communications Driver in RSLinx Software Follow this procedure to configure the ControlNet communication driver. IMPORTANT Do not use these steps to configure a ControlNet communication driver for any application that uses a SoftLogix5800 controller. For information on configuring the ControlNet card for use with SoftLogix5800 controllers, refer to page 5-4. 1. Install RSLinx software, version 2.42.00 or later, on your computer. 2.
Once You Have Completed the Installation 5-3 In the example below, we chose the 1784-PCICS card. A. Use the pull-down menu to select the ControlNet driver. B. Click Add New. 4. Name the new ControlNet driver. A. Name the driver. This example shows the default name (AB_PCIC-1) that RSLinx software uses. B. Click OK.
5-4 Once You Have Completed the Installation 5. After you create the driver, configure it to correspond to the ControlNet module within your computer. A. If multiple cards are located in your computer, choose the correct one. B. Make sure you use the correct Network Address. C. Click OK. The driver is now available in RSLinx software. You can browse the network by expanding ControlNet port on the desired 1784-PCIC or 1784-PCICS communication card.
Once You Have Completed the Installation 5-5 2. Select the 1784-PCIC or 1784-PCICS card. A. Select the ControlNet card. B. Specify the virtual backplane slot number. C. Click OK. 3. Select the serial number of the 1784-PCIC or 1784-PCICS card you want. If you previously configured the card that you selected by serial number, the chassis monitor remembers the configuration from the last time you used the card (whether in the same or different slot). A.
5-6 Once You Have Completed the Installation You can specify any slot number greater than 0 for the communication card. RSLinx software resides in slot 0. By creating the card in the virtual chassis, you configure the communication driver information needed by the SoftLogix controller.
Once You Have Completed the Installation 5-7 Go Online With RSNetWorx for ControlNet Software When going online with RSNetWorx for ControlNet software via the 1784-PCIC or 1784-PCICS card, select Port A, ControlNet under the card in the Virtual Chassis. Do not select AB-PCIC-1, ControlNet.
5-8 Once You Have Completed the Installation Notes: Publication 1784-IN003D-EN-P - January 2006
Chapter 6 Interpret the LED Indicators The LED indicators on the card give you information about the card and the network when you’re connected via the BNC connectors. Table 6.1 outlines the states and explains what each state means to you and the action you should take, if any, to correct that state.
6-2 Interpret the LED Indicators • Steady - indicator is on continuously in the defined state. • Alternating - the two indicators alternate between the two defined states at the same time (applies to both indicators viewed together). The two indicators are always in opposite states, out of phase. • Flashing - the indicator alternates between the two defined states (applies to each indicator viewed independent of the other). If both indicators flash, they must flash together, in phase. Table 6.
Interpret the LED Indicators 6-3 Table 6.
6-4 Interpret the LED Indicators Cause A or Action B Flashing red/off • No other nodes present on network • Add other nodes to the network Flashing red/green • Incorrect node address • Change 1784-PCIC or 1784-PCICS node address so that it is less than or equal to UMAX(1) • Stop and restart the 1784-PCIC or 1784-PCICS driver in RSLinx software • Incorrect network configuration • Use RSNetWorx for ControlNet software to reconfigure the ControlNet network so that UMAX(1) is greater than or equal t
Chapter 7 Specifications PCI local bus Compliant to PCI revision 2.2. The 1784-PCIC and 1784-PCICS cards are compatible with 5V and 3.3V PCI slots, 32-bit and 64-bit PCI slots, and PCI-X slots. Attention: The 1784-PCIC and 1784-PCICS cards are not compatible with PCI Express and should not be inserted into a PCI Express slot. Mechanical form factor, H x L Universal PCI 32-bit short card 10.7 cm (4.2 in.) x 16.5 cm (6.5 in.
7-2 Specifications EFT/B immunity IEC 61000-4-4: ± 2 kV at 5 kHz on communications ports Surge transient immunity IEC 61000-4-5: ± 2 kV line-earth (CM) on communications ports Conducted RF immunity IEC 61000-4-6: 10Vrms with 1 kH sine-wave 80% AM from 150kHz...80MHz Enclosure type rating None (open-style) Power requirements In US, this equipment must be powered from UL Listed Information Technology Equipment or UL Listed Industrial Control Equipment.
Index C card, install 1-1 configure ControlNet communications driver in RSLinx 5-2, 5-7 connect a SoftLogix controller to the ControlNet network 5-4 the card directly to the ControlNet network 1-9 to a device on the ControlNet network ControlNet network connect to 1-9 connect to a device on 1-10 1-10 install the driver in Windows 2000 3-1 in Windows 98/Me 4-1 in Windows XP 2-1 install the Virtual Backplane Driver 4-3 L LEDs status indicator 6-1 R RSLinx configure ControlNet communications driver D
2 Index Notes: Publication 1784-IN003D-EN-P - January 2006
How Are We Doing? Your comments on our technical publications will help us serve you better in the future. Thank you for taking the time to provide us feedback. You can complete this form and mail (or fax) it back to us or email us at RADocumentComments@ra.rockwell.com Pub. Title/Type ControlNet Universal PCI Communication Interface Card Cat. No. 1784-PCIC, 1784-PCICS, Series B Pub. No. 1784-IN003D-EN-P Pub. Date January 2006 Part No.
PLEASE FASTEN HERE (DO NOT STAPLE) Other Comments PLEASE FOLD HERE NO POSTAGE NECESSARY IF MAILED IN THE UNITED STATES BUSINESS REPLY MAIL FIRST-CLASS MAIL PERMIT NO.
Rockwell Automation Support Rockwell Automation provides technical information on the web to assist you in using our products. At http://support.rockwellautomation.com, you can find technical manuals, a knowledge base of FAQs, technical and application notes, sample code and links to software service packs, and a MySupport feature that you can customize to make the best use of these tools.