
User Manual Owner's manual
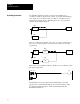

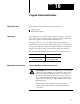
Table Of Contents
- 1772-6.5.8, Mini-PLC-2/02, -2/16, -2/17 Processor, User Manual
- Important User Information
- Summary of Changes
- Table of Contents
- 1 - Using This Manual
- 2 - Fundamentals of a Programmable Controller
- 3 - Hardware Features
- 4 - Installing Your Programmable Controller
- 5 - Starting Your Processor
- 6 - Maintaining and Troubleshooting Your Processor
- 7 - Memory Organization
- 8 - Scan Theory
- 9 - Relay-Like Instructions
- 10 - Program Control Instructions
- 11 - Timers and Counters
- 12 - Data Manipulation and Compare Instructions
- 13 - Three-Digit Math Instructions
- 14 - EAF Math Instructions
- 15 - EAF Log, Trig, and FIFO Instructions
- 16 - EAF Process Control Instructions
- 17 - Jump Instructions and Subroutines
- 18 - Block Transfer
- 19 - Data Transfer Instructions
- 20 - Bit Shift Registers
- 21 - Sequencers
- 22 - Selectable Timer Interrupts
- 23 - Report Generation
- 24 - Program Editing
- 25 - Programming Techniques
- 26 - Program Troubleshooting
- A - Specifications
- B - Processor Comparison Chart
- C - Number Systems
- D - Glossary
- E - Quick Reference
- Index
- Back Cover
RelayLike Instructions
Chapter 9
9-9
A Branch Start instruction begins each parallel logic branch of a rung. It
allows more than one combination of input conditions to energize an
output device. It is programmed before the first instruction of each
parallel branch.
A Branch End instruction completes a set of parallel branches.
Keystrokes
Enter a Branch Start or Branch End instruction by pressing either:
.
or
.
.
.
Important: You must begin each rung of parallel conditions with a
Branch Start instruction.
Removing a Branch Start or Branch End Instruction
Remove a Branch Start or Branch End instruction or change an instruction
type by performing the following steps.
1. Position the cursor over either the Branch Start or Branch End
instruction.
2. Press [Remove]
.
or
.
.
Inserting
a Branch Instruction in a Completed Rung
Insert a Branch Start or Branch End instruction or change an instruction
type by performing the following steps.
1. Position the cursor over the instruction immediately preceding the
position you want to insert a Branch Start instruction.
2. Press [Insert]
.
.
Important: Once you press the Branch Start instruction, the statement
BRANCH END OMITTED appears in the lower lefthand corner of the screen.
It stays there until you enter a Branch End instruction.
3. Insert the conditioning instructions for this rung.
4. You must begin each set of parallel conditions or rung with a
Branch Start instruction.
5. Complete the set of parallel conditions by pressing [Insert]
.
.
Branch Start/End