
User guide
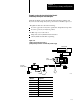


Overview of Inject, Clamp, and Eject Mode
Chapter 1
1-20
When you select this mode, you can use the following phases of operation:
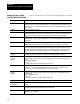
Inject Phase: Description:
Injection The ram (screw) injects plastic into the mold. You can vary the velocity of the ram (screw), or the pressure
driving it, to fill areas of the mold cavity at different rates to achieve uniform quality of the molded part. This
phase can be critical to part quality. The pattern of velocity or pressure variation during injection is called the
injection profile.
Transition Detects when injection is complete.
Pack (optional) Packing pressurizes the plastic to a specified density which determines the flexibility of the molded part. To
achieve uniform density, you can release or increase pressure in steps according to cooling gradients across
the mold. Thus, as the plastic cools unevenly, the pack profile can compress the plastic uniformly.
Hold Holding lets the plastic cool and shrink slightly from the mold cavity in preparation for ejection. The effect is
similar to packing. You can hold at predetermined pressures for predetermined lengths of time throughout
the hold phase.
Predecompression (optional) This single, backward movement of the ram (screw) separates plastic solidifying in the mold from molten
cushion remaining in the barrel prior to plastication. This phase is also called sprue break or suckback.
Plastication Phase The machine reloads by drawing plastic beads into the barrel containing the ram (screw). The mechanical
action of the rotating ram (screw) grinds and melts the beads. The longer it grinds, the hotter it melts. You
can vary the backpressure on the ram (screw) causing it to remain longer in an area. Thus, you can induce
any desired temperature gradient along the length of the shot by controlling ram (screw) backpressure.
Postdecompression
(optional)
This single, backward movement of the ram (screw) guards against drooling molten plastic into the open
mold during ejection prior to clamp close. This phase is also called melt pullback or suckback.
1st Close
2nd Close
3rd Close
You can program a singlestep clampclose profile and not use a second or third profile. Or, you can program
up to three clampclose profiles that let you do the following at up to three different points in the clampclose
phase:
• pick up a third mold plate
• set cores
• pick up or drop out pumps to change clamp speed or pressure
Low Pressure Close To guard against damaging the mold when the two mold surfaces make contact and to detect obstructions to
mold closure, you close the mold slowly with low pressure and closedloop or openloop control. Low
Pressure Close can only be controlled through a pressure vs. position profile.
1st Open
2nd Open
3rd Open
You can program a singlestep clampopen profile and not use a second or third profile. Or, you can
program up to three clampopen profiles that let you do the following at up to three different points in the
clampopen phase:
• drop out a third mold plate
• pull cores
• drop out or pick up pumps to change clamp speed or pressure
Open Slow
To decelerate the moving platen to accurately position it before ejecting the part.
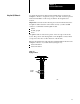
Ejector Advance
Ejector Retract
You can advance and retract the ejector in a single stroke or in multiple strokes using closed or openloop
control.
Tip Strokes You can shake the part off the ejector tip by programming rapid singlestroke interim ejector cycles starting
after the first advance stroke and ending before the last retract stroke.
Forward Dwell You can pause after the first advance stroke or before the last retract stroke to let a robot remove the part
when the ejectors are extended.
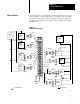
Summary of Inject, Clamp,
and Eject Mode of Operation