Installation Instructions 1769-L32C, 1769-L35CR CompactLogix Controllers Catalog Numbers 1769-L32C, 1769-L35CR Topic Page Important User Information 3 Environment and Enclosure Information 4 Prevent Electrostatic Discharge 5 North American Hazardous Location Approval 7 Before You Begin 8 Set the Node Address 10 Connect the 1769-BA Battery 12 Install the Optional 1784-CF64 or 1784-CF128 Industrial CompactFlash Card 13 Assemble the System 15 Mount the System 19 Panel Mounting 20 DIN-
1769-L32C, 1769-L35CR CompactLogix Controller Topic Page Install the Appropriate Electronic Data Sheet (EDS) Files 32 Load the Controller Firmware 33 Use the ControlFlash Utility to Load Firmware 35 Use the AutoFlash Utility to Load Firmware 35 Use a CompactFlash Card to Load Firmware 36 Select the Controller Operating Mode 37 Verify Proper Controller Operation 38 Interpret Status Indicators as Related to the ControlNet Network 41 Network Channel Status Indicators 43 Specifications 44
1769-L32C, 1769-L35CR CompactLogix Controller 3 Important User Information Solid state equipment has operational characteristics differing from those of electromechanical equipment. Safety Guidelines for the Application, Installation and Maintenance of Solid State Controls (Publication SGI-1.1 available from your local Rockwell Automation sales office or online at http://literature.rockwellautomation.
1769-L32C, 1769-L35CR CompactLogix Controller Environment and Enclosure Information ATTENTION This equipment is intended for use in a Pollution Degree 2 industrial environment, in overvoltage Category II applications (as defined in IEC publication 60664-1), at altitudes up to 2000 meters (6562 feet) without derating. This equipment is considered Group 1, Class A industrial equipment according to IEC/CISPR Publication 11.
1769-L32C, 1769-L35CR CompactLogix Controller 5 Prevent Electrostatic Discharge ATTENTION This equipment is sensitive to electrostatic discharge, which can cause internal damage and affect normal operation. Follow these guidelines when you handle this equipment: • Touch a grounded object to discharge potential static. • Wear an approved grounding wriststrap. • Do not touch connectors or pins on component boards. • Do not touch circuit components inside the equipment.
1769-L32C, 1769-L35CR CompactLogix Controller WARNING WARNING WARNING If you connect or disconnect the communications cable with power applied to this module or any device on the network, an electrical arc can occur. This could cause an explosion in hazardous location installations. Be sure that power is removed or the area is nonhazardous before proceeding. When you insert or remove the CompactFlash Card while power is on, an electrical arc can occur.
1769-L32C, 1769-L35CR CompactLogix Controller 7 North American Hazardous Location Approval The following information applies when operating this equipment in hazardous locations. Informations sur l’utilisation de cet équipement en environnements dangereux. Products marked "CL I, DIV 2, GP A, B, C, D" are suitable for use in Class I Division 2 Groups A, B, C, D, Hazardous Locations and nonhazardous locations only.
1769-L32C, 1769-L35CR CompactLogix Controller Before You Begin Use this document as a guide for installing and powering-up your 1769-L32C or 1769-L35CR CompactLogix controller. You should already be familiar with the system components. You mus flash upgrade the firmware on your CompactLogix controller before you can use it. The controller ships with firmware revision 1.x but must be upgraded to match the version of RSLogix5000 software that you are using.
1769-L32C, 1769-L35CR CompactLogix Controller 9 You can also use these components with the controller: • 1784-CF64 or 1784-CF128 Industrial CompactFlash card to add nonvolatile memory • 1756-CP3 or 1747-CP3 serial cable to connect a device to the RS-232 port • Either of the following to connect to the ControlNet network: • ControlNet taps for connections from controller channels A or B to the ControlNet network • 1786-CP cable for connections from a programming terminal to the ControlNet network via the con
1769-L32C, 1769-L35CR CompactLogix Controller • A 1769-ECR right end cap or 1769-ECL left end cap is required to terminate the end of the communication bus. ATTENTION This controller has a network access port (NAP) for temporary connections to the ControlNet network. Do not plug a DH-485 network cable or an RJ45 connector for EtherNet/IP networks into the NAP. Undesirable behavior and/or damage to the port may result.
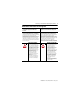
1769-L32C, 1769-L35CR CompactLogix Controller 11 1. Slide the side cover forward. 43860 6 7 01 2 34 5 2. Use a small screwdriver to set the node address via the controller switches. 6 7 01 2 5 89 34 89 31504-M 3. Write the node address on the front panel overlay after setting the node address switches.
1769-L32C, 1769-L35CR CompactLogix Controller Connect the 1769-BA Battery The controller is shipped with the 1769-BA battery packed separately. To connect the battery, follow this procedure. ATTENTION WARNING The 1769-BA battery is the only battery you can use with the 1769-L32C and 1769-L35CR controllers. The 1747-BA battery is not compatible with the 1769-L32C and 1769-L35CR controllers and may cause problems. When you connect or disconnect the battery, an electrical arc can occur.
1769-L32C, 1769-L35CR CompactLogix Controller 13 3. Insert the battery into the door as shown. 4. Slide the battery door back until it clicks into position. Install the Optional 1784-CF64 or 1784-CF128 Industrial CompactFlash Card ATTENTION Do not remove the CompactFlash card while the controller is reading from or writing to the card, as indicated by a flashing green CF status indicator.
1769-L32C, 1769-L35CR CompactLogix Controller 3. Match the orientation arrow on the card with the arrow on the front of the controller. 4. Note that the CompactFlash card supports removal and insertion under power. WARNING When you insert or remove the CompactFlash Card while power is on, an electrical arc can occur. This could cause an explosion in hazardous location installations. Be sure that power is removed or the area is nonhazardous before proceeding. 5.
1769-L32C, 1769-L35CR CompactLogix Controller 15 Assemble the System The controller can be attached to an adjacent I/O module or power supply before or after mounting. For mounting instructions, see Panel Mounting and DIN-rail Mounting. WARNING The CompactLogix controller is not designed for removal and insertion under power. If you insert or remove the module while backplane power is on, an electrical arc can occur. This could cause an explosion in hazardous location installations.
1769-L32C, 1769-L35CR CompactLogix Controller 4. Move the module back along the tongue-and-groove slots until the bus connectors line up with each other. 5. Use your fingers or a small screwdriver to push the module’s bus lever back slightly to clear the positioning tab.
69-L32C, 1769-L35CR CompactLogix Controller 17 6. Move the module’s bus lever fully to the left until it clicks, making sure the bus lever is fully engaged and locked. ATTENTION When attaching the controller, power supply, and I/O modules, make sure the bus connectors are securely locked together to be sure of proper electrical connection. 7. Use the tongue-and-groove slots (described in steps 2 and 3) to attach an end cap terminator to the last module in the system.
1769-L32C, 1769-L35CR CompactLogix Controller 8. Move the end cap terminator back along the tongue-and-groove slots until the bus connectors line up with each other. 9. Lock the end cap bus terminator.
1769-L32C, 1769-L35CR CompactLogix Controller 19 Mount the System ATTENTION ATTENTION IMPORTANT During panel or DIN rail mounting of all devices, be sure that all debris (such as metal chips or wire strands) is kept from falling into the controller. Debris that falls into the controller could cause damage while the controller is energized. When attaching the controller, power supply, and I/O modules, make sure the bus connectors are securely locked together to be sure of proper electrical connection.
1769-L32C, 1769-L35CR CompactLogix Controller Panel Mounting Mount the controller to a panel by using two screws per module. Use M4 or #8 panhead screws. Mounting screws are required on every module. IMPORTANT The grounding tab, located where you install the mounting screws, enables the module to be grounded when it is panel-mounted. This procedure lets you use the assembled modules as a template for drilling holes in the panel.
1769-L32C, 1769-L35CR CompactLogix Controller 21 6. Attach the modules to the panel by using the mounting screws. IMPORTANT If mounting more modules, mount only the last one of this group and put the others aside. This reduces remounting time when you are drilling and tapping the next group of modules. 7. Repeat steps 1…6 for any remaining modules. DIN-rail Mounting The controller can be mounted by using the following DIN rails: • EN 50 022 - 35 x 7.5 mm (1.38 x 0.30 in.) • EN 50 022 - 35 x 15 mm (1.
1769-L32C, 1769-L35CR CompactLogix Controller Product Dimensions The figure shows dimensions in mm (in.). Hole spacing tolerance is + 4 mm (0.016 in.). 15 (0.59) 67.5 (2.68) 52.5 (2.06) 70 (2.76) 35 (1.38) 118 (4.65) 132 (5.20) 52.5 (2.06) IMPORTANT 35 (1.38) 35 (1.38) 35 (1.38) 35 (1.38) 31502-M Compact I/O expansion cables have the same dimensions as the end caps. Expansion cables can be used on either the right or left end.
1769-L32C, 1769-L35CR CompactLogix Controller 23 Connect a Programming Terminal to the Controller Via RS-232 Connections Use an RS-232 cable to connect your CompactLogix controller to your programming terminal. You can use either of the following RS-232 cables: • 1747-CP3 • 1756-CP3 WARNING If you connect or disconnect the serial cable with power applied to this module or the serial device on the other end of the cable, an electrical arc can occur.
1769-L32C, 1769-L35CR CompactLogix Controller 1. Connect the 9-pin, right-angle connector of the RS-232 cable to the serial port on your CompactLogix controller. 2. Connect the 9-pin, straight connector of the RS-232 cable to your programming terminal.
1769-L32C, 1769-L35CR CompactLogix Controller 25 Default Serial Configuration Channel 0 (serial) has the following default communication configuration. Channel 0 Serial Default Communication Configuration Parameter Default Protocol DF1 full-duplex Baud Rate 19.
1769-L32C, 1769-L35CR CompactLogix Controller The Channel 0 Default Communications (DCH0) status indicator turns on (green, steady) to show when the default communication configuration is active. IMPORTANT Before pressing the default communication pushbutton, be sure to note the present communication configuration for Channel 0. Pushing the default communication pushbutton resets all configured parameters back to their default settings.
1769-L32C, 1769-L35CR CompactLogix Controller 27 The figure shows an example ControlNet network using redundant media. 1 3 2 1 Item Description 1 ControlNet node 2 Redundant media available on 1769-L35CR only 3 ControlNet link When connecting the CompactLogix controller to a ControlNet network, also refer to the following documentation: • ControlNet Coax Tap Installation Instructions, publication 1786-IN007 • ControlNet Cable System Planning and Installation Manual, publication 1786-6.2.
1769-L32C, 1769-L35CR CompactLogix Controller Connect the Controller to the Network Via a ControlNet Tap Typically, ControlNet taps are used to make permanent connections from the CompactLogix controller to the network. Perform the following steps to connect the module to the network by using a ControlNet tap. Do not allow any metal portions of the tap to contact any conductive material.
1769-L32C, 1769-L35CR CompactLogix Controller 29 2. Connect the tap’s straight or right-angle connector to the module’s BNC connector as shown in the figure.
1769-L32C, 1769-L35CR CompactLogix Controller Connect a Programming Terminal to the Network Via a 1786-CP Cable You can use the CompactLogix controller’s network access port (NAP) to connect a programming terminal to the ControlNet network. The figure shows the 1786-CP cable connections. 8 Shield Shield GND REF GND REF +24V DC +24V DC 7 6 PTRx_H 3.
1769-L32C, 1769-L35CR CompactLogix Controller 31 Connect one end of the 1786-CP cable to the CompactLogix controller and the other end to the NAP of the programming terminal. ATTENTION Do not plug a DH-485 network cable or an RJ45 connector for the EtherNet/IP network to the NAP. Undesirable behavior and/or damage to the port may result.
1769-L32C, 1769-L35CR CompactLogix Controller Install the Appropriate Electronic Data Sheet (EDS) Files If you have RSLinx software, version 2.43 or greater, the most current EDS files were installed with the software. If you are using RSLinx software, version 2.42 or later, you might need to install EDS files.
1769-L32C, 1769-L35CR CompactLogix Controller 33 Load the Controller Firmware The controller ships without working firmware. You must download the current firmware before you can use the controller. To load firmware, you can use: • ControlFlash utility that ships with RSLogix5000 software. • AutoFlash that starts through RSLogix5000 software when you try to download a project and the controller does not have the current firmware. • 1784-CF64 CompactFlash card with valid memory already loaded.
1769-L32C, 1769-L35CR CompactLogix Controller Use the ControlFlash Utility to Load Firmware You can use the ControlFlash utility to load firmware through either a ControlNet connection or a serial connection. 1. Make sure the appropriate network connection is made before starting. 2. Start the ControlFlash utility, clicking Next when the Welcome screen appears. 3. Select the catalog number of the controller and click Next. 4.
1769-L32C, 1769-L35CR CompactLogix Controller 35 Use the AutoFlash Utility to Load Firmware You can use the AutoFlash utility to load firmware through either a ControlNet connection or a serial connection. 1. Make sure the appropriate network connection is made before starting. 2. Use RSLogix 5000 programming software to attempt to download to a controller project. This automatically launches AutoFlash. 3. Select the catalog number of the controller and click Next. 4.
1769-L32C, 1769-L35CR CompactLogix Controller Use a CompactFlash Card to Load Firmware If you have an existing controller that is already configured and has firmware loaded, you can store the current controller user program and firmware on the CompactFlash card and use that card to update other controllers. 1. Use RSLogix 5000 software to store the controller user program and firmware of a currently configured controller to the CompactFlash card. 2.
1769-L32C, 1769-L35CR CompactLogix Controller 37 Select the Controller Operating Mode Use the keyswitch on the front panel of the controller to determine the controller Operating mode. Keyswitch Description RUN • Upload projects. • Run the program and enable outputs. • You cannot create or delete tasks, programs, or routines. You cannot create or delete tags or edit online while the keyswitch is in the RUN position.
1769-L32C, 1769-L35CR CompactLogix Controller Keyswitch Description REM - Remote Run • The controller executes (scans) tasks. • Enable outputs. • Edit online. REM - Remote Program • Disable outputs. • Create, modify, and delete tasks, programs or routines. • Download projects. • Edit online. • The controller does not execute (scan) tasks. REM - Remote Test • Execute tasks with outputs disabled. • Edit online.
1769-L32C, 1769-L35CR CompactLogix Controller 39 Controller Status Indicators Indicator Status Description I/O Off Either of the following: • There are no devices in the I/O configuration of the controller. • The controller does not contain a project (controller memory is empty). Steady green The controller is communicating with all the devices in its I/O configuration. Flashing green One or more devices in the controller’s I/O configuration are not responding.
1769-L32C, 1769-L35CR CompactLogix Controller RS-232 Serial Port Status Indicators (channel 0) Indicator Status Description DCH0 Off Channel 0 is configured differently than the default serial configuration. Steady green Channel 0 has the default serial configuration. Off No RS-232 activity. Flashing green RS-232 activity. CH0 CompactFlash Card Status Indicators Indicator Status Description CF Off No activity.
1769-L32C, 1769-L35CR CompactLogix Controller 41 Interpret Status Indicators as Related to the ControlNet Network Use the Module Status and Network Status indicators to determine how your CompactLogix controller is operating on the ControlNet network. These status indicators provide information about the controller and the network when the controller is connected to the ControlNet network via the BNC connectors and describes the possible conditions for module and network status indicators.
1769-L32C, 1769-L35CR CompactLogix Controller Module Status Indicator Indicator Status Description MS Off Controller has no power. Apply power. Make sure that the controller is firmly seated in the slot. Steady red Major fault occurred on the controller. Cycle power. If problem persists, replace the controller. Flashing red Minor fault occurred because a firmware update is in progress. No action required (firmware update in progress). Node address switch change occurred.
1769-L32C, 1769-L35CR CompactLogix Controller 43 Network Channel Status Indicators Only channel B is labeled on the 1769-L35CR controller. The 1769-L32C controller has only channel A but uses the second indicator in some status indicator patterns as described in the table. Network Channel Status Indicators Indicator Status Description Both channel indicators Off A channel is disabled. Program network for redundant media, if necessary. Steady green Normal operation is occurring.
1769-L32C, 1769-L35CR CompactLogix Controller Network Channel Status Indicators Either channel indicator (1) Off Check the MS indicators. Steady red The controller is faulted. Cycle power. If the fault persists, contact your Rockwell Automation representative or distributor. Alternating red/green Controller is performing a self-test. Alternating red/off Node is configured incorrectly. Check the card’s network address and other ControlNet configuration parameters.
1769-L32C, 1769-L35CR CompactLogix Controller 45 CompactLogix Controller - 1769-L32C, 1769-L35CR Attribute Value North American temp code T4A Replacement battery 1769-BA Weight, approx. 0.32 kg (0.70 lb) Programming cable 1747-CP3 or 1756-CP3 Panel mounting screw torque (using M4 or #8 screws) 1.1…1.
1769-L32C, 1769-L35CR CompactLogix Controller Environmental Specifications Attribute Value Operational temperature IEC 60068-2-1 (Test Ad, Operating Cold) IEC 60068-2-2 (Test Bd, Operating Dry Heat) IEC 60068-2-14 (Test Nb, Operating Thermal Shock) 0...60 °C (32...140 °F) Storage temperature IEC 60068-2-1 (Test Ab, Unpackaged Nonoperating Cold) IEC 60068-2-2 (Test Bb, Unpackaged Nonoperating Dry Heat) IEC 60068-2-14 (Test Na, Unpackaged Thermal Shock) -40... +85 °C (-40...
1769-L32C, 1769-L35CR CompactLogix Controller 47 Environmental Specifications Attribute Value Surge transient immunity IEC61000-4-5 ±2 kV line-earth (CM) on communication ports Conducted RF immunity IEC61000-4-6 10V rms with 1kHz sine-wave 80% AM from 150 kHz...
Additional Resources These documents contain additional information concerning related Rockwell Automation http://www.ab.com products. Resource Description CompactLogix System User Manual, publication 1769-UM011 Provides information about planning, mounting, wiring, and troubleshooting your CompactLogix system. ControlNet Modules in Logix5000 Control Systems User Manual, publication CNET-UM001 Provides information about how to use ControlNet Modules in Logix5000 control systems.