
Installation Instructions Owner manual

16 1768 CompactLogix Power Supplies
Publication 1768-IN001B-EN-P - July 2006
Install the Power Supply
To install the power supply, you must complete multiple tasks.
• Mount the Power Supply
• Wire the Power Supply
• Place 1769 I/O Modules in a 1768 CompactLogix System
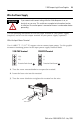
The 1768 CompactLogix power supply distributes power from the right side of the
supply and must be the leftmost module in the system. The maximum amount of
current the system supports on the backplane is 3.5 A at 24V dc. The maximum
amount of current the system supports externally is 0.25 A at 24V dc.
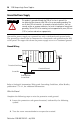
Mount the Power Supply
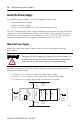
Before you mount the power supply, make sure you have proper spacing
and cooling.
Maintain spacing from enclosure walls, wireways, and adjacent equipment. For
adequate ventilation allow:
• 90 mm (3.54 in.) of space to the left of the power supply.
• 90 mm (3.54 in.) of space to the right of last module in the bank.
• 105 mm (4 in.) of space on the top and bottom of the bank.
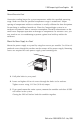
ATTENTION
During panel or DIN rail mounting of all devices, be sure that all debris, for
example, metal chips or wire strands, is kept from falling into the module.
Debris that falls into the module could cause damage on power-up.
1769 Compact
I/O
Bottom
Side
1769 Compact
I/O
90 mm
(3.54 in.)
105 mm
(4 in.)
Side
90 mm
(3.54 in.)
Top
105 mm
(4 in.)
1768 Communication
Module
Power Supply
Controller
44024
1768 Communication
Module